- The types of materials for the construction of the frame under the plasterboard
- Types of profiles for the construction of the frame under the plasterboard
- Necessary carcass materials for manufacturing plasterboard
- A calculator for calculating the required material
- Tools required for installation
- frame manufacturing technology
- Production semicircular frame elements
- Profile Mount Technology
With the help of gypsum boards can be built complex transitions in the ceiling, niches in the walls, arches, shelves, etc.. Considerable popularity is simply lining the walls plasterboard without frame. That allows you to get a perfectly flat surface even on the very grounds of the curves. But rejection within 4 See require lining the walls plasterboard on metal frame.
The types of materials for the construction of the frame under the plasterboard
Exists 3 the type of materials to build the frame for plasterboard:
- Metal profiles. This type is most widely used because of the convenience of working with a flexible metal, ease and simplicity of design of the finished assembly.
- Wooden frame for plasterboard. It is used in the smallest cases, due to the properties of the wood itself. First of all, it rot in contact to moisture or high humidity constant. Secondly, eventually it dries, which leads to a change in its geometrical parameters. But in the end it will affect the geometry of the finished structure itself, the corners will crack, begin to break away putty, etc..
- Combined. It is more widespread, because the whole frame for gypsum board is performed entirely from metal sheets, and in places, where the load will be increased on the wall (furniture or equipment), profile is embedded in a wooden bar.
Types of profiles for the construction of the frame under the plasterboard
Selecting a profile type for drywall is performed based on the geometric parameters and the required strength future design. It can be a decorative column or simulated fire in the wall, profile can then be applied under the drywall smaller thickness and width. Thus saving a certain amount of time and money. But if it will be a niche, arch, any projections, are not only an ornament room interior, but its functional elements. That material should choose thicker, fasteners should be made thicker.

Today on sale there are several varieties of metal profile of the geometric parameters and the type of production, from which you can make the frame assembly of plasterboard on the wall:
- The guide profile. It is a groove, curved in a rolling mill in the shape of the letter U or U. Accordingly, it may be the name of the PN or UW. It is used for fixing the base of the structure to the walls and ceiling. Its main feature is the, that it has a width proportionate, allowing it to freely insert a rack profile. For any installation of a profile under the drywall on the wall requires special strength and quality of the connection elements. A dense occurrence of UW in the CW just provides the necessary quality.
- rack profile, having abbreviation CW. Designed for a vertical element of any structure. It has a high bending strength due to the special rolling technology. If you look at the cut, you can see its rounded edges and additional twists on the flat surface. This gives it additional strength in contrast to the UW. Frame profile for gypsum board on a wall by observing technologies must have high strength, stability, and at the right location stiffeners not subject to vibration.
Necessary carcass materials for manufacturing plasterboard
Before starting the installation of the frame under the plasterboard wall, you need to prepare all the required supplies and accessories:
- Profile of two types.
- Wooden blocks or the thickness of the guide rack profile. They should invest in areas with increased load also a great option would be to use it in a doorway. Because the opening and closing of doors is usually created the vibration. A wooden beam due to its elasticity compensates for any types of vibrations. In many cases, the frame device for gypsum board does not require the use of wood. for example, suspended ceiling, a niche in the wall with shelves, etc..
- fixing components. These include various connectors (end and cross), brackets and hangers to mount designs on the ceiling and walls of loose grounds.
- metal wares. Mounting Profile for plasterboard with their hands can not do without the use of a variety of screws, screws, Tightening, rivets, dowels.
In this case, the screws must have at least three types:
- metal. Used in the implementation of fixing plasterboard sheets to profile.
- wood. Used to attach the profile to a wooden wall, Frame for plasterboard.
- Metal flat hat. These are hardware means of the bonding structure between the metal elements is.
A calculator for calculating the required material
Tools required for installation
For the installation of the construction of a profile for drywall will need the following tools:
- Shears for metal or Bulgarian;
- pliers;
- drill or screwdriver;
- plummet and construction cord;
- level;
- roulette;
- pencil, etc..
frame manufacturing technology
Before you begin the installation of profiles for gypsum board, must be applied to the layout.

so, and to project developed at baseline paper applied on the floor, ceiling or wall, depending, where the design will be. The initial line is a markup, from which it is possible to conduct all other calculations. When applying it on the floor it would edge face of the plasterboard sheet. It must be projected onto the ceiling and walls. This can be done using the level and plumb. If the distances are large enough, the best assistant in this case will be the construction cord. Properly applied marking the most accurate method to manufacture the frame profile for gypsum board.
After applying all necessary markup indented depth future design is required given the sheet thickness (commonly used sheet thickness 10 mm, thickened 12,5 mm ) Installation frame for gypsum board can be started. About how to mount the frame help video tutorial.

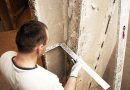
The first step is to measure the required piece of the guide PN or UW-profile. This should be done as accurately as possible, but the length of the displacement on 1-2 cm, strongly on the geometry will not affect. Attach it should be with the help of anchors. The method depends on the type of floor covering, its structure, the degree of strength. After fixing the profile to the floor can be assembled rails for plasterboard ceiling. Of course, making sure of the correctness of their actions by the level or plumb.
If the floor is concrete and durable, you can use the dowels. If the ground is loose and will continue to flatten screed, it is best to use anchors or brackets of appropriate length and diameter. In constructing the carcass on the ceiling or wall in order to align the special suspensions are applied, which may also be of several types.
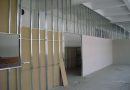
Further, frame assembly for gypsum board continues to mount side frames, as are used respectively rack profile. His mount is also dependent on the wall structure and softness. Dowels and anchors appropriate to apply in the case of concrete or brick walls. If they are made of wood, the correct solution would be the use of self-tapping screws, Tightening or screws. The most effective range for fasteners of the strut profile is 60 cm. And it depends on the future structure attached to the load. Respectively, if it is severe, and the need to strengthen the most.
Mounting profile for gypsum board can be carried out by different techniques, which depends on the complexity of the frame. After all, it can be a round arch, serving niche in the wall with an imitation fireplace, in many beautiful chaotic arrangement of shelves, niches at, krivolineйnыe structures on the ceiling and walls with lots of twists and turns, sophisticated asymmetric partitioning and more. The options are many, as well as the wishes of the people. But the principle must always be respected. The framework must be stable and fixed. cunning and tips for working with a profile, which will help speed up the work.
Production semicircular frame elements

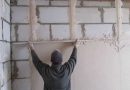
The guide allows you to do drywall for a perfectly flat surface. But how to make a curved bend, long or arch? And the answer is a simple enough. Mon to flex profile in its rib arc must be incised at the same distance. The less it, the smoother will bend. Besides, this distance is also dependent on the degree of roundness, and a bend radius. After the cuts have been made, necessary to fix element, before its refit. For this downtime twisted softwood stacked along the side lobes.
Plasterboard It bent similarly. On the one hand incision paperboard layer, but in the opposite smooth envelope on the frame.
frame assembly for gypsum board is a fairly easy task. In the process, the most important point is the application of markings, and its transfer from the floor to the ceiling. After all, the degree of accuracy of this operation depends on the final result of all the work done.
Profile Mount Technology

Installation profile for gypsum board can be carried out by two well-known technologies. The first of them American. It rack profile chute directed deep into the structure. second, German, is the location of the gutters along the frame mount. And basically orienting profiles type depends on the situation and characteristics of the design.
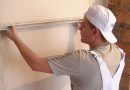
If the frame is made in the wall under the drywall, the rack profile is fixed by means of hangers. Then, setting the tray guide and secure the side stand, while aligning them using the level and plumb, should pull cord. He will continue to guide and touching the boundary medium studs. Before that, of course, all the racks already need to set the guide rails and gently pull your petals of suspensions, not to fall. After the string is taut, each rack must be set in place and fasten with screws on both sides.