
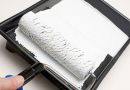
Pasting of walls photo wallpapers. When gluing photowall there is some instruction, which helps to make things right and achieve excellent results. The first step is to prepare the materials at hand, which are required for the job:
1. Bucket, which is necessary for mixing glue.
2. Not synthetic glue package photowall. It is best to choose the glue on a natural basis.
3. Brush, which is necessary for applying glue.
4. Roller to smooth the wallpaper.
5. Stationery knife to, to neatly decorate wallpaper edge.
6. Roulette for measuring wall.
7. Level.
8. Putty knife.
9. Pencil.
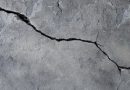
Before, begins wall-paper hanging, should make sure, that the smooth surface of the wall, smooth, peeled and ready to work, look how to prepare the wall for wallpapering. Do not forget about, that the wall is completely dry - this is very important. On your wall should not remain the old wallpaper and irregularities. If they exist, you should get rid of them with a spatula. An equally important factor is the fact, that the temperature of the room, where you are going to glue wallpapers, It should be at least twenty degrees. Remember, that you should completely eliminate drafts, otherwise you risk getting less than ideal results of your work, as the wallpaper may not dry evenly, wrinkled and in some places stretch.
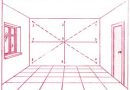
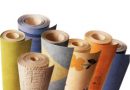
Go ahead. Lay the panel on the floor pictures, to see the whole picture completely. Now it is necessary to compare the size of the resulting image with the size of your wall. Farther, with a pencil and the level mark on the wall of each part of the figure, in this way, you can achieve the best result and the correct image. Moreover, so it will be easier to glue panels. Now comes pasting walls photo wallpapers.
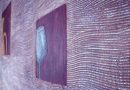
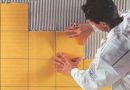
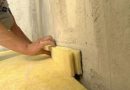
 Now you can stir the adhesive in accordance with the instructions printed on the package and apply it with a brush on the first panel. If your wall surface is not smooth, and more porous, then you, possibly, it will be necessary to apply several layers of glue. Further, exactly delineated lines attach to the wall first panel, and, using rolki glue it, carefully smoothing. Smoothes panel must be from the center to the edges. Exactly the same work is done in the second, third and fourth panel.
Since paste fifth panel, you should pay close attention to what, so that the image matched. To do this, the fifth panel a little to put on the panel number one (It is about five millimeters). Consequently, six panel, seven and eight is necessary to impose on the next panel so, that the resulting pattern is completely matched and correspond to the position result. It is necessary to carefully wipe all got glue on the front of the photo wallpapers with a dry and clean cloth. If it is necessary to trim the edges of photo wallpapers, it should only be done after, the glue is completely dry and wallpapers. To do this, you should use pre-cooked office knife.
Tips on how to stick to the wall wallpapers correctly:
Before, as you begin to put a wall panel photowall, it should be treated with glue. After that, you caused the adhesive to the surface it is necessary to wait until the, until the adhesive is partially dried. This is necessary in order, that all unnecessary moisture absorbed, but the wall at the same time remained sticky. photowall panel must be accurately positioned on the wall, which is coated with adhesive, and ensure that, that part photowall coincided with incised lines in advance. Very important tip - just press wallpapers from the center and evenly smooth roller to the edges. Each of the following photowall need to stick or exactly butt, or overlap, that is, adhere to the instructions of the wallpaper, that you have chosen for yourself - it will help to achieve an ideal result for the completion of work. Strongly do not worry, if you suddenly see small bubbles on the surface - they will go after the glue has dried, modern wallpaper not picky, if you stick gluing technology.
Video how to glue wallpapers on the wall
Drying time photowall:

The drying time of the adhesive and photowall greatly depends on humidity and room temperature, where is this work. If the room is dominated by the normal conditions, then the adhesive layer may dry only three and a half hours. But it must be remembered, that after application of the adhesive layer on the wall installation photowall must be made no more than three and a half hours.
But after applying the adhesive wallpaper and the wall must dry at least one hour. Can significantly shorten the drying time use infokrasnyh rays or hot air, but not more than sixty degrees.
Purification photowall surface after sticking on wall:
In order to remove liquid adhesive, which remained on the front side and at the joints photowall after bonding them to the wall is necessary to use water or a soap solution. If the glue has dried up, then it is necessary to resort to the use of ethyl alcohol or acetone. But it is very important to do it carefully, since these substances can damage the surface of photo wallpapers.
If you do not have to adhere to the rules of application technology photowall, after which you have formed deformation and bubbles, then this case shall not be considered a guarantee, and sharing these wallpapers are not subject to.
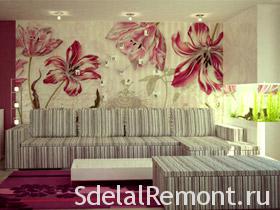
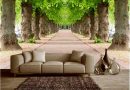
The color scheme - how to choose the color of the walls to the Mural:

It is often associated with the earth wallpapers, sun, hearth, fire. Cool colors when choosing photowall considered to be green, blue, blue, blue-green and various shades of these colors. some colors, which are deposited on the panel photowall, can create the impression of proximity, or delete an object. It is important to know, that if the room is dominated by warm colors, it is visually reduced, but, Consequently, for small rooms is recommended to choose wallpapers in cold tones, thus you optically enlarge the space.
Colors, which can create a feeling of proximity to the object, as well as increasing its volume, this:
1. Orange.
2. Brown.
3. White.
4. Red.
5. Pink.
Colors, which visually reduce the volume of the object, and create a sense of his remoteness, this:
1. Gray.
2. The black.
3. Blue.
4. Violet.
5. Blue.
As for green Colors, it refers to the neutral tones, and therefore, can not influence either the removal of, any object closer. All this is very important when choosing photowall, after all it is worth considering, that it is necessary for you and your housing. But do not forget about the appropriateness of the image, that is, where it will be located - in the bedroom, living room, Children's, in the office, and so on. See How to choose wallpaper for the living room. Now you're ready, because you already know how to glue wallpapers on the wall properly and hopefully watched video tutorials.
Finally briefly the whole sequence of actions:
 Let us once again go through the gluing technology, in fact worth remembering, this technology consists of several stages:
1. Cleaning the surface of the wall.
2. Measurement of the walls and matching of its size and the pattern size.
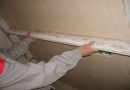
3. Removing the plinth. Suitable temperature and freedom from drafts.
4. Layout pattern in accordance with the required image.
5. Contouring lines on each panel photowall.
6. glue preparation.
7. AND, directly, very sticky oboev.
Still, Things to know, so is, to avoid visual reduce the room, should withdraw from the ceiling about five or six centimeters. Do not forget about, that the press and smooth wallpapers should be from the center to the edges. And just remember how to stick to the wall wallpapers right - stick each part photowall should be in accordance with your type of technology photowall, that is, or exactly butt, or the overlap. Videos to help and good luck!

really like your wallpaper I want to buy
We do not sell)