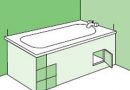
Some bathrooms have such dimensions, that install a complete bathroom in which it is impossible to. Practical solution in such situations would be the purchase and installation of the shower set shower cabin with his own hands. It is also very cost-effective option for the repair and regeneration of small bath room.
Self-assembly of the shower - very troublesome and time-consuming process, which complicates the work in confined indoors. All actions should be carried out in stages, performing dosborku and final adjustments. Remedy failures shower.
The current building stores offer a huge variety of shower enclosures. Many of them have instructions, containing several schematic drawings.
Mounting methods are divided into the shower corner and rectangular types. And they differ from the design type, who are:
- open, they include only the pallet and the front side;
- closed, they consist of a pallet, front wall, roof and the rear wall.
The design type is selected depending on the size of the room. The main assembly of the complexity of the soul is cramped room, therefore it is necessary to take into account further service during installation.
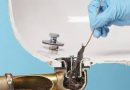
Installing the siphon soul
Before mounting the siphon shower, should determine the optimal height of the pallet. To do this, you must make preliminary measurements, profit and try the place of installation, all fasteners. Besides, can be connected to the sewer drain.
At low pallet excellent option would be the installation of a simple siphon. To ensure the smooth repair and stonecrops must be installed a siphon so, it is readily accessible to him and pipes. Siphon should be chosen according to the diameter and type of pallet.
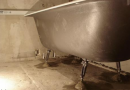
Installation of shower tray
Self-assembly of the shower pan is recommended to be divided into two stages:
- baiting fasteners;
- use at the place of installation.
For the first stage suitable best spacious room, which has a flat floor. Hold it directly in the bathroom would be uncomfortable.


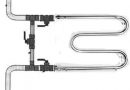
Before installing the tray, you must connect the drainage system. This is done by flexible hoses. To begin to assemble the pallet. To do this,:
- put the tray on legs;
- Screw long studs to full stop;
- tighten the central leg at the shortest support;
- fix the pallet to the wooden bars and tighten all fasteners;
- put the rest of the legs, distribute the load on the pallet to the level and secure;
- insert fasteners Screen;
- put the pan on the floor at the installation site soul;
- connect the flexible hoses to the water supply and drain hose to the water drain;
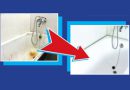
- check drains and leaks.

To check, fully from the sump water output, recommended connected to the sewer drain hose and fill it with water,. Work drain better, the faster the water goes. It can adjust the height of the pallet change.
If you purchased a shower attached installation instructions, which lists all the joints and make the necessary circuitry.
Fastening shower walls
A very important step in the self-installing shower enclosures is the installation of glass. This requires:
- mark on the wall of the side panel mounting, it is the level of;
- make holes in the wall for fixing elements, this is done with a drill or hammer;
- fix the side panel to the shower wall;
- make glass parts cabin to the panel and check the absence of clearances;
- establish both side panels and an adapter therebetween;
- attach the panels to the upper frame.

When assembling a closed shower cubicle:
- fix the wall panel, defining roof;
- wear contour of silicone on the rear wall, and inserted in the horizontal groove panel;
- secured with plastic clips;
- attach the front portion to the side panels;
- mount side panels;
- Attach the upper section;
- mount silicone rollers in the sliding doors;
- install sliding doors, eliminating distortions.

When the walls of the plastic shower stalls open requires sealing. Sliding elements require installation sealing gum. Joints go with silicone sealant
Connecting water shower independently
When connecting the water supply to the shower you need to use special connectors and reliable pipe. In this situation, the fasteners and clamps are ideal practical.
Connection begins with the overlap of the main water supply. Then, in the wall or tile drilled hole, using a drill, in which the anchor is installed and the screws, not forgetting the silicone sealant. After this fixed hoses. From the outside shower panels installed water pipes and decorative plates. Then checked for leaks and correct installation, and a fixed handle.
Recommendations for the assembly of the shower
- When buying a shower enclosure it is recommended to clarify all sizes, given the size of the room. The selected material will depend on the method of mounting and suitable for this element;
- Many pallets are made of plastic, which can not withstand water volume and weight of Human, therefore it is necessary to construct drainage podium;
- When installing glass elements necessary to observe the highest standards precautions.
- Producing shower enclosure installation, it is recommended to carefully check the possibility of leaks and leaks;
- Besides, it is recommended to take into account the preferences of all those, who will use the shower. It can be positioned on the right or the left of the front door.
When all instructions and accounting requirements necessary installation shower stall with his hands does not involve extra costs. And knowledge, obtained during assembly, help resolve quickly any, arisen as a result of operating problems.