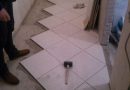
Perfect just does not happen without the various obstacles surfaces. During the process of tiling, on the road always rise some - what obstacles: boxes, sockets, thresholds, switches, doorframes, column, issues sewer pipes, transitions to other types of coatings. Very often there is a question - "How to work on laying new tiles on the surface around these obstacles?». We have already dealt how to put the tiles on the bathroom floor and walls right, and this article as a supplement.
Methods styling around various obstructions
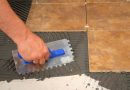
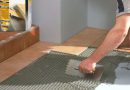
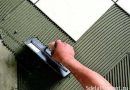
Need to work: simple pencil or felt-tip pen, or ordinary circular Tile, special glue for laying tiles. And check out the article how to cut tile correctly at home.
- To carry out the installation of the tiles around switches, You need to make a tile on the switch room and felt-tip pen to note the extra space on calling him. Tile, you need to cut the tiles marked by marking lines. Next, cut a place in it under the switch. To verify the accuracy and evenness of the circumcision done work, you need to put the tiles in place.
- To lay the tiles near the window opening, or in the corner of the wall, measure the distance from the last full tile to the window opening or corner of the wall, taking into account the gap between two and four millimeters thick, it is necessary for the seam. If the wall is uneven, the distances may be different, thus it is necessary to make measurements separately for each tile from the end before it starts. It is necessary to mark the distance on a hot plate, hold the cut line and the marked line to cut off the excess. Then apply the adhesive composition and attach the resulting cut piece of tile in place.
Laying the tiles around the large and small tubes made so:
 If the pipe is large enough and tile rests on the pipe only one angle, you will need to make the curve of the linear cutting. To do this, cut the sheet of strong paper and put it back into place, where the tiles should be laid. Holding the paper at this point, It needs to bend all superfluous and unnecessary, and after the paper cut on the curved lines in order, To get the template for the future under the tiles of the pipe. paper template to apply to the place to check the accuracy of the work done. The template should be attached to the tile, carefully cut around the pencil and cut along the planned lines.
If the pipe is small in shape and you have where - that in the middle of the new tiles, then the tile is required to attach it to the side and noting the bottom and top of the pipe diameter. After this you need to make the tiles near the bottom of the pipe, par with the bottom row of tiles edges and mark thereon endpoints pipe with right and left hand. Connect the label on a square in such a way, to form a square and just in the wrong place tiles, and wherein the pipe passes. With grinder circularly specify the desired diameter and desired drill hole.
Difficult obstacle is, when such holes fall into two, three or more tiles. In this case, each sector must marker to mark a particular place on, and trim tiles at the marked lines. So you need to do on each tile, that falls to the hole.
The most difficult obstacles are the column, exterior floor corners, doorframes. In this case, it is best to adhere to the following rules below.
Useful tips when laying tiles with obstacles
- Should be laid tile, which does not require cutting, and tiles, which must be cut exactly in half. These tiles have to stick to the visible part of.
- tiles, which require cutting in the most difficult places it is necessary to settle the last thing. To avoid mistakes in the markup, you need to use a template from paper, Cut the size of an entire separate tiles. Template to attach to the place, bend over obstacles, cut and move on the tile.
- Cut the tile along the contour, attach to the place to check the accuracy of. If the tiles do not require additional trimming, it can be laid on the adhesive composition to the desired location.
The site for self-repair of apartments as always helped to understand this question. If something is not clear - ask, happy to answer.