Use of the plaster necessary to align the surfaces, to give them a desired flatness.
But to obtain the required surface without skills novice difficult.
The use of certain technological methods facilitates plastering, allowing them to perform even novice plasterer.
What you need to know the novice plasterer?
To facilitate the plastering work with their hands are used special equipment, called beacons.
Besides, we must learn to choose the right plasters.
A few tips for choosing plaster mixtures
Choosing finishing materials, Try to stay on the same Manufacturer. This will avoid the incompatibility of materials and appearance after various defects.

In the Russian market of building materials there are plasters based on gypsum and cement.
Gypsum plaster mixture preferably, since they allow to apply a plaster layer to 5 cm, does not cause the formation of cracks.
The gypsum mixture is not subject to shrinkage, having high moldability.
Due to high adhesion and low weight gypsum plaster mixture is a perfect material for the alignment of the ceiling.
Unlike cement mixture, plaster has a high sound insulation and, and is able to "breathe".
Gypsum plaster mixture is considered as the best material for the alignment smooth concrete surfaces without reinforcing mesh.
Best gypsum plaster mixture is considered to be material, manufactured by the German company Knauf. But the cost of these mixtures makes us look plastering materials, produced by Russian manufacturers.
Here are a few Russian manufacturers, producing high-quality materials, including dry mixture.
by the way, dry mixture preferably has finished, providing opportunities for the master to choose the desired consistency.
These include: Dry mixes of "miners", material firm "TD Stroymontage MS", ready-mix company Rusean, and of course, Mansurov mixture of Joint Stock Company "ISU".
Recently in the Russian market appeared inexpensive mix of European quality young construction company Kreps.
Any work begins with a preparatory phase
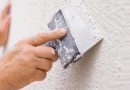
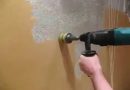
Before plastering the surface, it should properly prepare.
Wall purified from mud, dust, grease stains, paint and other debris.
And purified on the dried surface is applied several layers of primer. The primer should be selected from the same manufacturer, and that acquired mortar. Preference was given to acrylic primer, which are easy to apply with a wide brush or roller.
Primed and dried surface is ready for plastering.

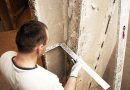
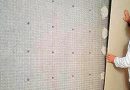
Plasterer at Beacons
Alignment of the walls on beacons greatly simplifies the process and improves the quality of work, although it requires more preparation time.
There are several options for leveling walls beacons.
The special galvanized steel profiles are used as beacons.
Beacons for leveling walls made of the damage to the surface and the planned rule plaster layer.
As beacons twisted screws can be used, which caps align rule level and laid solution followed by alignment.
For beginners, it is recommended to use as beacons galvanized metal profile.
To install the flashing profile on the surface of the vertical lines are drawn, line overlaps several heaps solution and applied profile, carefully leveled on level. When the solution solidifies, profile further strengthened solution.
Beacons are installed in steps, less than the length of your existing rules. If a rule has a length 1,5 m, the step of the installation of beacons should be no more than choose 1 m. The disadvantage of metal may be beacon of its rusting, if it is installed in a room with high humidity.
It is better to stay at the lighthouse,known manufacturers such as Knauf made of galvanized metal and good decent thickness and rigidity. Beware podtelok.
Often used as beacons plaster.
On the vertical line drawn by snaps plaster, greater thickness at the location, where the wall has a depression, and smaller in convex areas. To a solution line is applied generally to the level and aligned. Rule removes excess portion of the solution. Step installation of beacons is chosen on the basis of the rules of the length.
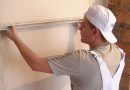
Experts prefer beacons, do not require special installation. These beacons can be installed, applying a metal U-shaped profile for fixing plasterboards. Better to take a user's profile, whose width is not more than 20 mm, so that it is easy entry rules.
Make profile along the length of the workpiece, equal to the height of the wall. On the wall are applied strictly vertical lines. On line snaps plaster, applied profile, into which is inserted generally with the level of. Carefully tapping the desired level and the excess solution is removed. After pre-solution hardening profile with rule removed, Profile cleaned of solution residues, and is preparing to set a new beacon.
This process dramatically reduces the time surface preparation for plastering. It is indispensable in areas with high humidity.
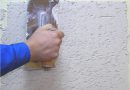
Alignment of walls on beacons with their own hands is nakidyvanii the surface harvested mixture and align it with the rules.
Typically, pull from the bottom up, constantly moving from left to right.
Before the application of the rules to the solution required to moisten it with water using a damp washcloth.
Remember:
Plaster solution should have a consistency of sour cream liquid for a surface with small deviations from the vertical, and thick cream for the walls with large gaps.
Dilute the solution as, how much you are able to work out for 20 minutes. This is the life of a plaster solution.
To align the walls without beacons need not only experience, but the ability to deal with the rule.
The method consists in leveling the surface with rules.
The advantage of this method consists in high productivity and material savings.
The disadvantage is, it is impossible to obtain a surface of high flatness.