
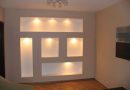
During the construction of private homes or capital repairs of apartment with his hands, always a problem, as quickly and economically align walls, from the ideal state in which further will depend on the quality of painting or wallpapering vertical surfaces. And if there is no plastering skills, it will be economically feasible lining the walls plasterboard. At the same time, won the alignment, It creates a completely flat surface for painting, there is a place for inside wall wiring and heating systems, incarnated design ideas on implementation of recesses, arches and walls. If, however, provide for more use of vapor barrier films, it can be safely added to warm the room in the "eaten" plasterboard space. Last thing, the, that this alignment of the walls of plasterboard with their hands, steals a few centimeters of living space, It is a minor drawback of this technology. In this manual,, as always, presented examples of photos and video tutorial, To better understand the material. Recall, we have already told, how to make plasterboard with their hands video and photo instruction.
Today there are two main, but radically different technologies (ways) plasterboard walls leveling: first, the usual assembly of sheets of metal or wooden frame, fastened along the walls, and, second, gluing the sheets directly on the surface of the walls with the help of "lepuh" (special glue). The second method, though economical and does not steal centimeters, but not for too curves and damp walls, and if their height exceeds 3 m. therefore, following a detailed look at a classic way of leveling the wall plasterboard on metal frame.
 before, you begin to self-assembly of plasterboard, should be considered, he does not like haste and negligence, and if you do not fulfill the elementary requirements attaching to the base sheet, then eventually this wall will begin to 'play', and let a wallpaper like you can not see, it will necessarily cobweb of cracks on the painted surface. Also, should be defined in advance, that will hang on the wall, ie. provide the maximum load on drywall, which technically can not withstand the weight of a bookshelf or a huge picture. therefore, guided on a predetermined design project, should provide additional mortgages from boards, that they have undertaken the bulk of things to hang on the wall. Another point, indoor, where the humidity is excessive (restroom, bath, kitchen), Wall desirable finish special moisture-resistant gypsum board, waterproofing material is further treated. Even though it is more expensive, but it will be glued to it tile. agree, perfectly smooth and water-resistant surface is very useful for the future of tile work.
Installation of plasterboard walls with his own hands
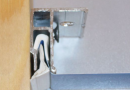
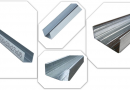
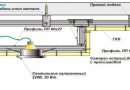
 so. At first determine the required amount of gypsum boards and metal profiles (but we definitely need UD and CD profiles, photo on the left) to align the walls of the room. We presume, that the size of the wall sheet is (height x width x thickness) 2500h1200h12,5 mm; UD-profile used as a starter (length 3 or 4 m) and fastened to the floor and the ceiling, but because the amount equal to twice the meter perimeter of the premises; CD-profile used to fill the base (length 3 or 4 m) and its expenditure rate per square meter of wall is about two meters. You should also buy: U-shaped brackets (based 1 PC. on 1 m2, photo on the left), dowel-nails (2,2 PC. on 1 m2 ), black screws on metal (13 PC. on 1 m2) i Bloke (2,5 PC. on 1 m2). A tool must have: drill, Cordless (desirable battery), roulette, building level and plumb.
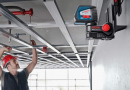
Getting Started. At first, we check the irregularities of the walls plumb, and with the help of roulette wall length, that, considering all Extension (they are usually not more than 10 cm), using the framework to hide them. I.e, If one wall we have the measurement of turned 3,00 m, and the opposite - 3,05 m, marking the start of the lower walls - plus keeping track. As a result, you can achieve perfect angles. The easiest course to check the room diagonals, the length of which must be the same, and once you achieve coincidence, It can be argued, the angles in the room straight. These measurements will help to draw on the floor bottom rough outline of the future framework. Retreat from the wall 5 see and hold the main line parallel roughing. Then the ceiling thus omit plumb, to tip the load coincide with the lower contour line, - put a mark on the ceiling; and so on every corner. Connect a point on the ceiling lines. As a result, we have achieved a perfect verticality of the walls of the future.
Now cladding plasterboard with their hands goes to the next step, along the lines marked on the perimeter of the floor and the ceiling using dowels securely fasten the starter UD-profile. Then, at the corners in the start profile is inserted and secured by the beetles guide CD-profile, that, in turn, fix to the wall U-shaped bracket.
Council: Before fitting guide, advance should be on the wall in a vertical line to fix the brackets with dowels (every 50 cm), which will greatly facilitate the consolidation of CD-Profile. Now a brief photo guide, and the video below the article.
Plasterboard paneling


Now you tell me more. That the frame is not turned concave or convex, horizontally stretch the corners of at least two cords, that will control the vertical plane. Next, fill the CD-profile wall with a step 60 See technology, as described above. Usually filling the frame does not cause problems, and the result is always happy. in short, a few hours later frame (ground) for fixing plasterboards prepared.
If you decide to fill the space between the main wall insulation and sheetrock, then this is perfect mineral wool, specifications Her excellent, (insulation from the inside is considered to be not quite right, due to the likely occurrence of condensation on the walls in the winter time, tk. dew point falls on the surface of the drywall), make sure you use the vapor-proof film, which is attached directly to the frame, and so on top of her plasterboard. So as you see types of sound-insulating materials, To determine which one to choose.
Now you can safely fastened to the prepared substrate drywall. To do this, cut the required length (if the ceiling below 2,5 m) sheet and fix it with screws to metal (their length 25 mm) in increments each CD-profile no more 30 cm. Bits screws should always drown one millimeter in sheet. Plasterboard sheets cut ordinary office knife, you just do strictly on the cut line - and, applying force with your hands, easy letter perelamыvaetsya.
Gradually fill in all the metal base plasterboard: first on a single sheet of possibilities, the joints of gypsum board were only on the metal profile, and then, cut to size pieces. Council: If the wall height is over 2,5 m and to have "doshivat" a piece of the desired length, the coupling must be in at each subsequent desynchronization mounting plate, which will reduce the likelihood of cracking after plastering work. In the area of window and door openings are not allowed to dock: only whole pieces of sheet. Also, do not forget to fasten the joints horizontally intermediate CD-profile.
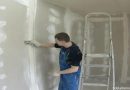
Everything, the result should get a perfect horizontal surface, which will only proshpaklevat. Well, after, it can either be painted, or pasted wallpaper. Now, watch the video tutorial, as it is done hands masterov.Uznat how much material you need, It helps free Construction Calculator Drywall, you will learn what you need to konichestvo Profile, screws and plates needed.
sheathing, alignment walls plasterboard video
Kakraz I was looking for how to sew up the wall plasterboard, excellent guide with photos and video examples! Add your site to your bookmarks!
We try to publish good and useful articles, to read again, it was all clear.