Independently put the tiles not an easy task, and that's why, Many trust it to professionals. But such a solution is quite expensive, and that's why, the execution of works with his hands is far from uncommon. It is in this turn-based and helps tiling.
An important factor in this case, it becomes clear compliance technology works. In total, the whole process can be divided into 7 steps. More specifically,, Laying of ceramic tiles on the floor in the following sequence:
- The first calculates materials, their purchase and preparation tool.
- Further it is necessary to prepare the surface, in this case, a base and its alignment undercoat.
- The next step is marking, which implies a rough layout of the tiles and applying marks, in some cases, the support stops.
- The next step begins laying, in particular the first row.
- Next, the entire area is laid seamless tile.
- The next stage is cutting the tiles and laying.
- And in the end held grouting.
In this way, for correct installation of the tiles on the floor with their hands full instructions are essential. And then we will look at in more detail each of the stages of work.
Preparation tools and materials
When, When is laying tiles with their hands, You need the following tools:
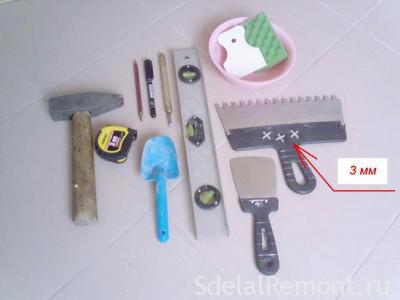
- Master OK.
- several spatulas, in particular, toothed, plain and rubber.
- It should also be multiple levels of arm, small, up to 50 centimeters, and middle, to 1 m.
- The next will be a rubber mallet.
- Another essential tool becomes Bulgarian or Tile, because in most cases just need to perform the cutting of tiles. You can also note the additional devices, such as pliers,, sandpaper and needle file.
- And the latest device is the capacity for the adhesive mixture.
With the tool sorted, Now should pay attention to materials, or rather in their calculation and purchase.
In particular, for the correct calculation is not simply enough to try on a surface area, Here an important role is played by factors such as, as:
- tile size.
- Thickness of adhesive mixture.
- tiles type.
- base Material.
- obstacles.
All these factors need to be considered just. Besides, if necessary, cut tiles, It should also pay attention to the size of the segments. Insofar as, if they account for more than half the size of the tile, whereas one such series, need to buy twice as many tiles.
Usually, when calculating, To this number is added 10-15%, which are mostly sufficient to cover at cutting costs, as well as cases of marriage (tile damage, irregular cutting, etc.).
Speaking of the glue mixture, Here, the calculation is carried out based on the type of tile, species mixture itself, size, and the necessary layer thickness, which is usually indicated on the package.
To calculate the necessary amount of grout and glue can use the calculators on our website:
Also Recommended Reading:
With this issue sorted out, now you can proceed directly to the process.
Surface preparation for laying
The first question becomes just training base. It is important to ensure the most even surface, otherwise perfect stacking will not work. The main mistake becomes a myth, which is slightly greater adhesive layer can conceal unevenness, that is not true. Quality installation is only possible on equal basis, and nothing else.
Before laying is first necessary to dismantle the old coating, if any, up to the base. The next step is formed strainer and waterproofing.
floor leveling method is not important. It can be as dry, and wet screed, arrangement of "warm floor" system, etc.. The main factor is the full compliance of the work technology.
Also subject to the dismantling of all porozhki, skirting and other obstacles, which can interfere put the tiles up against the wall.
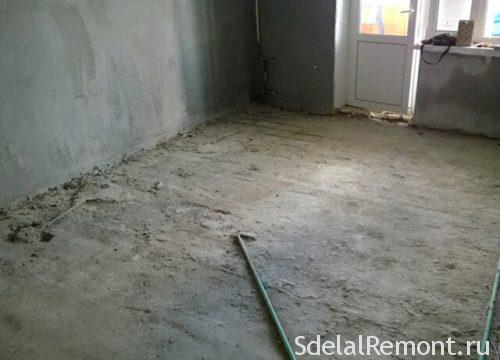
In some cases, possible laying tiles on the floor, without dismantling the old coating (in particular, provided, that it is the same tile).
Recommended Reading:
Marking surface
And the next step is marking the floor surface, which is especially important when installing tile uneven. Calibration is done in the following way:
- Celebrated a flat line of the first row of tiles. Since the installation is carried out, starting from the far corner of the room, respectively, and also marking.
- Further locations are held label material. In cases, When is tiling seamlessly with a picture requires the full location of drawing elements.
- An important factor is the installation at the entrance, in this case the counting should be done in such a way, to lay at the door of one-piece fragments, respectively, it may be necessary to indent from the far wall.
- An important factor in keeping the markup becomes seams, the size which also plays a role.
- You can also carry out a preliminary layout of the tiles on the surface, for more accurate marking of.
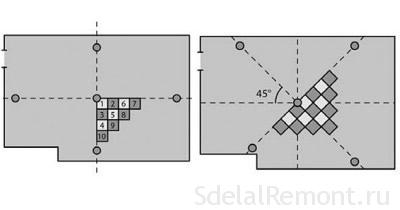
Start packing and filling area in one piece fragments.
After that, formed as markup, you can proceed to the laying of ceramic tiles with their hands. To directly analyze the beginning of the first row and the arrangement further stacking solid fragments, then, move on to the final cutting and stacking.
so, look at how it's performed tile laying, step by step instructions in this case would be the best assistant:
- The first step is to prepare the adhesive mixture. Here difficulties arise money had. We do everything in accordance with the instructions on the package. When this mixing amount may not exceed the size required for the portion in 1 square meter.
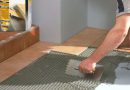
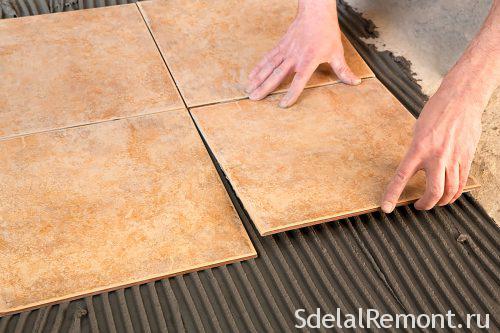
- Now, armed with a serrated trowel applied a layer of adhesive on the floor surface. For greater reliability, it is also possible to put a layer on the tile itself, in this case a mixture of furrows on the surface must be perpendicular to each other.
- Bed first tile adhesive, whereupon it presses lowering to the required level. Next, align it to the ideal horizontal position, which can be verified by using a spirit level.
- To align uses a rubber mallet, with the help of, tapping tiles more tightly pressed against the surface.
- It is important to do everything quickly and accurately. after laying, take away the tiles from the surface is not highly desirable.
- so, The first tile is laid and aligned on the level of. Now you can start laying the next.
- Same, As in the first case, the adhesive is applied, and tiles laid on the floor. Next, alignment is conducted by level of the first element. you can add some glue if necessary.
- After the final shrinkage of the tile the excess mixture is removed.
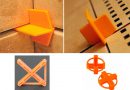
- It is important not to forget the use of crosses or special floor leveling systems, for forming the same stitches across surface.
- dispose baptize or should the corners, at intersection, or indented 2-3 centimeters from the edge of the tiles.
- All gaps between the tiles should be immediately cleaned from the excess glue, because after drying treatment would be virtually impossible.
- Likewise conducted and laying large tiles.
- Further, the base area is completely covered integer fragments.
At this, this phase is complete, and it is possible to move on. Before, necessary to give the glue to seize and harden to such an extent, order to cover you could walk. It is advisable to leave the masonry for a day, and then continue to work.
Cutting the tiles and laying the remaining fragments
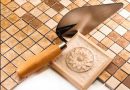
The next step is cutting the missing coat fragments. For cutting tiles may be used several devices, depending on its type and thickness. In some cases, allowed to use manual tile and stekloreza, in other to cope only with the help of the Bulgarian. For stoneware tiles need to have electric tile.
Selection tool, you must initially make all necessary measurements and perform the mark on the tile. All labels are held on the back side. Mark the tile you can start cutting. Since the process is quite dusty, it is desirable to carry out on the street.
If necessary, the uneven cut fragments, for example, arcuate, used machine with a diamond wheel or a special-Tile cutters.
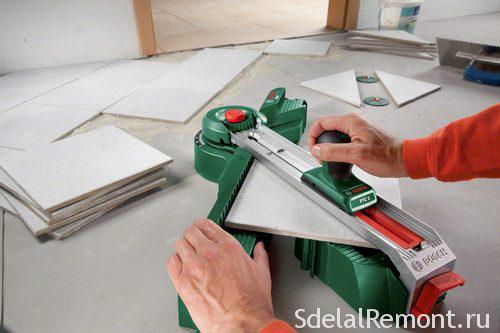
The actual cutting process is carried out as follows::
- Tile must be firmly fixed, to cutting not to shake or vibrate.
- Then, following labeling is done cutting.
In the case of using a special Tile, it includes a special area for the fixation and restraints, with which you can indicate the direction of cutting.
After cutting edges must be sanded, which uses a file, for large quantities, you can use the machine with a diamond or abrasive disc pad. Detailed video technology and tiling https://sdelalremont.ru/ukladka-plitki-na-pol-video.html
tile Grout
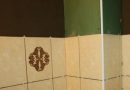
And the last stage becomes grouting. Is not carried out, it can only in the event of a seamless tile.
For its beginning it is necessary to wait for the complete drying of the adhesive mixture, then completely removed from the surface crosses and other auxiliary materials, if used.
For of grouting a mixture based on cement (In most cases), may also be used and other types of. An important factor is the direct selection of grouting, which should ideally complement the design of the tiles and the entire premises in general.
For more information on choosing and carrying out grouting in a separate article https://sdelalremont.ru/o-pravilnom-vybore-plitochnoj-zatirki.html
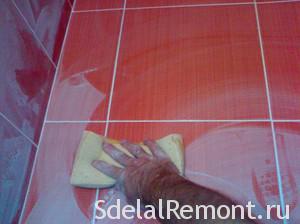
Before the start of conducting a complete cleaning of the surface, what can be done with a vacuum cleaner, and proceed. The process itself is carried out as follows::
- The edges of the tiles are pasted over masking tape. This is done if the tile matt and the pores are large and in order to avoid contamination, and reduce the amount of cleaning tiles using epoxy grout.
- The next step we plant grout, and with the help of a rubber spatula apply it.
- Movements are performed perpendicular to the seam, at the same time with pressing, for, to completely fill the joint composition.
- Thereafter the excess solution removed, seam at the same time a little deeper and leveled.
- After complete drying of the adhesive tape is removed and the tile surface is wiped with a damp sponge.
In this work tiling is completed.
helpful hints
And in the end, we offer some tips experts:
- The first, about markup. Before the count coverage area and note, as will lay down tiles. If you can not laying completely integral fragments, the wall must fall back in such a way, to the last fragment (at the door) It was whole.
- Laying best initially to carry out along a large wall, and after which along at.
- When using several types of styling, which smoothly merge into one another, you must clearly note the location of the fragments. The same applies to the creation of the figure.
- Not in any way be held tiling on uneven floor.
- Also important advice, and at the same time the answer to the question, some tiles easier to style, it will be a standard-size tiled tiles 30 on 30 centimeters.
conclusion
After reading the article materials, you will be able to carry out laying tile. But to consolidate the knowledge we offer watch some videos, which clearly shows and explains all aspects and stages of laying.