Provide access to hidden under tiles Communications can, making an inspection door with your hands and place it on the wall. This will reduce the cost of installation and will take not much more time compared with the choice of ready-made designs.
Installation of special sanitary manholes need, Firstly, in lavatories and bathrooms. They provide access to communications, metering instruments, filters, node management, and even water heaters, hidden behind walls or tiles, in rare cases, gender. With the help of these structures, It fits perfectly into the interior, easy to check the status of pipes and water meters, and for their replacement. Make inspection door with his own hands is easy, although it should know the features of the manufacturing and installation.
What is the hatch Invisible?
There are two types of inspection openings. Normal variant an affordable cost and ease of installation, but visible on the wall. Hatches Invisible does not catch the eye, but it requires more time for setup and experience. ready designs, frame and door you can buy, selecting from a range of well-known manufacturers ("Practitioner", Hago and "Lyuklend"). But profitable to do with your own hands sanitary manhole, masking his tiles, it will come out much cheaper.
The choice of tools and materials
In order to produce and install the door under the bathroom independently You must have the following tools and materials:
- Facility Push-to-open, ensuring the opening of the door without handles;
- moisture-resistant drywall (except for options with a brick or concrete wall) and plywood;
- wooden beams;
- reinforced mesh;
- PVA glue and adhesive for tiles;
- most ceramics in size across the surface for tiling, since its installation will be carried out immediately after installation of the hatch;
- drill and screwdriver;
- screws;
- tape measure and pencil.
The material and plywood can be used for most of the door and the hatch, and particle board or OSB - it all depends on the number of tiles pasted on it. The more ceramics, the stronger must be the design. The most stable variant is an oriented strand board, whereas plywood is suitable, if the door is designed for only one tile. The thickness of the hatch opening portion when selecting the SIR should be not less 12 mm.
Creating frame and door
After the selection of materials for manufacturing door frames and measurements carried out to determine the size and location of the hatch plan. It is desirable to install it in such a way, to him it was easy to get. If the location of the hatch is only possible in remote places, It should not provide a normal swing door construction, and hinged (in the presence of obstacles at a distance of less 120 mm from the hatch) or sdvižnuû.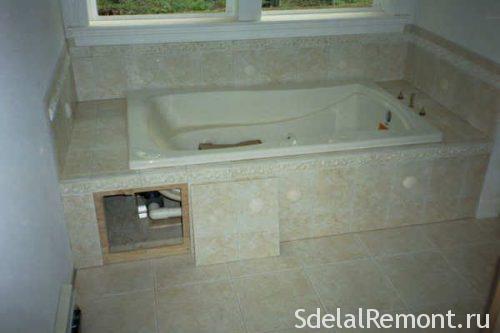
The size of the door is recommended to select multiple elements lining. For ceramics the width and height of 25-30 cm longer improvised audit hatches for the counter can be the same in size with a tiled. A key to access the communications door should provide at least 400x600 mm, coinciding with the area 4 standard tiles 20x30 cm. Large size is not always increase the usability of the hatch. And in order not to spend too much time on the design and materials, it is not recommended to do it too high or wide.
Council: Dimensions can choose and size of the opening in the brick or concrete wall. However, they can not match the tiles parameters, but the distance between the edges of the door and stuck on her pottery should not be more than 5 See the hinge side and 7,5 see the other sides.
In the process of planning the location and size of the door need to be considered, the material from which are made walling:
- if the basis for the installation of the tiles will be concrete wall or brick, It should focus on the dimensions of an existing niche;
- mounting a homemade hatches under the tile in drywall, aperture reinforce a framework of metal profiles.
Having defined the size, should choose the number and location for installation of the door hinges. For conventional hatch only two anchorages. For a large - three or four, spaced not less 100 mm apart and approximately 1-2 cm from the edges of the door.
We recommend separately see below video on the use of neodymium magnets for the manufacture of sanitary manhole.
installation steps
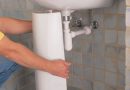
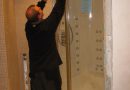
Begins to set auditing hatch bathroom with their own hands by creating a frame. For Drywall installation process is simplified, because as the carcass structure may make profiles, which enhances the aperture. A lining of the inner perimeter of the hatch is sheathed with strips of the same OSP, from which it is made. When installing inside a stronger wall on the edges of a niche with communications or devices mounted wooden bars.
The next phase - installation of hinges on the door, and their mates - in the right frame space (but only one screw). Further it is necessary to carry out the verification unit to determine whether mounting fasteners. Installed in the door must be in the same plane as a brick wall or plasterboard. In the second embodiment, the hatch try on with the already glued plasterboard part. After verifying the response of the loop completely fix the second screw, install door and again adjust its position.
the process of installing ceramic tile sanitary manhole under their hands is as follows:
- The outer part of the door and degreased hruntuetsya;
- The wooden surface is smeared with white glue;
- Bonded plaster mesh top (using spatula);
- After drying adhesive (not less 12 hours) preparing an adhesive solution;
- Tile is glued to the nylon mesh;
- Continue to install the rest of ceramics.
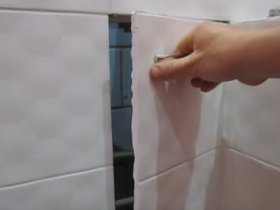
Council: Tiles should continue to be laid by the auditing hatch. First brought to the end of a series of (or 2-3 rows height), and then continuing laying under the door. In this way, the location of the ceramic can not be broken, and the hatch will be invisible.
After installing the tiles on the wall on either side of the door is additionally checked the location of the hatch relative to the plane walls. If he stands or, conversely, too recessed into the, It allowed more time to adjust the position of the attachment. In order to simplify the adjustment of the, the last to set a push-system.
Video on independent manufacturing homemade sanitary manhole