
Required tools: notched trowel, small spatula, Master OK, level, glue, plastic crosses, corner (Plastic corner molding), sponge, elbow. If the tiles have to be cut, Tile and no, you can use a glass cutter or grinder with a special range. Drill holes for the wires too special drill.
Before you laid new tile you need to see the article how to bring down the old tile. This will require a hammer and chisel. Carefully remove from the surface of the walls of the old adhesive or mortar, which was laid tile. The following is to align the wall surface. Work better with gloves and glasses, to avoid a variety of injuries.
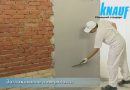
When the plaster wall or Rodbandom VOLMA necessarily allow the solution to dry and then apply a waterproofing layer.
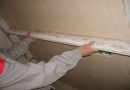
On the wall is necessary to put a notch to increase the area of the bonding surfaces. If the tile is placed on the floor to check his level, if not, then prepare the base under the tile. For this purpose, a long wooden plank screwed to the wall with screws, it must be fastened horizontally (shall be verified level). You can use rule, mounted on the wall.
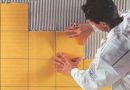
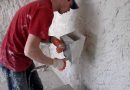
glue is kneaded, but not much (He quickly hardens). Laying tiles on the wall begins from the corner. In a corner of the wall mounted molding, in its grooves recessed tile. The adhesive is applied on the wall or on the tiles (to whom as conveniently). Spread with a notched trowel, to the entire surface of the wall, prepared under the tile, evenly missed. recommended tile for a few hours before laying soaked in water to increase the adhesion of glue. The first tile is laid, starting from the bottom row. It must be slightly pressed against the wall, and turn from side to side. Each laid tiles should be checked square and level. Laid tiles should be cleaned with a wet sponge, otherwise the glue dries and it will be difficult to remove. Also fits the following shall be verified and tiles. The recommended thickness of the adhesive layer - not bolee0.5 cm. plastic crosses are inserted between the tiles - this will ensure the same distance between the tiles. Thus laid the bottom row, and then the next. Calculate the amount of tile adhesive online.
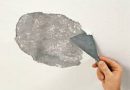
Each lined with a number of once again checked the level. After placing all the tiles it should be wiped with a damp sponge again. After a day - two can remove guides (tile base). Also retracted and plastic crosses, and smeared the seams. To do this, use a special grout, which is diluted with water to a homogeneous mass. Then a rubber spatula produce grout. After the grout just grab, produce grouting. Calculator number of tiles calculate online.
Laying tiles on the video wall
Wall cladding with tiles with their hands Video
Training video for tiling, porcelain tiles on bathroom wall. preparation and padding surface, after drying - the application of tile adhesive IVSIL Classic specialized notched trowel, directly laying tiles on the very walls of the room, Working with Tile (see the article how to cut tile correctly), gluing tiles, granite, proper grouting. Useful tips on facing wall tiles in the bathroom (Instructions come in handy for other rooms) their own hands. Final costs Construction Materials and tool.

Thank you for an interesting post, I read the article on your blog and realized that he was one of the best, I advise everyone to subscribe to update Articles. I really like how the material tiles, beautiful and practical! If you still want to know about tiles, Read the article on the topic: Laying the tiles with their hands + video tutorial here at this link https://sdelalremont.ru/ukladka-plitki-na-pol-video.html
Can I Volma layer of plaster bathroom (alignment walls under the tiles curvature 6-8 cm. Workers began to align walls. Plaster is not enough. I went alone to buy in Leroy Merlin”. told,that it is generally not suitable for bathrooms. Especially, I want to consolidate above the bath for drying belya.Kto rights?
Of course when this thickness is better to use solutions based on cement and be sure to fill the grid. When using plasters, gypsum-based or Volma Rotban allowed to use them in the bathroom in the apartment, if there is no direct contact with water and that the room is not street no other moisture sources. Be sure to follow the rule that the plaster to dry and then carry out waterproofing wall putty on a rubber or bitumen-based. Consultants in Leroy Merlin are young and do not know Knuf technology.