spots, they also spotlights - the ideal instrument for installation in suspended ceiling structures, especially if the latter are edged gypsum boards. By itself, the suspension structure have reduced the ceiling height in the room, so lamps installation in drywall, which are mounted on the outboard surface level, The extra height is not reduced, and LED models allow us to install in small spaces.
Forms ceiling lights
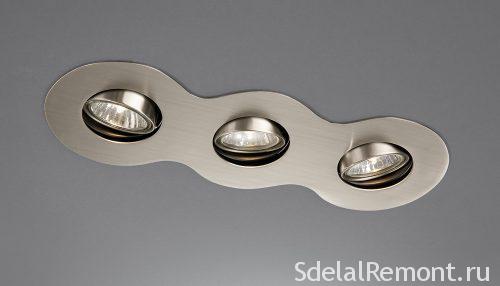
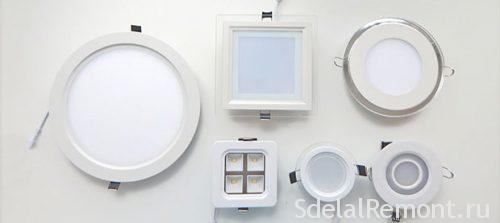
Fixtures for drywall - it's several species, which differ from each other types of lamps, consumed and voltage setting means. As for the last criterion, there are two positions: recessed and overhead.
- built - it lights, Technical part of which is located between the plasterboard ceiling and base surface, and decorative below the ceiling of GCR;
- overhead mounted on the surface of the ceiling plasterboard, and the method of attachment does not differ from installing chandeliers.
Additional design lamps for plasterboard ceilings are even and other qualities:
- single and block;
- rotary and fixed.
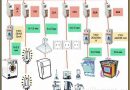
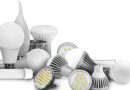
With regards to the lamps should be noted, that these light sources are present all kinds of lighting elements:
- incandescent lamps;
- halogen;
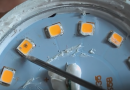
- LED;
- fluorescent energy saving.
According to the input voltage lamps are divided mainly into two groups: 220, 24 and 12 AT. Installing luminaires in plasterboard (halogen) on 24 and 12 The step-down transformer requires the presence of, which is mounted in the ceiling void. Today more and more popular are LED lights.
Requirements for the installation of lamps
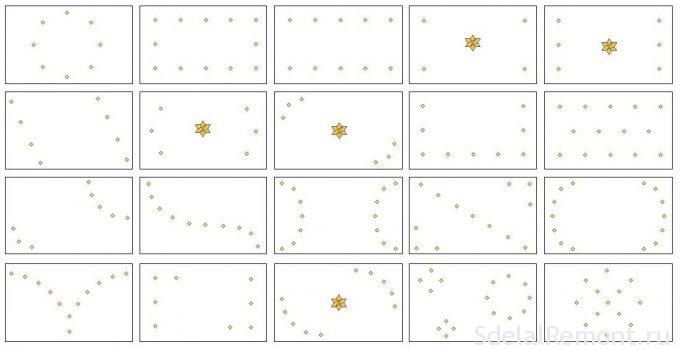
Location Embedded in the plasterboard ceiling lights on the ceiling of any rules and regulations is not limited. I.e, configuration may be very different. But most of the equipment has since, the lighting in the room was full or partial. Therefore, designers are three schemes:
- in rows, perpendicular to the wall, where the window is located. The distance from the wall to the first device must not be less than 60 cm. A series of installation step - 1 m.
- Checkerboard. Here, the same requirements.
- Installation of spotlights in the plasterboard produced at the periphery. I.e, the point light sources in this case act as an additional lighting space. The main instrument here is the chandelier.
All three schemes are simple enough, universal, but, as practice shows, today often do not use them. Since restrictions on arrangement, no spotlights, the variation in this case is a huge amount of. This particularly applies to ceiling plasterboard, constructed in two tiers.
The installation process spotlights
The first planned, under what scheme will be installed. Experienced Master circuit draws on paper, determining a distance scale between components and their exact location on the ceiling. Then cancel crosses space in the ceiling where the fixture will rasspologatsya, It is necessary to ceiling.
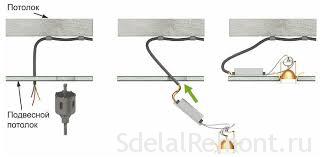
Next is the wiring harness (cable). This step should be carried out after the assembly on the ceiling frame of metal profiles. While some masters do first wiring, and then collect the frame. But in this case would have to pre-determine the place of installation of direct suspensions, applying to the roof surface of the label with the distance between the fastening elements. Because it may happen, that the wire would be in place of the suspension attachment. And to do this can not be.
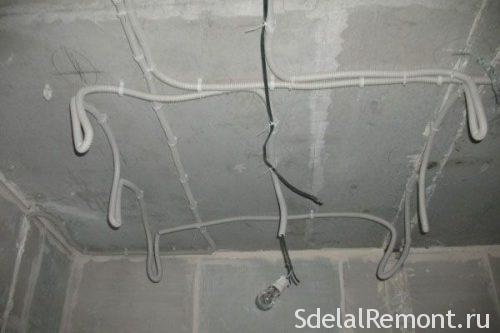
There is a second difficulty of wiring for ceiling lights, embedded in drywall, to rack mounting. wire (cable) will have to be fixed to the base ceiling. And this is the additional cost of hardware and the elapsed time. While the wiring of the assembled frame - a simple attachment to the suspension by means of insulated conductor wire itself in the form of a twist.
In any case, the cables have to be laid, passing them through the corrugated hose assembly. This additional protection, increases the life of the wires.
Before you start wiring, it is necessary to designate a place on the ceiling fixtures location.
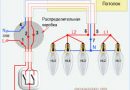
The scheme of connection can be serial or parallel. In the latter case, the parallel sections can be more depending on, both groups are switched lamps. It is on the discretion of the customer.


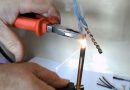
As for cable (the selection of its cross section). There is no need to calculate this parameter in view of power consumption. Optimal - section 1,5 mm² PVA . Better to buy a soft copper wire. Find out the best methods of connecting stranded wires.
Connection and installation of fixtures
After the wiring is set on the gypsum boards erected frame. Then again, now on the plasterboard ceiling, designated places lighting arrangement. They need to make holes for the light source.
note, that even at the stage of distribution of fixtures on the ceiling surface of the scheme must be strictly taken into account, to the lighting unit missed the element of the metal frame. Because in this case there is no possibility to instal, metal profile will just interfere with the installation.
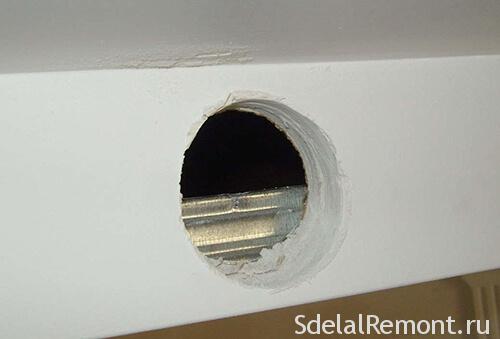
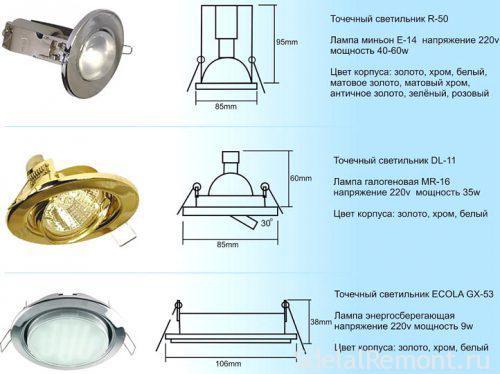
There is a subtle point - the diameter of spotlights for gypsum board should match the diameter of the hole in the ceiling. The first parameter manufacturer necessarily indicate a box (packing), but it is better to check it out.
Therefore, this size is applied on a plaster ceiling for installation of devices places. It is better to use a compass. Now it is necessary to cut holes in the road marking. There are several ways, How can I do that:
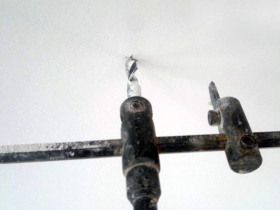
- The easiest - drill drill holes, which set a crown diameter, equal to the diameter of the circle drawn on the ceiling.
- On the circumference of the hole drilled through small drill with a step 1-1,5 cm. After that, a piece of drywall simply pressed into. true, edge of the hole would have to finalize a sharp knife or a jigsaw.
- You can use the Ballerina. For this cutter is exposed by the aperture radius.
It only remains to pull the wire from the cut holes and connect them to the lamps.
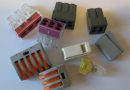
ways to connect, rather, fixtures, by which the produced compound, some. Simplest, but also a reliable, this terminal block with clamping screws or modern clam terminals WAGO.
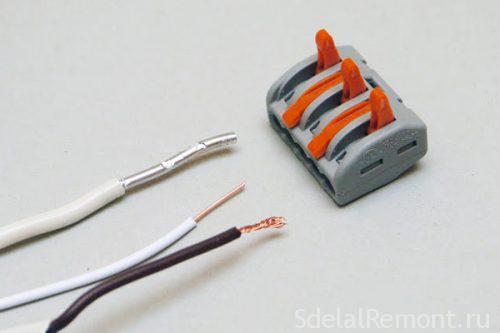
The wires from the lighting device to be inserted into it with one hand, pinching them with screws, supply wiring on the other hand.
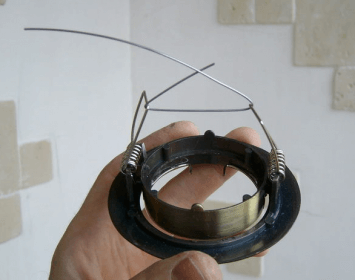
We can only carry out the installation of luminaires in plasterboard ceiling. The design of the instrument has a special clamping strips (mustache), which are spring loaded to one side. I.e, in a free state, they turned outwards, respectively stand for the technical part of the device. I.e, expansion antennae longer, than the cut diameter of the hole in the ceiling plasterboard. Therefore, the mounting brackets must be pressed, to push them into the hole.
Sometimes it is not easy to do hands, because it prevents itself drywall. Therefore experienced masters do so - a link between the antennae wire, and after installation of the lamp in plasterboard point it is cut by cutting pliers or a pair of pliers. Antennae straighten under the action of springs, based on the exterior side of the ceiling, not allowing the luminaire to fall.
Some designs recessed luminaires for plasterboard ceilings are collapsible. I.e, decorative part is detached from the technical. Therefore, the sequence of the installation work is a bit different:
- Disassemble the device.
- Technical compartment is installed in the ceiling plasterboard, that is, in the hole, Similarly,, as in the above case,.
- You are connecting the device to the power supply cable, which is pulled through the cartridge. Thereafter carried back utaplivajut.
- Decorative piece attached to the technical.
helpful hints
several recommendations, which will help to avoid mistakes in the process of selecting and installing fixtures point in drywall.
- Incandescent lamps are no longer used in the devices of this type. Among the other species should be considered the optimal ratio of price and minimum power consumption of electricity. In this respect, energy saving lamps best. LEDs consume less current, but such lamps are very expensive. Halogen many problems - require a transformer, frequently burn.
- Compound cable outlet from the main loop to embedded fixtures plasterboards made by soldering. By twisting should be abandoned. You can use the terminals of the "Nut".
- Through electrician, the total supply houses or apartments must be disabled.
- after connection, but before installing recessed downlights in drywall need to check their operating status. Just served on the devices current. If some of them do not light up, it is necessary to find the cause and celebrate it.
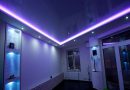
- In wet areas mounted waterproof model.
- Selection fixtures power is selected taking into account, the whole system and the ceiling is not overheated ideally this LED Downlight
conclusion
Despite the seeming complexity of installation embedded in the drywall ceiling lights, This process will be mastered by even novice. The main thing - just follow the sequence of operations and intelligently approach the selection of lighting fixtures and their installation. In addition, watch the video compilation.