The result of any repair depends on the correctness of providence works on alignment of the walls and ceiling in an apartment or a house. It is always important to control the quality of the works and follow the sequence.
We have examined in detail how to perform plaster walls with his own hands with the video, Now touch and ceilings. For work, we need:
- rule.
- Putty knife.

- plaster falcon.
- Level.
- Drill with stir nozzle.
- A mixing plaster.
- The rollers and tray for priming surfaces.
First, you must determine the irregularities of the walls and ceiling. Usually, This is a broad rule to the light.
Alignment and plaster ceiling with his hands
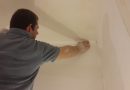
On the ceiling there are fragile items, We begin to work with their removal. Everything, that is showered with light exposure - bring down. Also embroidered stitching. Then the entire ceiling area Neaten brush, removing dust, web and other contaminants. Now the surface is ready for priming.
This is an important step in preparing the substrate, and it is not just about, primer that removes dust and moisturizes base, but also ensures alignment or restriction of its absorbency and, of course, enhances the adhesion of the subsequent material. Ceiling processing, made of reinforced concrete, choose concrete-contact, it includes a special filler fortseonirovanny (solid grains), which upon drying gives a smooth surface roughness, that at times it increases adhesion with the base material and thus improves adhesion. Pour primer tray and put on a roller ceiling. Deepening carefully coat with a brush.

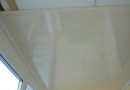
We give primed surfaces to dry and proceed to install beacons. They are necessary for the elimination of the ceiling in one plane. Lighthouses select Aluminum, they can not clean up after the drying surface, because they do not corrode. Dilute a small amount of gypsum plaster and fasten it at a distance of less than lighthouses rule width. We expose beacons in the same plane with the help of the level and the rules. After that, plaster, holding beacons, zatverdela, We proceed to substantive work.
For plastering of the ceiling in the living room using gypsum plaster "prospectors", as it will provide good sound insulation, and create a comfortable environment. In addition to this the plaster do not need to be afraid of, it will shrink or crack, as it contradicts the properties of gypsum. When aligning the ceiling important to remember: layer deposition should not exceed two cm. Local unevenness of the plaster can be aligned with their own hands, and a layer of up to eight centimeters. In the process of mixing, pay special attention to the following:
- Observe the mixing proportions. The manufacturer does not knowingly recommends a certain range of the amount of water, required for the mixture, since under these conditions the mixture works best.
- First, the tank fill water, and then, continuously stirring, fall asleep dry mixture. Required after stirring giving a solution to stand for five minutes and re-mix. This time is necessary in order, that all components of the mixture started to interact.
- A solution prepared. Getting planarizing. Spatula we put the plaster on the ceiling surface, mezhmayachkovoe filling space. Carefully fill the depressions and potholes.
- Next protyahyvaem nanesennuyu plaster rule, moving it on beacons.
Important! When working with gypsum plaster should be remembered, they are applied in a single layer. That is why all manufacturers are striving to increase the maximum layer coating its gypsum plaster. As you can see, subject to certain rules, perform stucco work with their hands and everyone will be able alignment of the walls and ceiling of the apartment will not be difficult. Details about how to make a quality and beautiful ceiling.
Proceed to the alignment of the walls
 Initial training - standard. Weak base element is removed, as well as dust and dirt. If one of the walls is made of the same reinforced concrete, the same material will be used to furnish her: primer and concrete-contact, aluminum beacons, plaster. primed, install beacons, apply and stretch the plaster. Finish with a window wall will be conducted in two phases. Alignment of the total surface and removing the slopes.
The wall is made of foam blocks. This highly absorbent material, which actively takes water from the plaster, This leads to uneven setting and cracking resulting surface. To avoid this, necessary primed wall "universal". We are waiting for dry and proceed to install beacons. Standard beacons to align the walls and angled to remove slopes.
Since this wall will be exposed to extremes of humidity, it is necessary to apply waterproof plaster, eg, cement-sand. However, after working with plastic and light stucco, Returns to the cement-sand mortar is not very pleasant. All because of the application of more sophisticated technology and high cost of time and effort. More information can be found here on the walls and finishing works.