Очень трудно достичь идеально ровной поверхности пола. Могут с течением времени выявляться впадины, ямки, трещины и другие изъяны, возникающие чаще всего из-за несоблюдения технологии заливки стяжки. Чтобы укладка была осуществлена максимально точно, следует произвести заливку пола по маякам. С ее помощью выставляется необходимая толщина будущей стяжки, и решаются другие вопросы. Но первоначально придется выполнить подготовительные мероприятия.
Используемые материалы
Различные виды материалов могут быть использованы в качестве маяков на основание пола под стяжку. Ими могут выступать готовые варианты, которые в ассортименте представлены в строительных магазинах или же выполнены самостоятельно. Готовые варианты специально предназначены для заливки стяжки. 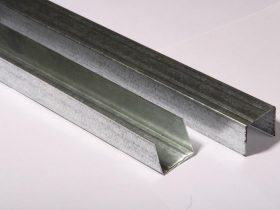 Когда используется гипсокартонный профиль Пн 27*28, то лучше всего один вставить в другой, чтобы он не прогибался под давлением раствора. Да и правило в таком случае будет лучше передвигаться по поверхности.
Альтернатива таким маякам – деревянные бруски. Обычно берут высоту и ширину одинаковой по 30 мм. Предварительно они должны быть смочены в воде в течение определенного времени. Это необходимо для того, чтобы они не впитывали влагу из цементно-песчаного раствора, используемого для заливки стяжки пола.
Еще один вариант для маяков – раствор, который готовится в пропорции 1 части цемента и 1 части извести. Ими выкладывают маяки по всей площади в помещении.
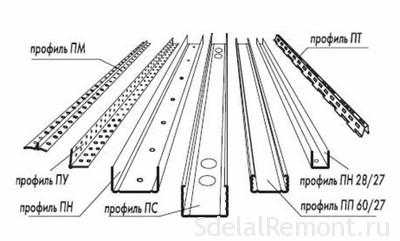
От вида заливки и используемых маяков будет зависеть перечень инструментов и материала. Есть стандартный набор, а есть и специфические пункты, на которые стоит обратить внимание предварительно, до начала проведения работ. Лучше всего, когда уже все есть под рукой, чтобы не отвлекаться в процессе осуществления выравнивания основания пола под маяки.
Определение наивысшей точки
До выставления маяков по периметру в помещении, следует определиться с разметкой и выявить наивысшую точку. Все следует выполнять последовательно и не отклоняться от технологии, чтобы достичь максимально эффективного результата.
Первоначально пробивается горизонталь. В этом поможет лазерный уровень или другие альтернативные материалы. Все будет зависеть от возможностей и финансового положения. Некоторое оборудование стоит дорого, и нет смысла его приобретать для одноразового использования. Метки делаются на одном уровне на стене, примерно на расстоянии 100-120 см от основания пола. Отмеченные точки по всему периметру соединяются между собой. Должна получиться ровная горизонтальная линия по уровню. За незначительную цену можно приобрести красящую нить, которая будет способствовать проведению работ. 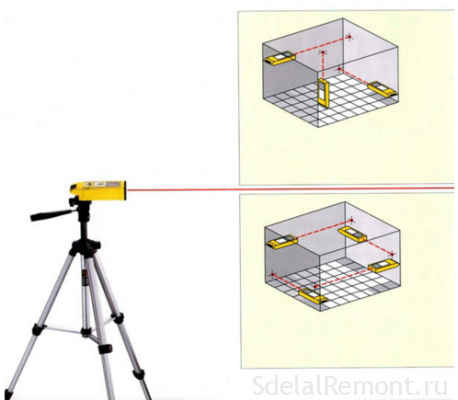
После этого проводится расчет для установления наивысшей и низкой точек в помещении относительно уровня пола. От выставленной горизонтали на стене вниз отмеряется расстояние до уровня пола и определяются вышеуказанные точки. Минимальная толщина будущей стяжки должна быть соблюдена в самой высшей точке. Все измерения лучше всего производить на стене карандашом, чтобы ориентироваться в пространстве в процессе выставления маяков. Когда определены высшая и низшая точка основания пола, разность этих показаний и будет считаться минимальной толщиной будущего пола.
Правила фиксации маяков
Максимальная эффективность и точность всех показаний будет выполнено, если осуществлено выравнивание пола стяжкой по маякам. Поверхность станет максимально ровной и будет подходить для настила любого вида напольного покрытия. 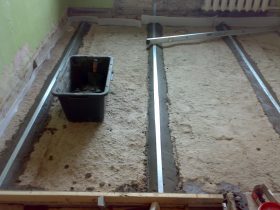 Они предназначаются для направления правила при распределении раствора, выступают в качестве ориентира при заливке стяжки бетонного пола. Если маяки выставлены правильно по технологии, то можно не волноваться за итоговый результат.
Правило в работе должно использоваться таким, чтобы оно было больше расстояния между маяками примерно на 20-25 см. Но и сами инструменты не должны быть слишком длинными, ориентировочно в 1.5 метра.
Маяки фиксируются на основании на расстоянии в 50-100 мм от расположения стен и других конструктивных элементов. Начало работ в помещении – дальние углы комнаты. Все сводится к входной двери.
Правильный расчет
Не лишним будет предварительно рассчитать количество маяков, которые необходимы для работы. Только в таком случае заливка пола по маякам будет быстрой и эффективной. Не придется отвлекаться от их установки и последующей заливки раствора для создания ровной поверхности пола.
Все маяки обычно ведут от входной двери по направлению к противоположной стене. Но первоначально определяется первый маяк и от него уже фиксируются на площади в помещении все остальные.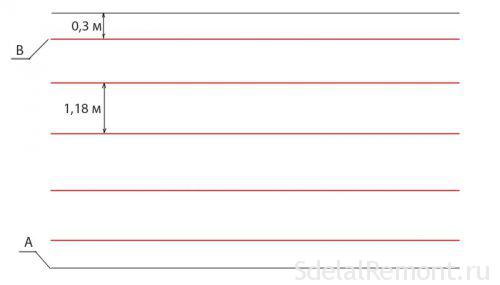
При выставлении первого маяка можно ориентироваться далее. При ширине комнате от входа в 5,32 метра, с максимальным расстоянием между маяками в 1.18 метра (с учетом использования правило в 1.4 метра), придется расположить 5 рядов маяков. Первый и последний ряд будет непосредственно у стен на расстоянии в 30 см. Между ними каждый последующие ряд будет на выставленном расстоянии. Таким образом, получится 4 промежутка между маяками, которые должны быть заполнены раствором и другими составляющими пирога.
Установка на саморезы
Начнем рассматривать установку маяков с использования саморезов. В наивысшем месте основания пола просверливается первое отверстие диаметром до 10 мм. В него загоняется деревянный чопик, а уже в него саморез. Следующий маяк фиксируется на противоположном конце. Поверх первых выставленных саморезов устанавливается правило, поверх которого – уровень. Если все соответствует горизонтали, то можно смело приступать к следующим действиям. Уровень должен подгоняться под первый выставленный маяк.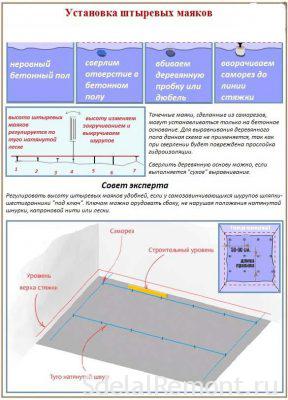
От первого маяка ко второму натягивается леска или шнур. Есть и другие альтернативные материалы, которые можно встретить в строительном магазине. На промежутке лески между саморезами делаются отверстия в основании бетонного пола на расстоянии 50-60 см друг от друга, в которые также вставляются чопики и вкручиваются маяки. Уровень для каждого из них должен быть одинаков. Это позволит в итоге выполнить качественно заливку стяжки по маякам. Все последующие ряды маяков должны располагаются параллельно первоначальному. Все действия идентичны и не должны никак отличаться. Выравнивание можно выполнить и поперек маякам №1.
Растворные маяки
Способов выкладки, как говорилось ранее, имеется достаточное количество. Среди них стоит выделить еще и расположение маяков на раствор. В качестве основного материала подойдет цемент или гипс. Из полученного состава раствора можно выложить горки на основании бетонного пола. В заложенный раствор фиксируются маяки в виде металлических или гипсокартонных профилей. Если в раствор добавить алебастр, то вся работа будет произведена несколько быстрее. Процесс схватывания составляет примерно 15-20 минут.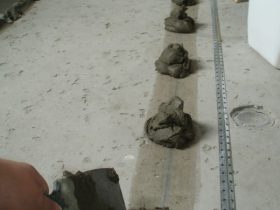
Подкладочным материалом не может быть тот, который очень хорошо впитывает влагу. Форма маяков в таком случае будет вменяться в процессе высыхания. В стяжке будут образовываться трещины, впадины и повалы.
В некоторых случаях достаточно просто выкладывать растворные маяки по периметру в помещении. Их высота будет зависеть от основания пола, его ровности и наличия впадин и выступов. В последующем их даже не придется удалять, а просто залить стяжкой пола.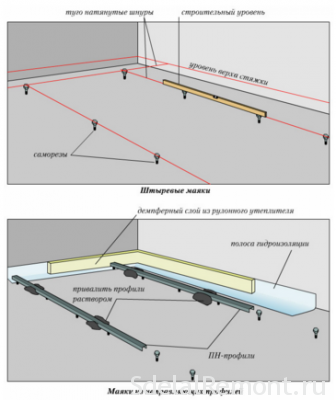
Распределение стяжки
Если необходимо выровнять пол по маякам своими руками, следует произвести их установку. С этим заданием можно справится. Достаточно лишь определиться с конкретным вариантом и выполнить монтаж. После этого можно приступать к заливке раствора. Здесь есть некоторые тонкости, с которыми стоит ознакомиться.
При использовании растворных маяков не следует дожидаться их полного высыхания. Это позволит в последующем раствору лучше схватиться. Но можно смочить поверхность водой или качественно прогрунтовать. В первом случае будет незначительная экономия средств и времени.
Между стеной и полом следует просмотреть все щели и стыки, чтобы в них не просочилась вода. Без этого начнутся сюрпризы для соседей во время заливки раствора. Все имеющиеся щели надо запенить. Приготовление раствора выполняется следующим образом:
- Готовится емкость, в которую засыпается песок вместе с цементом и смешивается тщательным образом.
- Во вторую емкость наливается вода, после чего из первой засыпается сухая смесь для будущего раствора. На 2 литра воды приходиться примерно 10 кг смеси.
- Лучше всего замешивать все в бетономешалке в течение определенного времени, чтобы получить однородную массу.
Начинается вся работа от дальнего угла в помещении. Раствор заливается между маяками, после чего распределяется по всей поверхности. Никаких резких движений в таком случае быть не должно. От реек правило не должно отрываться, чтобы в итоге получилось действительно ровное основание. При образовании «лишней» массы раствора, его выгоняют к входу, после чего убирают или переносят на место новой заливки.
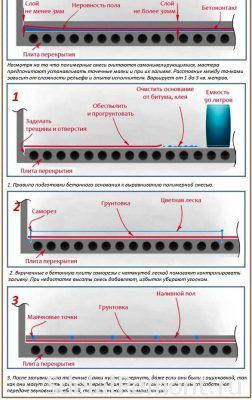
После заливки основания пола раствором могут возникнуть вопросы с тем, нужно ли убирать маяки после заливки пола. Все профили, особенно деревянные маяки должны быть в обязательном порядке убраны. Образовавшиеся пустоты заделываются раствором, тем же, что и выполнялась вся заливка. Стоит обращать внимание на то, чтобы не было образований луж. В последующем это может привести к появлению впадин. Даже если были получены после удаления маяков незначительные неровности, все они должны быть заделаны раствором.
Снимать ли маяки после заливки пола, если они специально предназначены для такого вида работ? От них избавляться не стоит, а они остаются в основании залитой стяжки пола. Никакого вреда и нарушения конструкция от таких маяков не будет.
При выравнивании пола в ванной комнате или туалете, то есть помещениях не больших по площади, для разравнивания лучше всего брать игольчатый валик.
После распределения раствора по поверхности пола следует производить уход за стяжкой, чтобы она равномерно высохла и созрела. Каждый из этапов имеет свое значение и нельзя отходить от технологии, ни при каких обстоятельствах.
Маяки для наливного пола
Заливка пола по маякам при устройстве наливного пола не всегда применяется по той причине, что готовый раствор имеет свойства самостоятельного распределения по поверхности. Но если же работы выполняются новичков и человеком, впервые совершающим такие действия, их установка будет обязательной. Кроме стандартных вариантов используют в работе маяки-реперы. 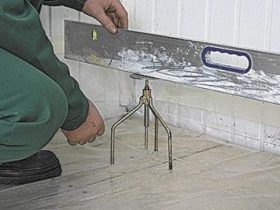 Они представлены в виде треног, внутри которых расположен специальный стержень. Данный стержень может легко перемещаться вверх и вниз до необходимого предела. Им устанавливают уровень стяжки в помещении.
До начала проведения работ по установке маяков следует произвести грунтование поверхности. Все работы по заливке стоит выполнять спустя 4-5 часов после выставления маяков и нанесения слоя грунтовки. Расстояние между маяками берется из расчета 1 м друг от друга.
Рассмотренные варианты говорят о том, что можно выполнить выравнивание пола по маякам своими руками. Для этого не требуется серьезных познаний в строительной отрасли. Достаточно лишь придерживаться технологии и рекомендаций от производителя. В итоге получится ровное основание, которое подойдет для настила любого вида напольного покрытия.


