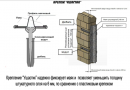
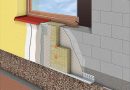
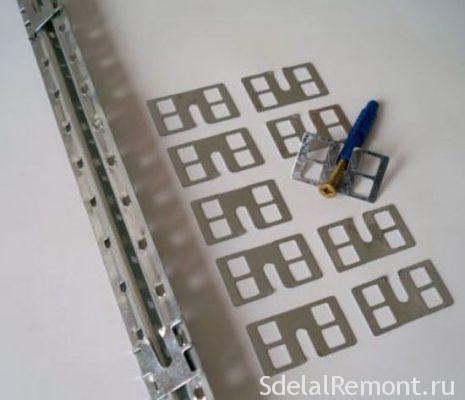
Крепёжное приспособление «креммер» представляет собой прямоугольную пластину, сделанную из оцинкованного металла. По краям прямоугольника располагаются отверстия для загибания, благодаря чему удобнее закреплять маяки. В центральной части – прорезь для закручивания самореза. Конструкция такого крепления под маяки позволяет не просто размещать на нём направляющую, но и легко изменять её положения, всего лишь на несколько оборотов ослабив шуруп. Выполнение штукатурных работ требует значительного количества материала. Так, при отделке стен стандартной двухкомнатной квартиры можно потратить от 5 до 6 кубометров сухой смеси и десятки часов. Тогда как специальный крепёж «креммер» для установки маяков позволяет уменьшить и время на выполнение работ, и количество потраченной смеси почти на треть.
Преимущества изделия
Среди преимуществ, которые даёт в процессе выполнения штукатурных работ такое крепление, можно назвать:
- возможность устанавливать направляющие без применения штукатурных смесей, в результате чего отсутствуют «мокрые» работы и не требуется время на ожидание высыхания раствора;
- установку на такие крепления металлопрофилей любой толщины, которые подходят качестве направляющих;
- совместимость с различными вариантами крепежей, на которых устанавливаются сами крепления креммер для установки маяков;
- надёжная фиксация направляющей и, одновременно, простая регулировка её положения.
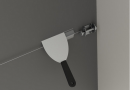
Для перемещения крепления в сторону достаточно открутить саморез (винт или шуруп) и выполнить необходимую корректировку. Затем крепёж возвращают в первоначальное положение и приступают к работам. При этом сами направляющие можно устанавливать на разном расстоянии от поверхности стены, в результате чего исполнитель может регулировать толщину штукатурного слоя и расход материала.
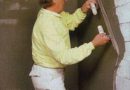
Стоит отметить в качестве преимущества и то, что монтаж креплений «креммер» для штукатурных маяков не требует никаких специализированных знаний. Для их установки не нужен и опыт строительных работ, требующийся при изготовлении, например, гипсовых направляющих. А, значит, и справиться с ними может практически каждый, не обращаясь к специалистам хотя бы на этом этапе. Хотя сами штукатурные работы желательно доверить профессионалу.
Существуют следующие варианты выставить направляющие на стену:
- крепление (Креммер) для установки маяков:
- клипсы для маяков под штукатурку;
- крепление для маяков Ушастик;
- установка маяков на раствор;
- штукатурка стен без маяков;
- струнный способ выравнивания стен.
Идеальная установка оцинкованных маяков
Перед установкой крепежа маяков для штукатурки требуется предварительно провести замеры и разметку. В первую очередь, это касается определения «нулевой точки», от которой начинается выравнивание всей стены. Чаще всего за неё принимается самая выпуклая часть конструкции – выступ или бугорок. При оштукатуривании других поверхностей «нулевой точкой» может стать и уровень пола двух соседних комнат, и стыки потолка, для выравнивания которых тоже можно применять маяки. Кроме того, технология установки маяков может учитывать необходимость скрыть за штукатуркой коммуникации – провода, трубы, воздуховоды. Эти конструкции тоже влияют на выбор «нулевого» уровня.
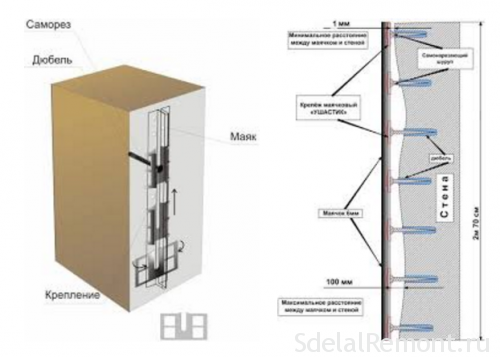
После определения положения точки отсчёта следует выбрать места для установки направляющих. При этом маяки должны не пересекаться с «нулевой» отметкой, а быть хотя бы немного (на 1 мм) дальше от основной части стены. С помощью этого метода штукатурный слой можно вывести на минимальную толщину, сохранив размеры комнаты и сэкономив средства на материалы. Места под крепления «креммер» для штукатурных маяков отмечаются ровными линиями, положение которых определяют по уровню или с помощью реек, отбивочных нитей и правила.
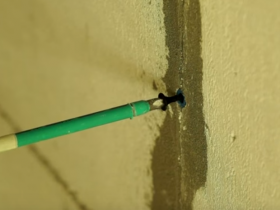
Следующий этап подготовки – сверление отверстий с шагом по вертикали в 300–400 мм и установка дюбелей. Таким образом, на стене высотой 2,5–2,7 м может оказаться 7 креплений «креммер», используемых для установки штукатурных маяков. А горизонтальное расстояние между маяками принимают стандартным – от 1 до 1,5 м, в зависимости от длины правила. Хотя, чем оно меньше, тем проще будет штукатурить.
Монтаж направляющих пластин
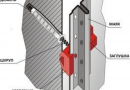
После завершения монтажа дюбелей происходит установка в них саморезов (с выравниванием шляпок в одной плоскости) и непосредственный монтаж креплений для маяков «креммер». При этом следует ориентироваться на «нулевую точку», выравнивая слой таким образом, чтобы его плоскость перекрывала этот ориентир. В результате стена получается максимально ровной, а штукатурки расходуется меньше. 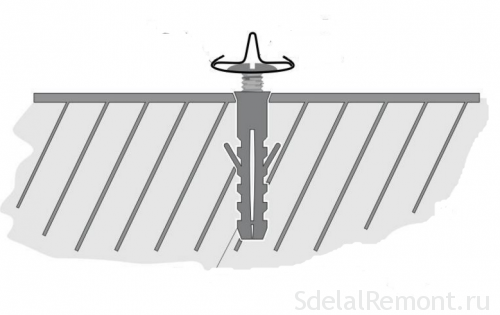
Откорректировать положение шляпок шурупов, с помощью которых устанавливаются крепления для маяков под штукатурку, лучше всего с помощью лазерного уровня. Сначала по «нулевой» точке выставляется один из саморезов. Затем по нему выравниваются остальные. Шурупы подкручиваются до тех пор, пока все шляпки не окажутся в одной плоскости.
Особенности монтажа
В процессе монтажа желательно учитывать следующие нюансы:
- крепление под маяки стоит закручивать не вручную, а с помощью шуруповёрта в режиме минимальной скорости. Это позволит более точно регулировать закручивание;
- при необходимости скорректировать положение направляющей достаточно просто сдвинуть крепеж для установки маяков с самореза, открутить его и переместить профиль. Если расстояния между крепежом слишком маленькие, возможно, придётся откручивать несколько саморезов.
При откручивании болтов крепления для штукатурных маяков желательно учитывать количество оборотов. Ровно столько же следует сделать, если требуется ослабить и другие саморезы.
Стоимость материала
Цена такого крепления для маяков под штукатурку, купить которые можно в большинстве строительных маркетов и онлайн-магазинов, сравнительно небольшая:
- 100 деталей можно купить за 116 руб.;
- упаковка из 50 деталей обходится в 58 руб.
На стену высотой 2,7 м и длиной 5 м понадобится около 35 креплений. На комнату – до 100 штук. На среднюю двухкомнатную квартиру при проведении капитального ремонта (с учётом коридоров и дверных проёмов) – не меньше 300 элементов, общая стоимость которых составит чуть больше 300 рублей. Не зря сказано на упаковке, что бережет нервы и экономит силы.
Видео по установке штукатурных маяков креммер на стену