- Подвесной потолок в квартире
- Последовательность создания подвесного потолка
- Необходимые материалы. Набор инструментов
- Профиля
- Гипсокартон
- Крепежи
- Чертеж подвесного потолка
- Подготовительные работы
- Разметка подвесного потолка из гипсокартона
- Создание металлического каркаса
- Монтаж гипсокартона на созданный каркас
- Как разрезать гипсокартон
- Армирование стыков и финишная отделка
- Правила ухода за подвесным потолком
Каждый хозяин квартиры, планируя сделать ремонт, сталкивается с потолками. В основном они имеют неровности, от которых трудно избавиться. Для этого применяется гипсокартон. Навесной потолок из гипсокартона легко монтируется своими руками, при этом экономятся не только денежные средства. При создании гипсокартонной конструкции присутствует ответственность и порядок действий.

Подвесной потолок в квартире
Подвесных потолков есть большое множество. Они могут быть классическими, фигурными, одного уровня или нескольких. Существует также множество вариаций с комбинированием подсветки подвесного потолка.

Основные системы подвесных потолков из гипсокартона:
- Один уровень – классический ровный потолок с люстрой.

Одноуровневый гипсокартонный потолок с основным освещением - Много уровней – фигурные элементы, а также деление одной комнаты на зоны.

Зонирования гостиной при помощи многоуровневого потолка из гипсокартона с подсветкой - Комбинированный потолок – в основном идет комбинация короба из гипсокартона с натяжным потолком.

Комбинированный потолок гипсокартон и натяжное полотно - Подсветка – играет большую роль в подвесном потолке. Это может быть основной свет и ночная подсветка из светодиодной ленты.

Подсветка на гипсокартонном потолке играет роль ночного света


Для создания уникального освещения светильники устанавливаются в правильном положении, то есть не на одном уровне, таким образом, чтобы лучи скрещивались зоны в помещении.
Последовательность создания подвесного потолка
Чтобы осуществить монтаж подвесного потолка из гипсокартона соблюдается алгоритм определенных действий:
- Сбор и приобретение материалов и инструментов.

Инструменты, материалы для создания гипсокартонного потолка - Создание эскиза на бумаге.

Эскиз-проект для гипсокартонного подвесного потолка с фигурными элементами и подвсветкой - Подготовительные работы для дальнейшего монтажа.

Проведение подготовительных работ перед монтажом подвесного потолка из гипсокартона - Осуществление разметки на базовой поверхности.

Произведение разметки для подвесного потолка согласно снятым размерам - Монтаж каркаса из выбранного материала (металлические профили).
- Обшивка гипсокартоном. Важный этап, где могут возникнуть некоторые нюансы и секреты при работе с ГВЛ.

Крепление гипсокартона к металлическому каркасу - Армирование стыков на созданном гипсокартонном потолке.

Армирование стыков с помощью армирующей ленты - Финишная работа с гипсокартонной конструкцией.

подготовка поверхности гипсокартонного потолка к покраске, поклейке обоев


Следует соблюдать поэтапный процесс во избежание ошибок, которые, могут быть неисправимы.
Необходимые материалы. Набор инструментов
Для создания прочного, красивого потолка необходимо приобретать материалы производителей, зарекомендовавших себя с лучшей стороны по качеству выпускаемой продукции. Самой популярной фирмой является «KNAUF».
Профиля
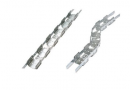
Для производства каркаса под гипсокартонный потолок потребуется приобрести комплект профилей:

Направляющий – основа для создания каркаса. В направляющий профиль вставляется и фиксируется потолочный.
Потолочный профиль – создает обрешетку каркасной основы под гипсокартон. На этот элемент крепятся листы гипсокартона. Поэтому, приобретая материалы для каркаса, следует пользоваться только одной фирмой с высоким качеством материалов.
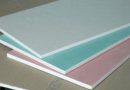
Гипсокартон

В зависимости от помещения выбирается марка гипсокартона. Если это ванная комната, балкон, мансарда тогда применяются влагостойкие листы гипсокартона. При создании потолка в коридоре, гостиной, спальни используется обычный ГКЛ серого цвета. Если необходимо сделать подвесной потолок своими руками в комнате, где установлен камин или груба от печи, тогда применим жаростойкий гипсокартон красного цвета.
Лист гипсокартона для подвесного потолка используют толщиной 9,5мм., но лучше применять 12,5мм. В идеале по технологии полагается два слоя листов. Потолочная конструкция должна быть надежно закрепленой.
Крепежи

Крепежи для гипсокартонного подвесного потолка должны соответствовать сертификатам качества. Если крепежные элементы будут некачественного производства, это может привести к хлипкости каркаса. Хорошо зарекомендовали себя элементы от фирмы Кнауф.
А также потребуются еще такие материалы для подвесного потолка из гипсокартона:
- Прямой подвес.
- Соединитель для профилей – краб.
- Удлинитель – в том случае, если потолок имеет большую квадратуру.
- Дюбеля 8/10. Анкерные болты для подвесов.
- Для соединения каркасных элементов с базовым основанием из бетона, потребуются шурупы 4.2/51
- Саморезы для соединения профилей, а также для гипсокартона с каркасом.
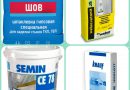
- Грунтовка – для чернового потолка с антисептиком, для гипсокартона обычная.
- Шпатлевка для армирования стыков.
- Шпатлевка «Финиш» гипсовая.

Материалы для упрочнения подвесного потолка - Армирующая лента.
- Демпферная лента для металлических элементов каркаса, а также для закрытия углов на черновом потолке.
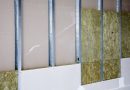
- Минеральная вата.

Набор инструментов, без которых создание подвесного потолка из гипсокартона не возможно:
- Линейка, метр, карандаш, строительный уровень (лазерная установка).
- Дрель и набор сверл.
- Шуруповерт или отвертки.
- Строительный миксер.
- Ножницы для резки металла.

Инструменты для создания подвесного потолка - Строительный нож и набор лезвий.
- Набор шпателей.
- Валик, кисть.
- Наждачная бумага.
Собрав все необходимые инструменты, а также ознакомившись со списком материалов можно смело переходить к дальнейшим действиям.
Чертеж подвесного потолка

Для создания эскиза на бумаге, потребуются размеры помещения, в котором планируется подвесной потолок из гипсокартона. В этом проекте нужно начертить желаемый потолок со всеми размерами. Здесь отмечается разметка для каркаса, рисуются фигурные элементы подвесного потолка из гипсокартона. На отдельном листе бумаги создается электро схема для подсветки. Каждый светильник отмечается отдельной точкой. На схеме показываются выключатель, розетки.
В обязательном порядке требуется отметить места крепежей каркасной основы. А также в чертеже следует учитывать толщину гипсокартонного листа.
Не стоит пренебрегать миллиметрами, поскольку они могут играть большое значение в монтаже каркаса.
Подготовительные работы
До начала работы требуется провести подготовительные работы. Из комнаты выносится мебель, которая может стать помехой в рабочем процессе. Далее, стены, потолок очищается от обоев, краски и других отделочных материалов. Со стен следует смести пыль и паутину.

Если после снятия краски или обоев появились дыры, тогда проводятся штукатурные работы и дается время для высыхания. Щели немного расширяются и армируются при помощи ленты серпянки, которая препятствует дальнейшему движению трещины.

При обнаружении плесени необходимо провести ряд процедур по обсушиванию места, после чего потребуется грунтовочная смесь с антисептиком. Раствором наносится на всю черновую поверхность.
Стены возле потолка должны быть ровными, поскольку к ним в последующем будут крепиться направляющие профиля. Если есть впадины или бугры – от них избавляются. Все подводится под уровень. Чтобы проверить поверхность на ровность можно использовать правило.
После высыхания штукатурки, грунтовки по всему периметру угла между стеной и потолком прокладывается демпферная лента. Она служит уплотнителем между стеной и металлическими профилями, а также является шумоизоляционным материалом. Лента приклеивается на угол при помощи клеящих составов.

На подготовительном этапе работы требуется определиться с освещением. Приобрести желаемые светильники. От их габаритов зависит высота подвесного потолка.
Разметка подвесного потолка из гипсокартона
Установка подвесного потолка из гипсокартона производится согласно снятым замерам по сделанной разметке на черновом основании и стенах. Для разметки требуется найти наинизший угол потолка. От этой точки отступить высоту подвесной конструкции, с учетом высоты светильников и толщины гипсокартона, по всему периметру помещения провести горизонтальную линию. Эта линия будет служить ориентиром для направляющих профилей. Выше разметки делаются дрелью отверстия под крепежи. Расстояние равняется половине спинки направляющего профиля. Отверстия должны быть на расстоянии до 40см. в углах, а также на краях профиля 15см.

Вторым этапом является нанесение линий для потолочных направляющих непосредственно на черновой потолок. Лист гипсокартона крепится по периметру, а также средней линии. Стандартный размер листа 120 см., поэтому требуется начертить линии через каждых 60см. На этих линиях обозначаются точки крепления подвесов.
Теперь можно отметить линии поперечных, которые делаются из потолочного профиля. Поперечные линии прокладываются между основными линиями на расстоянии друг от друга 40см. Это усилит конструкцию подвесного потолка. На этих отрезках также отмечаются места крепежей.
На разметке отмечаются крестиками (кружочками) места будущих светильников. Они должны быть в определенной последовательности и лежать на одной линии.

Совет. Для того чтобы высчитать точную высоту подвесного потолка из гипсокартона, следует взять самую низкую точку (угловую) от нее отступить к полу высоту направляющего профиля, плюс толщина гипсокартонного листа и плюс 8мм. зазор.
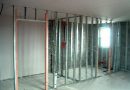
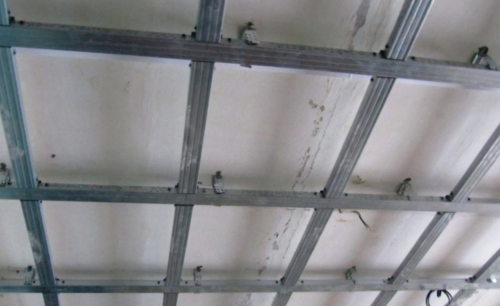
Создание металлического каркаса
Монтаж каркасной основы подвесного потолка под гипсокартон начинается с направляющих профилей. Следует быть внимательным и проверять каждый зафиксированный элемент уровнем на ровность. Итак:
- По нанесенной на стены разметке фиксируется направляющий профиль. Здесь для крепежа потребуются дюбеля. На спинку направляющего профиля клеится уплотнительная лента. Профиль должен быть прикреплён таким образом, чтобы его нижняя часть совпадала с линией. В заранее сделанные отверстия вставляются дюбеля, после профиль закручивается саморезом.

Фиксация направляющего профиля для каркаса под гипсокартон - Следующим шагом будет крепеж подвесов. Первый ряд возле стены на черновом потолке – подвесы крепятся на расстоянии 25см. Каждый последующий ряд – крепление происходит через 50 см. для крепления элемента требуется приклеить уплотнитель для избавления от контакта металла с бетонной поверхностью. Можно ленту прикрепить к подвесу, а после зафиксировать его. Крепление подвеса производится только при помощи анкерных болтов. Поскольку гипсокартонный потолок имеет вес, тогда он должен быть жестко монтирован. Саморезы могу не выдержать нагрузки и повыскакивать из основания.

Фиксация подвесов на потолок по нанесенной разметке - Потолочные профиля вставляются в направляющие, закрепляются саморезами, а также фиксируются к подвесам. Здесь является очень важным моментом ровность плоскости. Для этого применяется уровень, правило, можно натянуть нить, которая будет определять границы плоскости. Выступающие концы подвесов загибаются внутрь, чтобы можно было прикрепить гипсокартон.

Фиксация потолочного профиля при помощи подвесов и направляющего - Поперечные. Они должны быть размером 40см. от одного профиля к другому. Потолочный профиль режется ножницами для металла на нужные кусочки. Они крепятся также к подвесам. Крабами идет их фиксация с профилями.

Фиксация поперечных в каркасе для подвесного потолка


После создания прочного каркаса, его следует проверить на положение в плоскости (ровность), а также на жесткость. Если он поскрипывает, шатается, возникает хлипкость конструкции, тогда находятся слабые крепления подвесного потолка из гипсокартона и фиксируются, во избежание шаткости.


Далее, проводятся коммуникации, электрическая проводка. Для безопасности все провода помещаются в специальную гофру, которая не дает контактировать с металлом. При нагревании провода может произойти замыкание. Проводка делается согласно электрической схеме. В местах крепления светильников, следует выставить провод наружу – 15-20см.
Все провода не подключаются к электросети до окончания всех монтажных и финишных работ.
Для предотвращения резкого перепада температуры (в частном доме) или для шумоизоляции в готовый металлический каркас укладывается минеральная вата.
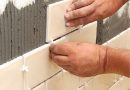
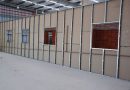
Монтаж гипсокартона на созданный каркас
Для того чтобы заняться монтированием гипсокартона на каркас, подготавливаются листы гипсокартона. Для этого, изначально перед всеми проделываемыми работами, гипсокартон следует занести в комнату, где создается потолок. Материал должен пробыть в помещении не меньше суток. После этого, при помощи соседа начинается отделка металлического каркаса.
Первым делом требуется просмотреть каждый лист на наличие фаски (уголок вдоль листа должен быть скошен под 45 градусов на 5 мм.). Если её нет – необходимо сделать рубанком. Ножом не нужно этого делать – получаться неровные края и повреждение верхнего слоя картона.

Сначала крепятся целые листы гипсокартона к каркасу с помощью еще одно человека. Горизонтальные линии листов не должны совпадать, от этого зависит прочность конструкции. Поэтому один лист крепится с одной стороны каркаса, а второй с другой стороны. Таким образом создается шахматная конструкция. Лист гипсокартона фиксируется саморезами 35мм. Крепеж производится от края листа на 1 см. к профилю, а шаг 15 см. Не стоит слишком часто закручивать саморезы – это плохо отразится на ГКЛ. В последствии он может лопнуть или деформироваться. На одном листе должно быть 3 ряда саморезов и поперечные.
После того, как будут зафиксированы все цельные листы можно приступить к вырезанию кусков, которыми следует закрыть остальной каркас.
Как разрезать гипсокартон
Лист укладывается на ровный стол. На него карандашом наносится разметка. По линии при помощи линейки и острого ножа делается надрез до половины толщины гипсокартона. После этого надрезанная часть должна выступать за границы стола. При нажатии лист лопнет в районе разреза. Кусочек требуется перегнуть, оставив полосу сгиба картона на другой стороне. Теперь с этих 2 кусков, которые находятся на одном картоне сделать ровный угол 90градусов. Нож ставится до упора лезвия в угол созданного гипсокартонного уголка и аккуратно проводится по всей линии сгиба. Таким образом, лист будет разрезан ровно.

На разрезанном куске гипсокартона надо сделать фаску, а после зафиксировать его на каркас.
Саморезы следует немного прижимать в гипсокартон (но не сильно). Тогда они не будут торчать над поверхностью и потолок получится идеально ровным и красивым.
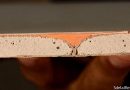
Армирование стыков и финишная отделка
Армирование стыков – важная работа, которая создает прочность всей гипсокартонной конструкции. Швы должны быть «запечатаны». Они дают продолжительность жизни потолку.
Для армирования стыков их изначально следует сухой кисточкой освободить от камушков и пыли. После этого весь потолок обрабатывается пылесосом. Валиком наносится грунтовочное покрытие на гипсокартон. Все стыки очень хорошо промазываются кистью с грунтовкой.

Спустя время высыхания, подготавливается раствор из специальной шпатлевки для армирования швов. А также потребуется армирующая лента – серпянка, армированная бумага. На шов тонким слоем накладывается шпатлевка (её следует хорошо «втоптать» в шов). Сверху на сырую смесь накладывается лента. Центр ленты должен приходится со швом. Края ленты прижимаются и разглаживаются. Чтобы не осталось пузырьков воздуха, по верху проводится средним шпателем. Лишний раствор уберется, а лента несколько «утопится» в шпаклевке. После недолгого высыхания на шов накладывается еще один слой шпатлёвки и хорошо выравнивается. А также этим раствором закрываются все места креплений гипсокартона.

После высыхания раствора наждачной бумагой производится затирка. Все лишние выступающие элементы при этом убираются.
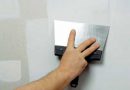
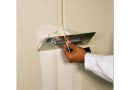
После окончания армирования следует финишное шпаклевание. Для этого применяется раствор на основе гипса. Наносить его следует тонким слоем, соблюдая ровность поверхности. Недопустим в одном месте просвет гипсокартона, а в другом бугор из раствора.
После высыхания смеси, наждачной бумагой проводится затирка всей поверхности. При необходимости (много просветов гипсокартона) гипсовый раствор наносится повторно на потолок.

После проведения затирки, вся пыль убирается. Получился прочный и идеально ровный подвесной потолок. Для дальнейшей отделки (поклейка обоев, покраска, нанесение декоративной ленты) весь потолок нудно покрыть грунтовкой. В углах, где не достает валик, применяется кисть.
Отверстия для розеток и светильников проделываются при помощи специальной насадки на дрель. Они имеют различный размер, поэтому следует к этому отнестись очень внимательно. Если отверстие будет больше, чем светильник, это создаст трудно решаемую проблему.
Правила ухода за подвесным потолком
Для продолжительного срока эксплуатации подвесного потолка следует придерживаться некоторых правил: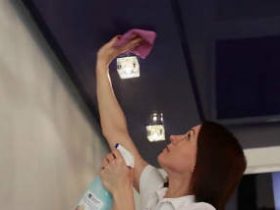
- Гипсокартон не «любит» резкие перепады температуры и повышенную влажность. Набирая влагу в себя, а после отдавая её, потолок начнет деформироваться, пойдут трещины. Поэтому лучшим вариантом будет оптимальный процент влажности в помещении до 75. Температурный режим должен меняться постепенно.
- Для содержания потолка в чистоте следует очищать его сухой мягкой микрофиброй. Если возникли пятна, тряпку можно смочить, но хорошо выжать, после этого аккуратно стереть пятно. Гипсокартон разрушается от воздействия щелочи. От качества краски потолка зависит истирание и возможность влажной уборки.
- Нельзя тереть по потолку тыльной стороной губки (жесткой), а также другими абразивными предметами.
Подвесной потолок делает помещение чище, аккуратнее, светлее. При правильно оформленной подсветке и основного света, потолок будет гармонично вписываться в общий дизайн комнаты, не нарушая, а создавая в ней гармонию покоя и уюта.