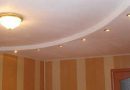
- Пятна и разводы на потолке и как не допустить их появления
- 1. Причина первая, густая краска
- 2. Медленность в работе
- 3. Валик с длинным ворсом
- 4. Банально, но факт
5. Неправильный метод покраски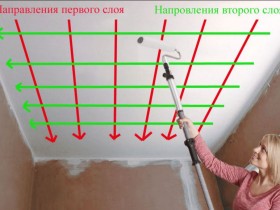
- 6. Плохая подготовка основания.
- Пятна и блики на окрашенном потолке и как исправить это положение
- Вак справиться с пятнами на потолке из-за старых протечек
- Советы о том как правильно покрасить потолок без разводов
Вероятно, каждый, кому когда-нибудь доводилось делать самостоятельный ремонт, сталкивался с проблемой неравномерности покраски. Вроде как старался, тщательно подбирал инструменты и краску, подготавливал основание, а в результате — разводы и пятна, причем отлично видные при ярком дневном свете. Большинству из тех, кто столкнулся с таким эффектом, в голову сразу приходит «спасительная» идея нанесения второго слоя. Но, обычно, такое решение — не лучший выход. Станет только хуже. Покрась хоть пять раз подряд, эффект будет тот же. Пятна и разводы только станут заметнее. В чем же причина и как покрасить потолок без разводов правильно?Наши советы позволят Вам сделать эту работу качественно.
Пятна и разводы на потолке и как не допустить их появления
Итак, как правильно красить потолок. У этого, как и у других видов работ, выполняемых во время ремонта, есть свои тонкости, так сказать секреты покраски. Негативный эффект может проявиться в результате как одной ошибки, так и нескольких сразу. Ознакомившись с основными причинами появления разводов на потолке, вы поймете, из-за чего так получилось.
1. Причина первая, густая краска
Вязкую краску значительно сложнее распределить равномерно, чем жидкую. Наиболее важно разбавить ее еще до нанесения базового (первого) слоя. Производителями красок рекомендуется разводить их максимум на 10%. Хотя чаще всего на банках указано, что краска готова к употреблению и не нуждается в разбавлении. Покупатель, конечно же, доверяет написанному и в итоге наблюдает разводы на своем потолке.
Отсюда вывод, краску необходимо разбавлять водой. Кстати, воды можно брать и больше, чем рекомендует производитель, но не более 20%. Нужно наблюдать за консистенцией: краска не должна тянуться как свежий мед, а мягко стекать с валика. Для первого прохода допустимо, чтобы консистенция была пожиже, а вот на второй немного гуще.
Главный минус сильно разведенной краски в том, что пройдется наносить больше слоёв краски, что повлечет ее расход.
2. Медленность в работе
Когда выкрашенные зоны слишком уж быстро сохнут, то просто физически невозможно прокатать границы между ними. Поэтому в таких местах и появляются полосы. Заметнее всего они становятся после полного высыхания поверхности. Так что, желательно не делать перерывов в работе и раскатывать краску равномерно, пока потолок влажный.
Нужно в обязательном порядке потолок равномерно прогрунтовать, для равномерного высыхания.
3. Валик с длинным ворсом
Гладкие поверхности лучше всего красить валиком с коротким ворсом. В противном случае избежать подтеков, неровностей и другого рода неприятностей будет тяжеловато. О том какой производитель валиков лучше и как выбрать ворсистость валика можно узнать на сайте.
4. Банально, но факт
«Непрокрас»? Не обеспечили хорошее освещение в окрашиваемом помещении? У вас плохое зрение, а линзы либо очки не надеваете? Тогда вы просто не могли увидеть, где остались неприкрашенные участки. Это происходит достаточно часто, что в одном месте краски ложится больше, а в другом меньше, по причине что валик уже без краски и сыховат.
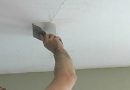
5. Неправильный метод покраски
Не стоит красить сплошными полосами. Вероятнее всего, по границам этих полос останутся линии и они уже никуда не денутся. Как правильно наносить краску на потолок рассмотрим далее видео.
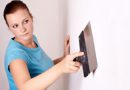
6. Плохая подготовка основания.
Это одна из наиболее частых причин. Учтите, что краска не прячет дефекты, имеющиеся на поверхности, а подчеркивает их!
Поэтому, если хотите получить гладкий окрашенный потолок, то доведите его идеального состояния. Правильная подготовка основания, шпаклевка и шлифовка, это залог успеха.
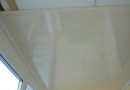
Пятна и блики на окрашенном потолке и как исправить это положение
Итак, причины мы выяснили. Надеемся, что в будущем удастся избежать большинства из них. Однако, как поступить сейчас, когда потолок уже покрашен и весь в жутких полосах, подтеках, пятнах? Как довести его до нужной кондиции?
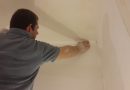
Остался, пожалуй, единственно верный выход — шлифовка, то есть потолок необходимо шкурить до тех пор, пока поверхность не станет однородного тона и шероховатой. Насчет тучи грязи и пыли волноваться не стоит, их много не будет если использовать шлифовальные машинки. Ведь снимать нужно лишь небольшой слой краски. Шкурку выбирайте относительно мелкую. Старайтесь работать очень аккуратно, чтобы не добраться до слоя шпаклевки.
После завершения ошкуривания, поверхность необходимо протереть влажной тканью и осмотреть её при хорошем дневном свете. Если потолок выглядит однородным и гладким, то можно приступать к грунтованию. Если же нет, то лучше использовать финишную шпаклевку, нанеся ее тонким слоем. Как только он высохнет, снова слегка шлифуем.
На следующем этапе выполняется грунтование. Немаловажно приобрести под покраску качественную грунтовку. И грунтовать лучше не один раз, а несколько (минимум два). После каждого раза необходимо ждать полного высыхания поверхности. Только после того, как потолок приобретет идеальный вид, то есть станет ровным и гладким, как зеркало, можно приступать к работе.
Не забудьте: Если основа имеет пятна, разводы и неровности, то все эти «артефакты» будут заметны и после завершения работы! Поэтому перед тем как начать, убедитесь в том, что ваше основание полностью готово. В случае возникновения сомнений прогрунтуйте повторно
Вак справиться с пятнами на потолке из-за старых протечек
Эти участки нуждаются в специальной обработке. Вначале их необходимо тщательно зачистить и помыть, а затем дождаться полного высыхания. После подвергнуть обработке биоцидным раствором. Используйте, к примеру, Fongimur. Средство не смывать ни в коем случае! Сразу же после этого используйте универсальную блокирующую грунтовку. Она поможет блокировать просвечивание пятен сквозь шпаклевку и краску.
Советы о том как правильно покрасить потолок без разводов
Добиться оптимального освещения. Лучший результат получится при дневном. Тогда все «непрокрасы» будут заметнее.
- Для хорошей покраски без наличия разводов необходимо постараться обеспечить нормальную либо высокую влажность. Как показывает практика, покрасить потолок валиком без разводов летом значительно легче, нежели в зимний период года. В теплое время уровень влажности намного ниже. Благодаря этому краска сохнет быстрее, что не дает хорошо раскатать ее по всей площади.
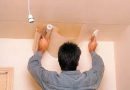
- Хорошая подготовка обязательна. Прибрать все с пола, чтобы не «продираться» сквозь завалы. Лишние препятствия отнимут время, а ведь красить нужно быстро. Поэтому профессионалы, знающие как правильно наносить краску на потолок отдают предпочтение валику с длинной ручкой, чтобы не использовать стремянку.
- Чтобы не допустить на потолке появление разводов, работать нужно энергично и быстро!
- Краску необходимо разводить чистой водой из крана пока не будет достигнута очень жидкая консистенция.
- Не нужно стараться интенсивно отжимать валик. Ребристая поверхность в кювете служит не для отжимания, а чтобы равномерно распределить краску по шубке. Валик должен быть постоянно насыщен, поэтому макать его нужно чем почаще.
- Начав покраску потолка, не стоит нажимать на валик с силой. Необходимо его катать, а не вдавливать и не тереть им. Это позволит покрасить потолок валиком без разводов.
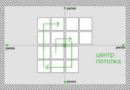
- Краску необходимо наносить квадратами, а не полосами. Особенно в том случае, когда площадь помещения большая. Работать нужно зигзагообразными движениями для равномерного распределения краски по сектору. Также не следует надолго останавливаться в одном квадрате. Все же, сделав несколько движений, остановитесь. Убедившись, что обработана вся поверхность окрашенного участка, двигайтесь дальше, к другому квадрату. Границы квадратов нужно раскатывать, пока они влажные. Работа обязана быть непрерывной и динамичной!
- Нанеся первый слой краски, тщательно осмотрите потолок при хорошем освещении. Если остались непрокрашенные места, то нужно быстренько, пока поверхность мокрая, прокатать их. После того как потолок высохнет, нужно обязательно проверить результат повторно. Если краска плохо легла, то можно сделать вторую попытку. Однако, если опять будут проблемы, то придется начинать все с самого начала, то есть шлифовать и несколько раз грунтовать.
Важно знать что любое подкрашивание после высыхания образует новые пятна
К сведению:
- При использовании полуглянцевых или глянцевых красок результат может оказаться непредвиденным. Матовая более предпочтительней и не остаются явно видимые разводы.
- На белоснежном потолке, в отличие от бежевого либо кремового, более заметны любые огрехи. Поэтому, если не уверены в своих способностях, то добавьте в краску немного колера.
- Запомните, что чем больше площадь поверхности, тем более высока вероятность получения сомнительного результата. Поэтому не стоит удивляться, когда в небольшой спальне потолок вышел как нарисованный, а в большой гостиной на него не взглянешь без слёз.
- Немаловажно также качество краски. Вы можете сэкономить, приобретая краску для стен, но на потолок покупайте лучшее! Он намного более привередлив.
Не стремитесь к идеалу. Окрашенные поверхности практически никогда не безупречны. Главное, чтобы при ярком освещении пятна, полосы, разводы и подтеки не кидались в глаза. Добиться идеала можно только если использовать всевозможные распылители.