- Характеристика парящего потолка
- Требуемые материалы для создания потолка со световыми линиями
- Светильники для парящего потолка
- Эскиз создания потолка со световой линией
- Подготовка имеет значение
- Черчение на черновом потолке
- Монтаж гипсокартонного парящего потолка со световыми линиями
- Крепление профилей для металлического каркас парящего потолка
- Обшивка металлической основы гипсокартонными листами
- Оформление ниши для световой линии по периметру созданного потолка своими руками
- Фиксация светодиодной ленты и установка стекла
- Установка светодиодной ленты и отделка потолка
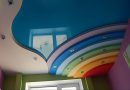
Делая ремонт в собственном доме, часто дело касается потолка, потому как он создает общую картину всего интерьера квартиры. Делает акцент на общем дизайне или скрывает недостатки. Парящий потолок со световыми полосами всегда делает помещение привлекательным, светлым, просторным. Создавая «парящий» потолок над головой следует ознакомиться с техникой монтажа, а также выбрать подсветку, которая и создаёт «эффект парения».
Характеристика парящего потолка
В парящем потолке с линиями есть один важный фактор – подбор правильной подсветки. Именно правильный монтаж каркасной основы, а также подсветка делают потолок красивым и ухоженным.

Для воспроизводства парящих линий на потолке не нужно больших вложений. Он создаётся своими руками, следует быть аккуратным и точным в расчётах.

Выделяется 3 вида парящих потолков:
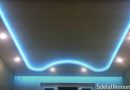
- Одноуровневый – ниша для подсветки монтируется на черновом основании. Светодиодная полоса для потолка монтируется по периметру плоскости.

Одноуровневый потолок с подсветкой по периметру - Двухуровневый – первый ярус зашивается гипсокартоном. На этом ярусе создается короб для скрытой подсветки.

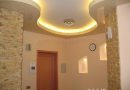
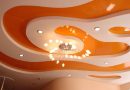
Двухуровневый гипсокартонный парящий потолок - Многоуровневый – третьим и четвертым уровнем служат криволинейные конструкции, а также круги, квадраты.

Многоуровневый потолок из гипсокартона
Отличительные черты потолка с парящими линиями:
- Визуально увеличивает комнату;
- При желании углы поверхности округляются;
- Быстрота и простота производства.
- Стоимость материалов сравнительно невысока.
- Светодиодные полосы монтируются в потолок легко и быстро.

Недостатками является сокращение высоты комнаты, а также нелепость данного потолка в малом помещении. Варианты парящих линий на потолке можно увидеть в прилагаемом фото.


Требуемые материалы для создания потолка со световыми линиями
- Гипсокартон потолочный 9.5 мм.
- Профили: ПНП, ПП, алюминиевый для светодиодной ленты.
- Подвесы для крепления потолочного профиля.
- Дюбель-гвозди и анкер-клинья 6*40,6*60.
- Шурупы для крепления профилей, подвесов 11 мм, для гипсокартона 3.5*25 мм.
- Электрические провода для проводки.
- Для световой полосы в потолок: LED-лента, оргстекло, пластиковые уголки (самые маленькие).
- Клей ПВА.
- Грунтовочные смеси.
- Шпаклевочные материалы для армирования швов, лента-серпянка.
- Финишная шпаклевка.


Материалы приобретаются из расчета на 10 % больше.
Светильники для парящего потолка
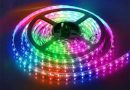
Чтобы сделать эффект «парения» со световой полосой в потолке следует правильно подобрать осветительные приборы. Используются лампы дневного света, устанавливаемые в скрытой подсветке. Лучше использовать светодиодную ленту, выбор которой велик по цветовой гамме и по количеству диодов на 1 кв.м.


Сейчас дизайнеры предлагают готовые решения, использовать короба под светодиодную ленту, закрытую оргстеклом. Делается это просто. Для установки светодиодных полос в потолок существует 2 метода: самодельные конструкции и с использованием готовых встраиваемых коробов.

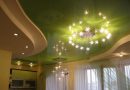
В центре потолка обычно вешается люстра как основное освещение. Только в одноуровневом потолке люстра не должна быть громоздкой. Большие красивые люстры вешаются в высоких комнатах с многоуровневыми конструкциями. Но, в основном, при создании «парения» осветительные приборы в центре комнаты отсутствуют.
Эскиз создания потолка со световой линией
Первое, что нужно сделать – начертить эскиз потолка. Следует точно знать, сколько будет уровней, какая будет применяться подсветка? Выбрав световые полосы на потолок, получится один или 2 уровня. Если предусмотрен второй уровень, тогда он будет на порядок меньше первого, допустим, парящий квадрат в центре.
Для одноуровневого потолка на бумаге чертится эскиз под металлический каркас. Но, с нишей для подсветки. На создаваемом чертеже отмечаются все размеры, точки пересечения профилей, а также места крепежей. В обязательном порядке чертятся листы гипсокартона. Стыки листов имеют большое значение, поскольку в этом месте должна быть поперечная планка из профиля. Все размеры указываются в единице измерения – миллиметры.

Внимание. Указав единицу – сантиметры, можно сбиться в расчетах, что грозит неправильным монтажом металлического каркаса.
Отдельно, составляется план-схема для электропроводки. Заранее уточняются места вывода проводов для подсоединения светодиодной ленты, розеток, выключателей. А также указывается подсоединение проводки к распределительной коробке.

Подготовка имеет значение
Проведенная работа перед монтажом металлического каркаса будет указывать на прочность всей конструкции. Подготовительные работы включают в себя следующие процессы:
- Помещение, где создаётся парящий потолок со световыми линиями из гипсокартона, освобождается от предметов, мешающих работе (мебель, шторы, люстры).
- В случае обнаружения трещин, требуется провести армирование и шпаклевание.
- Вся поверхность потолка покрывается грунтовкой.

Не заделанные трещины на потолке в дальнейшем могут негативно отразиться на гипсокартонной конструкции. Если потолок не покрывается грунтовкой, а дом (квартира на последнем этаже) холодная, возникнет грибок, что так же отрицательно скажется на подвесной гипсокартонной конструкции.
Черчение на черновом потолке
Для занятия по черчению линий для металлических профилей понадобятся инструменты:
- Лазерный уровень. Обычный строительный так же нужен, но построение ровных линий на потолке будет затруднительным.
- Карандаш или цветной мелок. Хорошо, если есть отбивочный шнур. С его помощью легче всего оставлять на плоскости стен и потолка ровные линии для каркаса.
- Метр или рулетка.

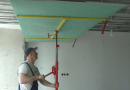
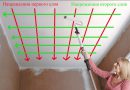
Изначально, в комнате нужно измерить высоту всех углов. При нахождении самой низкой точки делается отметка. От чернового потолка производится отступ вниз на 8 см минимум. В этом же углу на потолке отмечается такая же точка с отступом 8 см. Что это значит? По этим точкам через всё помещение по периметру проводятся линии. Создается разметка для ниши под парящие линии. Чем шире ниша – тем больше линия. Здесь вступает в силу правило – размера комнаты. В помещении малой квадратуры на потолке широкие световые полосы неактуальны.

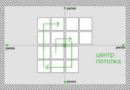
На потолке с шагом 60 см проводятся полосы для потолочного профиля. На данных полосах выставляются точки крепления подвесов – через каждых 50 см. перпендикулярно линиям на потолке отмечаются места крепления поперечных для крепления гипсокартона. Они имеют такой же шаг – 60 см. Должны получиться ячейки 60х60.
Разметка для парящего потолка из гипсокартона готова.
Монтаж гипсокартонного парящего потолка со световыми линиями
Создание парящего потолка со световыми линиями требует внимательности, времени для проверки точности выполнения работы. Вся работа разделена на этапы формирования потолочной конструкции. Первым выступает производство металлического каркаса. Его особенности: правильный выбор крепежей, проверка точности создаваемой плоскости, прочность, жесткость.

Вторым этапом является обшивка гипсокартоном. Здесь есть правила, упущение которых приведет к скорой деформации и трещинам на потолке. Третий этап – установка парящих линий в потолок. Эффект парящего потолка зависит от правильно подобранной подсветки, а также точность её установки.

Четвертым этапом является армирование стыков, грунтование, шпаклевание. На данном этапе главным выступает качество материала и правильность выполняемой работы.

Финишный, завершающий весь процесс этап – отделка потолка. Это может быть покраска, оклейка однотонными обоями, декоративная отделка.

Крепление профилей для металлического каркас парящего потолка
Металлический каркас является основой для парящего потока. Правильность его выполнения отражается на всем потолке со светодиодными полосами. При создании каркасной основы учитываются такие факторы, как: усадка нового здания, возраст дома (особенно старые частные дома), процент влажности, температурный режим. Если парящий потолок со светодиодной полосой создается в теплой квартире, а многоквартирный дом устойчивый, тогда поперечные в каркасе устанавливаются только в местах стыков ГКЛ. Но, если же здание неустойчивое и подвержено многим внешним факторам, то каркасная основа должна быть капитальной, прочной. Для усиления поперечные устанавливаются с определённым шагом.
Итак, создание металлической обрешетки начинается с установки направляющих профилей. Обозначения: ПНП – потолочный направляющий профиль или UD – европейская маркировка.

Потолочный профиль крепится дюбель-гвоздями 6/40 к потолку по крайней линии. Шаг крепления таков: от края отступить 15 см. после каждые 25 см. последний дюбель фиксируется также от края профиля на 15 см. ПНП крепится по всему четырехугольнику на потолке.
Далее потребуются вырезанные кусочки из потолочного профиля ПП (он же CD). Длина такого отрезка равна расстоянию начерченной линии от потолка по стене (100 мм). Стойки крепятся маленькими саморезами к направляющему профилю на потолке. Шаг крепления стоек – 30 см. Они создают жесткость, прочность конструкции.
К стойкам фиксируется еще один направляющий профиль в который будут вставляться потолочные профили. По всему потолку по отмеченным точкам на анкер-клины крепятся прямые подвесы. Крепежи вставляются в «ушки» подвесов и забиваются молотком. Для соблюдения ровности и формирования единой плоскости через всю поверхность натягивается нить. Ориентируясь по этой нити, а также при помощи уровня вставляются в направляющие и крепятся к подвесам потолочные профили.


Перемычки создаются из ПП. Они прикрепляются к потолочному профилю крабами. Для жесткости крабы крепятся не только застежками, но и саморезами.

По окончанию вся металлическая обрешетка проверяется на жесткость, прочность и ровность. Это является важным пунктом, потому как неровный и хлипкий каркас не создаст парящей конструкции.

Внимание. Проведение проводов среди металлических профилей происходит только в гофрированном рукаве, иначе при соприкосновении провода под напряжением с металлом произойдет замыкание. В месте подсоединения осветительного прибора к электропроводке нити кабелей выставляются на 20 см и изолируются.
Обшивка металлической основы гипсокартонными листами
Для начала следует из гипсокартона вырезать высоту потолочной конструкции. Данные отрезки крепятся к внешней стороне металлической обрешетки. Для этого применимы саморезы размером 3.5*25 мм.

После фиксации вертикальных отрезков ГКЛ обшивается весь потолок гипсокартонными листами. Здесь следует ознакомиться с правилами:
- Гипсокартонный лист фиксируется только на профиль. Не должно быть провисающих углов.
- Фиксация самореза проводится с шагом 15 см и от края листа 1 см.
- Стыки гипсокартонного листа не должны совпадать по горизонтали. Шахматный порядок обшивки создает прочность всей конструкции.
- Шляпка самореза не должна торчать над поверхностью, но и слишком глубоко также шуруп вкручивать не следует, поскольку это повредит поверхность листа.
При обшивке гипсокартонном металлической обрешетки следует еще раз проверить поверхность при помощи уровня, правила. Не должно быть перепадов в месте стыка ГК-листов.
Оформление ниши для световой линии по периметру созданного потолка своими руками
Поскольку потолок одноуровневый, ниша получается из чернового основания потолка и стены. Светодиодные полосы для потолка создаются в данном методе без профиля-держателя, который производится специально для данного освещения. Потребуется профиль для светодиодной ленты, пластиковые уголки минимального размера, оргстекло.

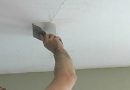
Для выравнивания поверхности ниши, следует всю внутренность покрыть грунтовочной смесью, а после высыхания нанести ровный слой шпаклевки и оставить сохнуть. Сухая поверхность обрабатывается наждачной бумагой.
По мнению мастеров, в нише следует уложить изоляционный материал. Это может быть фольга или же иной фольгированный материал. Крепится он при помощи ПВА. Это создается для отражения света и изоляции.
По центру ниши, к потолку крепится профиль для LED-ленты. Поскольку лента греется, то профиль, по мнению специалистов, следует крепить не до самого конца ниши. Оставляется 3-5 мм. Выбор светодиодной ленты индивидуален. Видов диодной полосы много: различного количества диодов на 1 метр, цвет, производитель.

Фиксация светодиодной ленты и установка стекла
В потолке с парящими линиями светодиодная лента для правильной работы подключается к диммеру. Это следует учитывать при подготовке к монтированию ленты. Светодиоды помещены на особое полотно, с обратной стороны имеющее липкий слой. Этим слоем следует закрепить ленту на профиле. Для подсоединения к диммеру, контроллеру, а также для подключения ленты нужно ознакомиться с правилами установки и эксплуатации.

После подсоединения осветительного элемента, включается напряжение в сети и проверяется правильность установки.
Следующим этапом идет фиксация оргстекла. Для этого нужно действовать по плану:
- Приобретается пластиковый уголок минимальных размеров 20х10, клей, маленькие саморезы с потайной головкой.
- С уголка срезаются боковые части таким образом, чтобы получились полоски. Данные пластиковые полосы фиксируются с внутренних сторон ниши таким образом, чтобы края совпадали с внешними уголками. Для надежной фиксации применяются распорки.
- К приклеенным полосам фиксируются саморезами пластиковые уголки, смотрящие внутрь. Шляпки саморезов «утопляются» – после того, как будет сделано отверстие саморезом, на этом месте пустой битой нужно сделать 2-3 витка. Получится углубление для шляпки. Полочки, на которых будет держаться оргстекло готовы.

Возможный вариант устройства потолочной ниши на ПВХ уголках. В дальнейшем в проем вставляется матовое оргстекло.
Конструкция получается разборная. Если требуется ремонт или установка дополнительной подсветки световых полос, тогда одна сторона поднимается, заводится стекло и прикручивается обратно.

Зазоры, оставшиеся внизу на стыке пластика и гипсокартона, заделываются шпатлевкой или акриловым герметиком.
Установка светодиодной ленты и отделка потолка
Светодиодная лента клеится на установленный в нише профиль. После чего подсоединяется к электропроводке, диммеру, согласно схеме установки ленты.
Внимание. Не следует ленту клеить до самого конца ниши. Поскольку она нагревается, идет расширение. По концам ниши оставляется зазор хотяб в 5 мм.
Когда LED-лента будет установлена, её следует проверить на правильность подключения. Для этого используется выключатель, а также пульт управления.
Вся поверхность гипсокартонного потолка покрывается грунтовкой. В местах стыков ГКЛ грунтовочная смесь накладывается кисточкой. Все швы покрываются армированной лентой и шпаклевкой «Кнауф Фуген». Этой же смесью закрываются все места крепежей.
Далее потолок отделывается в зависимости от задуманного дизайна – краска, обои, декоративные покрытия.
Световые полосы в потолке — это дизайнерская задумка необычного потолочного освещения, которая делает всё помещение светлым, ухоженным, необычным.