You want to cut and paste on a plinth ceiling correctly, but do not know how to do it? At first glance it does not seem difficult, but if we consider the more details, it's not so easy. In the photo below, It shows how to cut and paste the inner and outer angle ceiling skirtings (fillets) Styrofoam or polyurethane. All instruction is painted in stages in an understandable way, with examples.
Ceiling moldings usually do, when it is necessary to close the gaps between the ceiling and the wall decoration materials. for example, Did you decide pokleit wallpaper, and the farther the wall, the bigger and wider the gap between the ceiling and wallpaper. I know one person, to which there was such a situation, He did not listen to experienced people and in the end result was the, What he least wanted. And he had to run to the nearest store and buy a fillet.
How to glue the ceiling moldings
so, let's start. To begin, measure the perimeter of the room footage and determine how much you need fillets. The length is usually on standard 2 m. But it's best to buy a stock, just in case. Also define the width of the, which is right for you. They can be glued to the wall in various ways.
Before you install the ceiling moldings need to prepare the ceiling or wall - checked their evenness. If defects, then align and proshpaklevat, with primer binding surface. If there are small bumps, for the occasion, You can use the fillet with soft edges, which will not generate much noticeable differences.

The first method: a special putty or acrylic (to gluing oboev). And second: once at the wallpaper on the sealant.
Most prefer to mount directly on the wallpaper. We recommend as an alternative to silicone sealant adhesive it is perfect for this raboty.Proizvoditel does not play much importance. Everything will be fine to stay. But this way, even for those, whose curved walls, because between the wall and fillets can be formed cracks, they will need to gloss over the same sealant. It is white, therefore, it will be more or less normal.
It is desirable to align walls. Expert's Advice to glue on plaster ceiling moldings, ie before pasting wallpaper. Thus cracks are sealed by a filler. And accordingly customize the wallpaper to itself fillets. This option will suit more experienced.
Basically masters prefer to glue the foam moldings on the white acrylic sealant can easily be applied, it keeps well and dries quickly. Its main feature it is possible to plug the gap,corners and it is well painted. acrylic sealant cost within 100 rub. and there is not much point in buying an expensive .
In general, everyone decides for himself which way he used.
How to make the installation
To begin with the corner of the room. And it is here, and could be in trouble. At first sight, It seems to do just the angle of ceiling moldings, believe me it is not so. You can buy ready-made corners in the shop, they are sold with the fillets. If you can not find, then you will have to cut corners.
Cut need with the help of such tools: Stus, hacksaw, a sharp knife. Insert a piece of material in a miter box at an angle 45 degrees and press tightly. Now it remains at the desired angle and with the right side cut Ceiling Molding.
Do not rush to glue cornices along the straight sections. First be engaged angles - in this case, You can trim them if necessary, or sanded to obtain a good joint.
Now let's look in more detail, how to make the installation of ceiling moldings with photo examples.
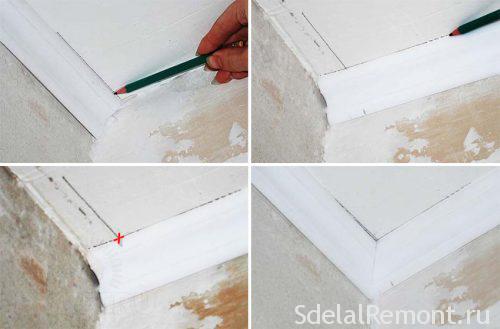
How to cut the fillet angle ceiling with inner and outer photos
Thus cut plinth, if you want to get an external angle.


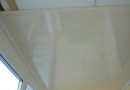
The result obtained here are the fillet edge.


Then, the internal angle. Pay attention, but that, what angle and what side Miter need to cut ceiling moldings.
Council: When cutting any of these materials, you should use a hacksaw with a fine tooth. Otherwise, it may get uneven end parts. Large tool tooth material will have a snack.


That's what happened in the end, after cutting and pasting on the wall ...


Site renovated apartment with his hands advises to start to practice on pieces, if it all works out, go ahead for the cause, cut internal and external corners.

If you did everything correctly, cut the first angle happened. You can glue the two angled plinth to the wall. If you have chosen to, glue on wallpaper, promazhte the fillet adhesive and attach tightly to the wall. Remains soft cloth, you can remove the glue. Also, the adhesive seal the gap between the wall.
 If you have chosen to be fixed to the ceiling moldings Wallpapering, they need to be fixed with the help of putty. Plaster put on the fillet with a spatula. And attach tightly to the wall. Remove the remains of a spatula or a wet cloth. The slots also can gloss over putty.
Tips to facilitate the installation of overhead dumbbell:
- To properly perform measurements, plank measured between the two corners. Thus for the length of the interior angles measured from the internal elements, and the distance from the outer corners of the measured point, which is spaced a distance from the inner, equal to the width of the plinth deep space.
- When installing the foam skirting boards at the junction between the wall and stretch ceiling, Adhesive is applied to part of the plinth, comes into contact with the wall, and not with the web.
- Final fixing plinth carried out after adjusting the angle thereto adjacent strips.
- In the presence of the wall, ceiling and floor of a right angle, strips easier to adjust the bottom, expanding the parts on the floor or on a table prepared.
- small cracks, remaining at the corners, shpaklyuyutsya.
- Particular attention should be paid to the installation of ceiling plinths of wood rare breeds. In this case, gap filler expected result, It is not likely to give. Against the background of the texture will be the bright spot.
Well, ready inner and outer corner? So the installation of fillets you doing right. Now take the next bar, and in the same way to mount on a wall pasted plinth and do not forget to lubricate the joint angle. When proceeding to the next corner, then carefully measure out the distance, which remained, and cut the missing part, everything has to be very accurate. Will remain unchanged side, which is joint to joint with skirting. So cut out every angle. When everything is glued, they could be under the paint ceiling color. Good luck gentlemen and remember, that need to be cut after determining the exact size.
Masking the joints and painting
If after gluing ceiling moldings between the bars were small gaps, this is absolutely not scary, because they can be easily removed by rubbing the white sealant. If you are not whitewashed and painted ceiling, then the best option will be the following.
Light filler have to go through all the glued strips, promazyvaya them as a coloring composition, and after drying, remove the excess using fine sandpaper or a special grinding sponges for work on plaster. After this the final trim and ceiling moldings become a single entity, and you in turn will not find any gap.
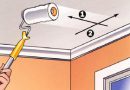
After that, you glued ceiling moldings and eliminated all the shortcomings, you can begin painting baseboards. The coloring process is considered optional plinth, but if you want to give your finished ceiling and more attractive, it is necessary plinth still paint.
way of, guess
Simple "collective farm" option - cut "by eye" at 45 °. For this piece is taken Abutting, which is adjusted to the previous angle upon.
One can try to design weight, the case is quite long and painstaking. We need maximum accuracy!
When fitting constantly try on conjugation obtained in situ. Only after several fittings possible to achieve a good result, and then glue on the base plinth. In short, without experience can not do:)
video tips, help you stick ceiling moldings