- Options lighthouses under screed
- wooden slats
- Metal plaster profiles
- Metal profiles for plasterboard UD 27
- Steel tubes
- The walls of the solution
- Gorki solution
- U-shaped profile
- Benchmarks adjustable for leveling floors
- Screws in the role of lighthouse
- The use of adjustable fixtures by type <<Umka>> and similar systems
Before performing the installation of the floor covering, are aligned subfloor. It must be deduced to pour strictly horizontal level. To this end, wet performed (Cement-sand) or dry screed. The final finish is perfectly smooth. To chart the future of the landmark level floor, to which should be poured floor, installs lighthouse screed.
Options lighthouses under screed
Special elements displayed and indicates the level of the floor of the future. They are mounted on the same horizontal level equidistant (between themselves) in one room. This simplifies the tie.
In various instances, the various types of beacons. there Pinion, that are structurally robust design linear, used in the regeneration of the wet (concrete, cement-sand) screed. on, how to correctly set the beacons to tie, It depends on the quality of, appearance, the duration of operation of the final coating. dry (expanded) screed is also performed on the rack elements (their top). For the construction of self-leveling floors are established benchmarks (Tripod).
wooden slats
Fill the floor with wooden lighthouses today made very rarely, and dry screed on them is performed often. This method is hardly used now. Rails are wooden bars (thickness of 30 mm), before use necessarily thoroughly soaked in water. After completion of such beacons are pulled out from a solution of set, and the resulting voids are laid fresh mix. The level is maintained by the laid screed. To correctly set the beacons, their height adjustable wooden wedges, pads, screws.
Metal plaster profiles
Today it is the most common method of arrangement is not very high screed. Along the line of future placement guides on the floor curled screws, screwing and unscrewing that exposes the height profiles.
To control the horizontal stretches between the screwed thread screws, cord or fishing line. Output zero level of future sex, are laid around thread hillocks solution. The mixture hardens quickly, sometimes it is poured alabaster. Just sand-cement mounds of dry 2-3 day (composition with additives is grasped within 3-4 hours). Quite often performed the role of lighthouses perform plastering profiles.
Experts recommend to fix the profiles with the same mixture, which runs the entire screed (without additives, alabaster quickly destroyed). It is considerably more reliable, but often for mounting rails special plaster formulations used.
In such bumps stacked profiles and are pressed into the mixture until the desired level. Plastering profiles are easily deformed. Therefore, the alignment must be carefully lighthouses ties. With the use of such guides may be performed to tie layer 2-3 cm. thick layer (6-10 cm) lay out will not succeed (solution under pressure profile vygnetsya).
Metal profiles for plasterboard UD 27
Profiles U-shaped plasterboard, also apply, to expose beacons. First, in the base of twist screws (followed in step 40-50 cm). Their size is chosen, to the inside wall plugs included at least half. Screws at the walls are exposed to the zero level of the future sex (adjustment is made by screwing or unscrewing). To make it convenient to set up guide, thread stretched between walls, cord or wire.
U-shaped profiles are arranged on top of the base upwards screws. According stretched yarn twist remaining screws, the guide to put in zero future floor. Rule verified correctness horizontal, and a correct positioning between the profiles.
Similarly, the installation may be beacons:
- on the bars of wood;
- bricks;
- solution of hillocks.
then there, wherein screws located, solution is enclosed by the guide.
After curing mixture:
- verified correctness horizontal;
- Beacons are embedded solution removed.
When the mixture was completely dry, round profiles performed screed.
Steel tubes
To equip the floor, where it is necessary to equip powerful concrete screed, Pipe sections are used for various. Pipes can be applied round, rectangular, they are sturdy and do not deform. The spacious rooms of this type is more convenient to make lighthouses floor:
exhibited zero future floor;
pull cords, thread or fishing line, it should be guided in the performance of the screed;
decomposed solution mounds;
they are set and slightly pressed into the tube;
regulation and shall be verified horizontal level, correct placement of the guides between a;
future floor height is adjustable indentation, or podkladyvaniem solution there, where the mixture is not enough.
Simply put beacons to tie with square tubes.
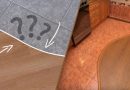
The walls of the solution
At first 2 screws twisted in the base. They are connected with wire (fishing line), which is wound a few times. Future rail obkladyvaetsya mixture, to form a low stenochku, on top of which is held rule. The wall is aligned to the level of the floor of the future, and the guide is obtained from the solution. The horizontal surface (top wall) a beacon. Rule movement is performed perpendicular to the wire, of the screw head. When beacons dry, you can end the execution of the screed.
Gorki solution
Everything for semi-dry screeds set beacons on the floor of the convenient solution heaps (cement-sand). In the corners of stacked mounds mixture, displayed below the zero level of the floor. It is imperative to maintain a distance between the knobs is not longer than the selected rule. a handful of dry, and in the free space is laid solution. The bumps used in the role of guides, which typically moves, when the mixture is leveled. This is a good way to resettlement thick, high screeds (6-9 cm).
U-shaped profile
When there is no special rails, Wizard used U-shaped profile (the regeneration of the filling screed) It is used for leveling and controlling the amount of expanded clay. The walls of the guide up 27 mm (when the height of the screed 30 mm). Lighthouses left in the filling material. Used and ceiling profile (60h27 mm), which is located up edges. The space between the edges, and the space around the guide is filled with material. To razravnyat keramzit, usually put on beacons and stretches himself, so the excess material is removed.
Correctly set the beacons under the floor screed is a very important stage of preparing the base for final finishing. On this depends the quality and appearance of the floor covering. Controversial is the need to choose a guide from the wet screed (or they can be left inside). For the removal of the argument put forward, that of the metal profile through time rusts, and tie breaks. You can always acquire aluminum rails, which specifically razrabonany :)
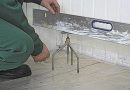
Benchmarks adjustable for leveling floors
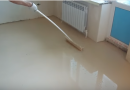
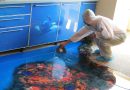
Repery-Tripod (Benchmarks or point beacons for self-leveling floor) set before, how to pour the floor. Self-leveling floor alone spreads over the ground and forms a horizontal line. benchmarks used, to control its height. A frame is a tripod, comprising a rod therein. It moves up and down, as indicated by the zero level. The frames are professional tools. On the premises is required several such tripods:
first, the surface is primed;
benchmarks are set on the floor after 5-6 hours (with respect to the distance 1 m);
levelness ties regulated by the central rod (using hats).
Screws in the role of lighthouse
When the equipment self-leveling floor in the role of lighthouses can act screws. They are twisted in the foundation, and then they can be easily removed. They are used instead of a professional frame. Screws connect cord, twine, which should focus on the regeneration of the self-leveling floor solution. Upon completion of works, until complete solidification of the mixture can be turned out screws.
The use of adjustable fixtures by type <<Umka>> and similar systems