- What we expect from the ceiling plasterboard?
- What to consider when drawing up the plan of each level
- Two ways to collect the two levels of the ceiling frame. Which to choose?
- We are putting the future framework ceiling. Tools and materials
- installation of drywall: easy and difficult at the same time
- Spotlights and neon - select how the backlight
To date, the Internet inundated with articles and videos on the topic: "How to make a two-level ceiling of plasterboard with lighting". Naturally, uninvited expensive designers, teams and just master craftsmen. As "separate the wheat from the chaff", how to find plasterboard work and a good plan, and practical, and gives at least some guarantee?
What we expect from the ceiling plasterboard?
Which is primarily expected from the frame ceiling? Reliability and a long service life without shifts and deformations. Then there will be cracks in the ceiling of GCR and not have to deal with their unplanned correction. The more sites there repair, the more "neponyatok" can be found. Let us only a fraction of nonsense about the "correct" installation ceiling of GCR, taking for example a photo with the caption beneath it:
«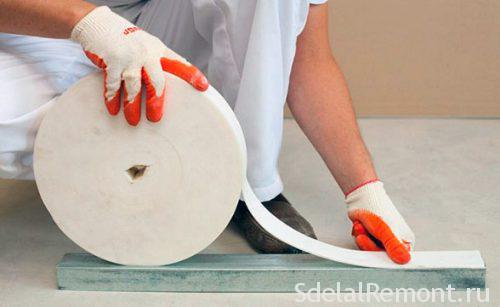
Sealing tape - a porous material with a self-adhesive base, width 30 mm. It is used for the support structure, to frame ceiling gypsum board tight against the concrete and less transfer sound.
First of all, frame for the ceiling of plasterboard is never going out guide ceiling profile (PNP). The only exception is the use of it in a curvilinear structures, and it is only the know-how of Russian craftsmen. The photo also shows a guide profile is 28h27 mm, since the width of the sealing strip 30 mm closes it completely.
Secondly, plasterboard It is called false - its framework must not adhere to the concrete! By the concrete adjacent straight hangers, but nobody will confuse with the segment profile, as in the photo. Here are just a few people glues these suspensions damping tape. And in vain ...
If the author was referring to the wall, to which are attached the ceiling guide profiles, then this is not the frame, and a frame for frame. And the walls are normal people rarely make concrete.
Can, of course, challenge above. But for people not only making, but thinking, there is reason to check the information, which is found on the Internet. But the correct use of sealing tape to your ceiling will only benefit.
The conclusion is simple: if you want a beautiful and durable two-level ceiling of plasterboard backlit, do it yourself. Explore photos and videos, Read more about this site, make a rough plan of action. Then take a look at it from the height of his experience, think for strength and capabilities. And go buy materials and components. find out, embodiments of beautiful ceiling illumination LED ribbon.
What to consider when drawing up the plan of each level
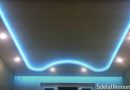
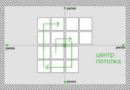
On what should be a start in the construction scheme of the ceiling levels? clear, that the more complex the lines of the second level, the more difficult to calculate the amount of material. Because costs to begin to consider, how to make a two-level ceiling of plasterboard with lighting on the perimeter of the entire room. Such an option - not the most refined, But with the right chosen lighting and illumination will be a source of pride for years. At the same time it is worth thinking about the lighting niche for fixing cornices. In the photo below - box around the room with spotlights second level, neon transition between the levels and the central ceiling lighting (the picture is not seen)
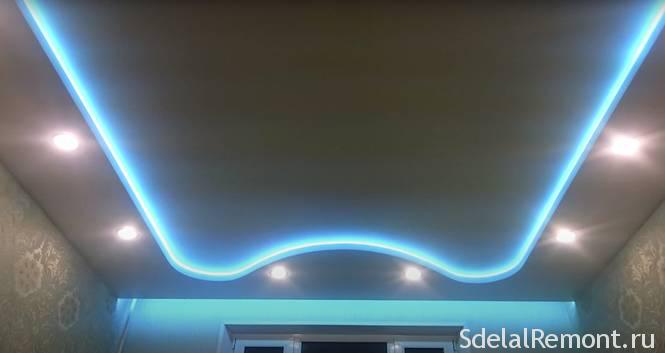
Based on this photo, you can plan all operations, knowing only about the size of the room:
- The width of the first level, very close to the ceiling, should schedule multiple digit 1,2. This is the standard width of gypsum sheet, and it makes little sense to mold the edge of the small insert. It is better to put 2-3 a number of entire sheets GCR.
- The remaining distance to the walls is divided by 2 and get the size of the second ceiling level. If the height of the old ceiling is not exceeded 2,5 m, box of the second level is necessary to make longer, that there was no "crushing" effect.
- Place in the niche at the window schedule so, to be able to work in it screwdriver. by the way, screw also has a length, though small.
- The height of the second level is necessary to make such a, that in the niche for the backlight hand held. It is unlikely that the source of the scattered light will last forever.
- A place, which will be attached a central chandelier, additional inserts reinforce and direct suspensions.
- To avoid confusion in the lines and dimensions, schemes better draw for each level, and separately for lighting.
- Finally, each circuit layer of plasterboard ceiling with lighting on the perimeter should be drawn after, as a way of mounting frame is selected. This - below.
Two ways to collect the two levels of the ceiling frame. Which to choose?
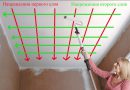
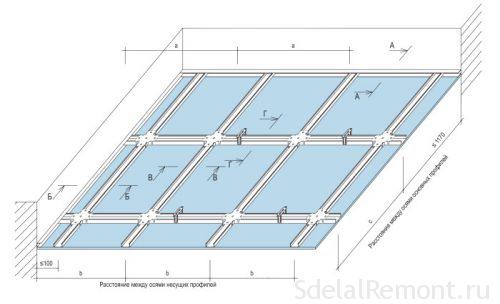
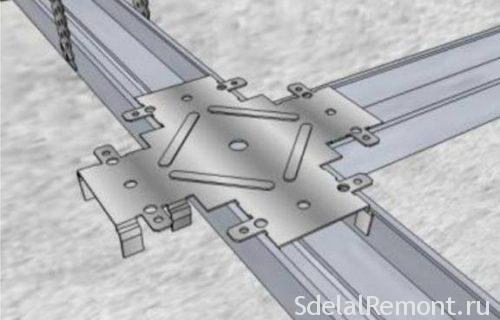
Frame for ceiling - is of metal sheets assembled cell structure. For the convenience of the old ceiling rascherchivaetsya in the 60x50 cm size rectangles. Along these lines must pass Centers ceiling profile - longitudinal and transverse. The first bearing is secured to the ceiling and using direct hangers. The second represents the segments, connecting the longitudinal profile at an angle of 90 °. To secure the intersections of the longitudinal and transverse ceiling profiles developed a special single-level connector - crab.
The result is a frame for single-level ceiling. In our case, this will have the carcass structure first level.
The basis of the ceiling of plasterboard with a two-level backlight can be collected in two ways. The first is good for beginners and inexperienced: each layer of the ceiling is collected separately - highest first, the first; then a lower, second. This method is used, when the box is on the ceiling of plasterboard with backlight has radii and waves. But the niche under the curtain does not deliver a lot of problems.
In the case of the ceiling in the photo have to use another method. First mounted second level, including the curved portion of the carcass, and then sewn up the middle profiles. It's time to be taken for the preparation of schemes and render the required amount of materials.
We are putting the future framework ceiling. Tools and materials
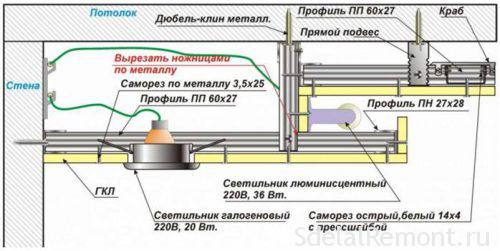
The chart below clearly seen the whole construction of the ceiling of the future. It remains to consider a phased installation.
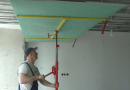
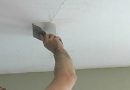
Installation of the two-level ceiling of plasterboard with lighting need to start from the second level. Along the perimeter of the walls repel the future border of the second layer, departing from the ceiling of the old boundaries no less 15 cm (5 see for 1st layer, 5 see for illuminating the screen and niches 5 cm space above the screen to form a luminous flux and for the replacement of burnt illumination elements). For this purpose usually use laser level and paint coloring cord (otbivku). At all laser level - universal device and its you need to use at all stages of the control horizon and vertically. Ceiling guide profile fixed to the wall on dowel-nails So, to the boundary line was slightly lower. Holes in the wall are usually doing a perforator, equipped with a drill on concrete.
The old ceiling of the second level is transferred to the boundary, depart from it 7 – 10 cm (niche width to illuminate) and draw another line. On it is fastened to the ceiling of the old PUP (cm. scheme above). To create curved sections 2 side of the guide profile of the three cut with scissors or metal grinder.
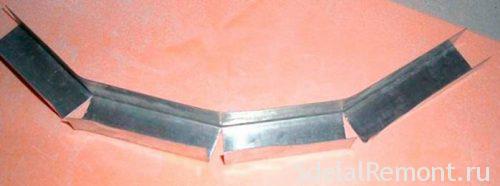
The distance between cuts - 5 cm, in this case the line will be more smooth. Locking profile on bending desirable as often as possible. To the ceiling fixed on the TNG-anchor wedges. Perhaps the use of dowel-nails, but they need to 2 times more to ensure the strength of the attachment.
In the attached to the ceiling guide profile insert a length of 15 cm (the height of the second level) PP. they will replace direct suspension, commonly used for this purpose. The distance between their centers - 10 – 15 cm. The segments are recorded in the TNG sharp screws PN (press washer) via shurupovёrta. Below these segments are closed second guide profile, which is part of the radius, naturally, is cut.
Many are advised to apply the screw on metal, equipped with a drill. This is undesirable. When such a drill bit drills a thin metal, profile may be deformed. For our construction, it is unacceptable.
The horizontal wall connected PNP PNP level with boundary segments ceiling profile. Their length is equal to the planned width of the second level. At the junction of the side walls of ceiling profile are cut and folded at a right angle. The thus obtained pitch fixed to the EOR boundary level screws. The distance between the centers of the segments - 50 cm. At radii put additional segments, reinforcing frame.
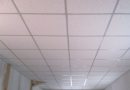
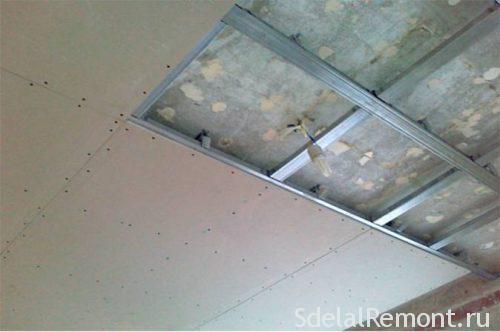
so, box on the ceiling of plasterboard with backlight assembled. Proceed to assemble the skeleton of the first level of the ceiling of the future. It will be of a rectangular cell of ceiling profile, distance between centers which is equal to 60x50 cm. This structure should eventually look like this, as in the photo below.
Begin with the installation of two-level ceiling of plasterboard with lighting at this stage it is necessary to install the PPP on the second level of the perimeter frame. In this case guide profile attached to the vertical segments PP. Then to the ceiling using anchor-suspensions wedges fixed directly on the lines, respective centers of longitudinal ceiling profiles. This was written in the previous chapter. The ends of the suspensions are bent down, between the fixed longitudinal PP.
Installation PP each laser is controlled to obtain the ideal horizontal surface. The ends of the hangers, sticking below profiles, folded up or cut.
On top of the longitudinal profile in the region in 50 see Dress crabs. The side clamps crabs insert segments transverse profile. Then crab lugs are folded down and fixed by screws through holes intended for this purpose.
The first level is assembled. Do not forget to reinforce the mounting location for the main lamp, if necessary.
Before you begin lacing frame plasterboard, you need to make a wiring harness.
Electrical wire is recommended to enter into the corrugation, protects them from mechanical damage and, Consequently, short circuits. However, the final decision on its use is taken by each person on their own.
installation of drywall: easy and difficult at the same time
There are several type plasterboard. For ceiling usually take the sheet thickness 9,5 mm, it is thinner and, respectively, easier to wall. To create a curved surface arched produced GCR 6,5 mm.
GCR black is attached to the frame length of sharp screws 40 mm. Here it is necessary to know a few basic rules:
- The edges of the sheet of gypsum should always pass through the center of the profile. In this case, mount the GCR to the profile will be quite durable and reliable.
- At the junction of the sheets need to leave a gap in the 2-3 mm to compensate for gypsum board advances under the action of various factors.
- Cap screws recessed into the surface sheet 1-2 mm. To comply with this rule produced special bits with limiters.
- The screws are screwed at regular intervals. Up to the bottom left 2 cm.
- The sheet is fixed to the profiles over the whole area, for this risk is marked on the drywall profiles Centers. The distance between the screws - 15 – 20 cm.
First sutured first, the highest level of the ceiling. Then comes the turn of drop from level to level. The straight sections will not cause complications. But with radius have little tinker.
The most common way to give a strip of drywall curvature - wet it. Here's how. Construction knife pierced cardboard with one hand. Then the surface is wetted with water. wait 10 minutes. gypsum namokaet, is softened and can be carefully, gradually bend radius for the correct. After fixation screws to dry the strip and keep the resulting shape.
Comes the turn of the second level. Here, a wavy surface neatly cut with a knife, and then smooth out fine sandpaper or a paint mesh. Holes spotlights easiest to drill and drill bits for drilling large holes in wood.
The last step is finishing the ceiling. For this work you need to have on hand:
- Paint brushes and rollers;
- bath under the roller;
- several spatulas of various lengths;
- drill with paddle-mixer;
- plastic dishes for the preparation of solutions.
First drywall primed acrylic primer deep penetration with antifungal additives. We have to wait, while the primer is completely dry. Then special plaster mixtures shpaklyuyut seams between sheets and heads of screws. As the joints are sealed amplification reinforcing tape (serpyanku).
At least putties delayed the entire surface of the ceiling. Niche plasterboard backlit for the cornice and the transition from one level to get off in the first place. The layer thickness must not exceed 2-3 mm. All roughness after drying layer rubbing sandpaper.
Do not forget to vacuum the ceiling, a thin layer of gypsum dust, deposited on the surface after such treatment, able to be reduced to "no" to all previous work.
Before the final ceiling finish - painting or pokleykoy oboev - the surface is desirable again primed.
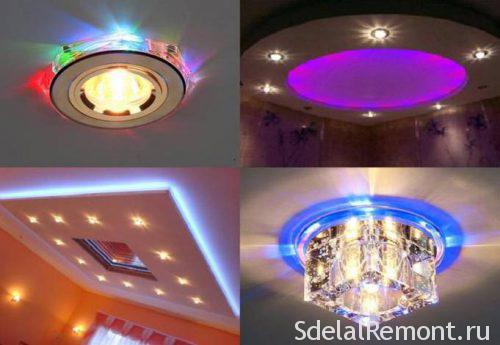
Spotlights and neon - select how the backlight
Choosing downlights is so large and diverse, that suggest something in this direction is difficult. Most commonly used built-in plasterboard LED lighting, and halogen lamps. They are not only able to cover a certain area of the premises, but also to create a ceiling light beams of different configurations; is a lamp, combining two types of lighting - halogen and LED (on photo):
Another feature of these lamps is the ability to adjust the light intensity. Some types of light-emitting diodes supplied with remote control, which will be used to place the various light illumination scenarios. Such lamps are equipped with respective control units.
Hull point lighting devices are equipped with fixing springs and their installation in the ceiling holes will not be any problems. As well as their replacement in case of failure.
Conventional incandescent lamps mounted less and less because of the large size and temperature increase with prolonged use.
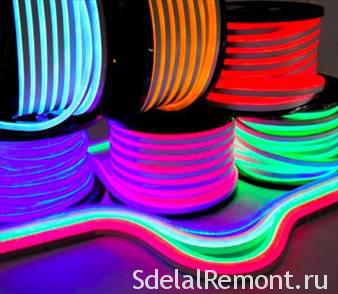 As for illumination levels between, the most popular in recent years and enjoys flexible neon LED Strip Light. Despite the difference in the title, the basis of these highlights using one and the same element - LED.
Whatever the hidden ceiling lights of drywall is not used - the choice depends on your taste and management skills, to sell you their products.
As you can see, two-level ceiling of plasterboard with lighting is rather complicated in execution. But the enthusiastic response of friends and guests will be the deserved reward for all the difficulties borne by you.