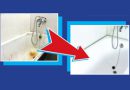
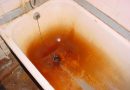
Acrylic bathtubs have become frequent guests modern bathrooms, because they are much easier to iron, aesthetic, having different types of design. But over time, such products may be damaged, losing their former neat appearance. How to make repairs acrylic baths with their own hands and without engaging the services of a professional plumber?
Common types of acrylic baths damage
 mechanical, arising from the careless use of hygiene items.
- chemical, under the influence of strong detergents, which leave spots and other non-aesthetic marks.
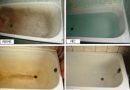
Solve these problems can be: Replace damaged bath with a new. Or to repair acrylic bath with his hands, refurbished product at a reasonable price.
subtleties repair
Before the start of "recovery" bath is important to determine the color of products and materials, from which it is produced. The discrepancy between the colors can greatly affect the outcome of the work done, and alter one job twice not so that it would be desirable!
Required tools
During the restoration will need the following set for repair of acrylic baths.
- A pair of rubber gloves.
- Polished drive or sponge.
- Pasta bath.
- Emery sheet from 2000 grain to 800.
- The liquid acrylic, to eliminate the deeper chips.
- Drill with a drill 0.5-1 mm.
- alcohol solution.
- Soft bezvorsisty swab.
Instruction for beginners
- Professionals advise expand the area of damage, so that the clutch of the old and new material did not differ visually, with the crack in the depth and width should be increased by 2 mm.
- Repaired surface is required in advance degrease alcohol.
- Apply the mixture to the damaged area must be properly, Fresh acrylic must not rise above the old and be deeper than him.
- After that, how to repair chips of acrylic baths is important to close the completed portion of the film with adhesive tape and leave to dry for 6-7 hours. It is desirable at this time not to use the bathroom.
- After removing the protective film to treat a skin surface to be repaired, which is included in the repair kit to repair acrylic bathtubs.
We make repairs minor scratches and burn-through
If the damage is not deep, are superficial, then do a repair acrylic bath cover is very easy and simple.
- Sandpaper grit varying degrees trimmed damage of, first major, in the end - small.
- After finishing polish process requires grinding of the surface of the bath acrylic.
- In this case, a plastic tub repair completed, but if you scratch deeper, without the liquid acrylic will not do.
remove cracks
Cracks appear acrylic bath due to a heavy object falling, wear or other force majeure. They should be removed immediately after detection, so as not to result in deteriorating the entire article.
Cracks in the acrylic bath repair using an epoxy putty. The following actions are performed:
- First major sandpaper trimmed damaged side.
- Next drill drilled holes on either side of the crack by 1 mm.
- Washed with soapy water "blank" under shpatlevku, wherein the opening is sealed after drying.
Damage composition is aged about 12 hours, after sanding area restoration.
As repaired acrylic bath with a repair tape?
The first part works to dry the purified damaged surface is similar to the above method, but continue to cut part of the repair tape, which overlaps the length of the crack on 1 cm on each side potholes. Protective film removed, and the sticky side firmly glued to the crack.
It is important to remove all air bubbles within the coating. Three hours to complete the setting will be enough. Use a bath in this period is prohibited, so that the fluid does not come under the tape and did not spoil all the work.
Repairs chips in the bath
How can you effectively lead plumbing in order, when an acrylic bath formed chips and even holes?
To completely restore the functionality of devices need to perform
repair chips in acrylic baths 2 phase.
 The surface of the trimmed coarse filler, the dried layer is polished with sandpaper.
- After that, as it was possible to repair acrylic bath, the entire surface of the product is subjected to polishing. Brightens up all angles, bath becomes natural snow white, all cracks and Falcons are in the distant past.
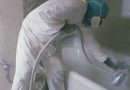
When it comes to deep defects and serious holes, better to entrust the job to professionals, to perfect the product has served the owners for years to come.
For those, who for the first time faced with such a task, It will be useful to view the video repair acrylic bathtubs, where the example of one of the users described step by step all the nuances and major technical problems.
Frequent users matters
How to repair acrylic bath so, the layers of material not leave after a while?
Such a defect is possible non-compliance with the installation and operation of the product of the elementary rules, and running step manifestations cracks may cause such troubles. When scratches or OSKOL edges extend from the lower FRP layer, you need to take special glue and glue the base before the repair bath.
Instead of glue can be used for fiberglass repair kit, which is sold in any store.
People say - the eyes are afraid, and make up! Let your bath will always be safe and sound. On the question of how to repair acrylic bath, you know all the answers to the above, thanks to the detailed material.
Using the period of repair acrylic bath video, you can see the details of all stages of preparation and specifications of the restaurant features plumbers.