- Let's start with an embossed decoration
- arches
- niches
- pedestals
- wall openings
- Decoration Materials
- Wallpaper as the fabric
- About ceramic tile
- Putty and decorative plaster
- Use of tissue in the interior walls of plasterboard
- A few words about the use of tissue in the interior walls of plasterboard
- How to glue fabric
- Helpful tips in the interior
- Design plasterboard walls in the hall: arches and niches
Today, one of the most common building material is a gypsum board. Mount technology developed by Knauf plasterboard sheets, It allows you to create different designs, make your apartment nice and cozy. Create a wall design of the drywall in the room can not only structural elements, but using different materials: wallpaper, ceramic tile, decorative plaster, fabric and wood. But how to do it, and described in the following article.
Just note. Gypsum board is easily processed, cut, bends. It is easy to mount. Using it you can create any components.
Let's start with an embossed decoration
The design of the walls of plasterboard can be issued construction of various structures, such as arches, niche, curbstones, wall openings.

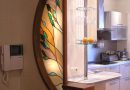
arches
Arch called design, representing a curved ceiling blind or through-flight. Mounted between the columns or pillars for creating a lateral thrust. It serves as a pass-through, and acts as a decorative element.

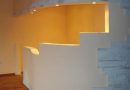
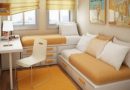
niches
Niche called an architectural element of any geometric shape, made out in the form of a recess in the wall, serving to accommodate the jewelry: vases, figurines, fonts, household appliances, pots of flowers. Most often used when installing niche walls, or as a decorative element.

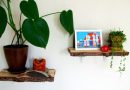
pedestals
Tables called design, designed to accommodate not only within, but on top of various objects or things. Gypsum stone decide not only the functional task, but also, equipped with spotlights, create effective design.

wall openings
Wall openings are called through passages, the molding of decorative openings in the form of various geometric shapes. Wall openings are made in the form of shelves to accommodate books, toys, figurines. It is important to know the thickness of the walls.

Decoration Materials
But any designer design requires exterior trim. The wallpaper will be used as finishing materials, ceramic tile, decorative plaster, cloth. The interior walls of plasterboard is well complemented by properly selected furniture, curtains, light.

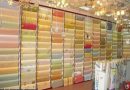
Wallpaper as the fabric
Surface, assembled from plasterboards, most suitable for wallpapering. This surface requires little or no additional training, excluding putty, cleaning of joints, hats of screws and a primer before pasting.
It should be noted at once! By wallpaper with a paper substrate is not required even surface primer.
About ceramic tile
Attention! Ceramic tiles are laid only on moisture-resistant cardboard, referred gypsum plasterboard and having a greenish color. Usually, at monad structure for ceramic tiles are laid two or more plasterboard layer. Using the moistureproof sheet of plasterboard, ceramic tiles can be installed in any room. If you are going to impose a communications, Construct the first box of drywall, and have them overlaid with ceramic tiles.

Putty and decorative plaster
While the resulting surface with drywall application does not require additional alignment, but the joints, place hats of screws you need to putty. To do this, apply the finish coat. You can use satin-gypsum.
The resulting surface is often Wallpapers, color.
But is used to design solutions decorative plaster, providing inexhaustible finishes. Not only that, the very plaster allows you to find a variety of interior decoration, and the use of textured rollers, or Venetian plaster technology can create real works of art.

Use of tissue in the interior walls of plasterboard
Especially popular in the decoration of the walls, including plasterboard, use tissues. The use of fabrics for upholstery gives them a special elegance, originality and charming beauty. It applies any kind of fabric and texture:
- The most popular are the tapestry, drap, sitec, silk, velvet.
- For a budget option fits best furniture fabric.
Glued best velor and suede. If you decide to pull the fabric onto the frame, use viscose or cotton. Drape walls are preferably made of lightweight fabrics.
Novice designers is best to choose synthetic fabrics.

A few words about the use of tissue in the interior walls of plasterboard
As used as soft, and durable fabric, what and how they are fixing, there are several. Fabrics can be pasted, pull on the frame.
Glued tissue is well aligned plane, which are the walls of plasterboard.
Stretched on the frame tissue can hide small irregularities, save on plastering and sanding work.
How to glue fabric
- The surface of the tissues under the pasting should be smooth, without projections and depressions.
- The wall is cleaned thoroughly with a spatula, shpaklyuetsya. The surface is cleaned with an abrasive material, treated against mold and fungus.
- After drying completely smooth surface is primed and checked for the absence of grains and cavities.
- Priming layer removes residual grains of sand and dust.
If you are using a thin cloth, it is necessary to glue the surface of paper sheets overlap.
- The fabric is glued on the stripped and dried up layer of paper.
- Especially it is necessary to perform, if before any tissue at the surface is not glued.
- Label the tissue itself produces special mastic, flour paste or casein glue.
Fabrics are deformed when wet. Choose those tissues, which are subject to less strain.
- Usually, before pasting tissue soaked and glued after complete drying.
- Pasting a lead angle, plastering walls paste or putty.
- Edge glued cloth to dry fixed wooden slats, hammering nails do not end up with a step 50 cm.
Preferably tissue lining fastened with wooden slats.
- The lower rail is fixed to the floor, the upper rail is fastened at potolka.Zadelyvayutsya a plaster layer previously.
- tensioned fabric, mounted rails, clinch.
Helpful tips in the interior
To solve design problems not only use architectural techniques, but using different finishing materials.
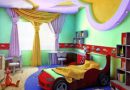
Fashionable design of walls made of plasterboard in the hall you can get not only the use of expensive finishing materials. We need a fresh idea and unexpected decision, we recommend taking a photo tour design gallery .

Design plasterboard walls in the hall: arches and niches
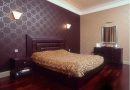
The main bathroom is considered to be any apartment or living room. It often take guests, They gather the whole family. By competent design space design depends not only on ease of use, but also the atmosphere.
We offer to collect a niche for TV or arch.
Niche under the TV
Modern TV has a flat design and low weight. The installation of the wall bracket using the factory or made for TV with their own hands. Mounted in such a way, harmoniously looks in the interior of public institutions, because it provides an overview for each visitor.
In the TV room looks more harmoniously in a niche. And security in this design provides higher.

How to make a niche for TV
For manufacturing niches under the TV from sheets of drywall you will need tools and materials:
- From the materials you will need a metal profile with markings CW, YOUR. This so-called guide and rack profile. With it's going to frame a future niche.
- V can be used as a carcass material for a wooden bar section 30 × 30 mm.
- For plating niche use 6,5-12,5 mm thick plasterboard.
- Is the frame with screws, is installed and fastened special connections and plugs.
- To make use niche curved contour arched profiles and thin sheets of plasterboard.
From the tool you can not do without:
- drill with adjustable speed frequency;
- shutupoverta;
- knife construction;
- Hacksaw frames;
- Shears for metal;
- plane.
Razmechaty, measuring the necessary structure set using:
- roulette;
- plummet;
- cord;
- level.
Getting started in manufacturing niches to start with the development of the project, taking into account the size of the TV installed.
- You need to provide a space, discolors the ventilation device, laying of connecting cables, installation of additional devices.
- Developing a niche for TV installation, Consider the simultaneous creation of shelving to accommodate books, colors, ukrasheniya.Eto items will not only give the interior a more harmony, but also serve as an additional space.
- Appropriate setting of the original illumination.
This layout will allow to lay a variety of communication, fits well into the design of. More details on mounting design Profile of.
find out, how to hang the TV and at the same time save on the bracket, having made his own hands.

Build niche
- Any work begins with a markup niche installation site.
- On the wall, apply the installation location of the future niche.
- Cut to size vertical rack rails profile, secure them to the wall with dowels.
- Of the guide profile cut horizontal carriers and secure them to the rackmount with screws.
- To increase the rigidity of the structure, install additional jumpers.
- You now have the framework for future niche.
- For plating structure cut plasterboard blanks. Mounted on the blank frame with screws in increments of at least 25-30 cm. Do not forget utaplivat cap screws to a depth of 0,5 mm.
- Perform installation of accessories for switches, sockets and fixtures.
- The resulting framework is necessary to putty niche, clean and apply a finishing layer.
We design and assemble the arch
Arch should be used in the construction of partition walls, Making the wall. harmonious look arches, decorating the entrance to the kitchen, loggia. Installing arches can significantly extend the space of the room, increase doorway, free from the door. Arches are particularly relevant in small apartments.
How to install arches
The work begins with the acquisition of the necessary amount of material. You will need a sheet of plasterboard, metal profiles or wooden beam, fasteners, putty.
Having defined the look of the future arch, make a sketch or drawing.
- Add dimensions to the wall.
- count, what and how much material you need.
- Walls, to which will be attached arches frame, it is necessary to align the.
- Secure the rack profiles to the walls, floor, ceiling with dowels.
- You should get R-Design obrznaya.
- Because drywall cut upper arch portion and fastened with screws to the resultant structure at the perimeter of screws with a pitch of 20-40 mm.
- Now it is necessary to fix the shelves to the lower U-shaped structure pre-cut blank of plasterboard. To provide a radius of the profile at several locations incised with scissors, metal.
- If you need a certain arch width, do the work above the second part of the arch.
- For, to sew arch radius, necessary to cut the workpiece bent plasterboard. Plasterboard well bent, if the width of the incision on one side with a 10-20 cm increments. step size depends on the radius of the arch. The smaller radius, the more often a step notch.
- Fastened curved drywall screws.
- All irregularities and cavities necessarily shpaklyuyut and lights. Top finishing material overlaps.

I wish you success.