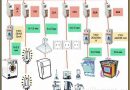
- types of switches
- Dimmers
- timers
- remote switch
- communicating switches
- Wiring and cross one of two feedthrough devices (control points 3)
- Installing two cross and two feedthrough devices (with four or more control positions)
- indicator switches
- Conventional classification of price groups
- How to install and connect the open wiring switch
- BUT. Switches with open wiring
- How to install and connect the switch flush
- AT. Switches hidden wiring
- Installation of the old type Escutcheon
Electric light switches - which are small devices, routinely used in the home and at work to control different light sources. Consider, what are the types of circuit breakers are.
types of switches
There are many different types of circuit breakers, different both externally, and the degree of protection against moisture and dust. These properties are marked on the surface of each piece of electrical equipment with a 2-digit and 2-Latin letters IP. For example, suitable for indoor switches with degree of protection IP 20, for shower room - models IP44, Outdoor - IP65 respectively, and subsequent.
Dimmers
Sometimes, instead of the standard key switch, It uses the device to function smoothly changing light intensity (dimmer). On the front panel instead of keys located knob or 2 touch buttons: "Less than" and "greater than". Field of application of such a device is limited - it works only in conjunction with an incandescent lamp.
timers
Timer - view of an electronic device, equipped with a built-in timer, allows you to control lighting automatically. Grounds for application timers are quite diverse: by providing optimal lighting for houseplants to create the illusion of "presence" of the house owners with their virtual absence, in order to avoid breaking the apartment thieves - "burglar".
remote switch
These are electronic devices, which can be controlled at a distance, via a special remote control. Are sensitive to any infrared remote (from TVs, music center and other equipment). Are used, basically, people with disabilities, which greatly facilitates their lives, and the lives of their loved ones.
communicating switches
In order to control the electric light from two or more points, smokers large area and multiple doorways, widely used cross checkpoints or switches. The diagram below illustrates one embodiment of such circuit breakers for connection space with two inputs-outputs. Now look how looks wiring diagram switch.

Control the lighting can be from any of them. Communicating circuit breakers do not have a strictly fixed position keys "on - off", unlike conventional. It can constantly change, often resulting in the user puzzled.
Wiring and cross one of two feedthrough devices (control points 3)

Intermediate switch (№ 2 on the picture) - this is the entrance Tandem switch. At its simultaneous application with the usual pass-through switch it becomes possible to control the light spacious room, with three or more points, is most useful when there are multiple input - output.
Installing two cross and two feedthrough devices (with four or more control positions)

indicator switches
switches, equipped with an indicator, relatively comfortable in the dark. Thank them, users no longer need to look for cherished key in complete darkness. Indicator switch - as a kind of beacon in the night.
Conventional classification of price groups
Electrical outlets and switches can be classified into three price groups.
BUT. Economy class
This group includes low-cost domestic appliances, produced for the mass market, the production of which is of questionable quality materials used. Chinese production device manufactured from higher quality materials and have a more presentable appearance. However, the build quality is not happy and those, and the other. In the active operating conditions of their life is low.
AT. Sockets and switches of average price group
It is more reliable and quality products, made of better quality materials and modern technology. Buyer attracts appearance products, but few scares price.
WITH. Sockets and switches the high price category
Product from the category of "elite". From product "middle" class differs, by and large, only in appearance. As raw materials are often used leather and precious wood, as well as semi-precious stones.
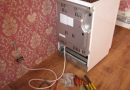
How to install and connect the open wiring switch
BUT. Switches with open wiring
These switches have two components: internal mechanism and an insulating cover. They are placed directly on the wall surface, using Escutcheon.

by device installation work begins with the installation Escutcheon, represents a dielectric pad. With the dowels, screws, screws or screws (depending on the type of surface), Playground rigidly fixed to the wall. Thereafter Enclosures, through the holes in it, supplied directly switch mechanism. At the end of the terminals joining the wire ends.

On the insulating cover device manufacturer premeditated and perforated special hole, a kind of a window to enter the wire. Cap, in addition to giving the isolation switch is also an appropriate aesthetic appearance, It is set in place and fixed using screws or latches. At the end of worn keys (key).
All switch setting process should take place in a blackout!
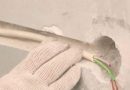
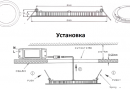
How to install and connect the switch flush
AT. Switches hidden wiring
Installation switch of this type is performed using Escutcheon, resembles a shallow cups (a photo).

In the wall, using a special tool (crown), recess. The gypsum wall cut simple round hole size Escutcheon. Firmly fix the device will help in deepening the foot-jaws. More detail all described in the article flush mounting under plaster, shtroblenie and laying wires.
If the circuit breaker should be placed in the brick, a gypsum or concrete wall, the need to secure the device mortar based on plaster. Enclosures should "settle" in the wall exactly, without perekosov, which will ensure their smooth operation for a long time.

The next stage - gouging in the wall surface, meet Enclosures, furrow (Stroebe). Grooves must be deep enough to, feeding wire to mask. Tab wire in groove must be made so, to the output of its length wire ends remain no less 10 cm. It is so much need for further connection cable to the terminals of the switch. One end of the wire is attached to podrozetnik special screws (if the wall is made of plasterboard), or by means of metal struts, included in the mechanism design (the only way when installing old metal Escutcheon).

Installation of the old type Escutcheon

tighten the screws, to straighten the spacer, using a screwdriver. At the expansion switch mechanism is fixed rigidly by spacers. To ensure reliable fastening sure that the following conditions: front stop device should overlap the edges Escutcheon, ie. be slightly wider than their. At the end of the work is placed on top of the lid and set the keys. installation is finished.