- The choice of tiles
- Substrate Preparation for laying
- Required tools and materials
- Application Penoplex the regeneration garden path base
- Marking a tile
- The technology of pouring concrete base
- Laying tiles
- Construction of border
- Filling the cement mixture
- Laying tiles garden
- Grouting
- Surface preparation for operation
- conclusion
If you want to beautifully arrange the tracks at their summer cottage, the need to explore all of the paving and the methods of preparing the substrate. A particularly important factor is the direct creation of the right of the pie out of the sand, gravel before laying tiles on a dry solution of. By itself, the creation of the technology pie layers of sand and gravel is quite a good account, and all thanks to its strength, beauty and durability.
To date, types of tiles have tens, or even hundreds of, that allows everyone to choose a, which will fully comply with all preferences. At first sight, work on laying the concrete tiles can seem quite complex. But do not worry, it is not so difficult, as it seems. With this work, depending on the volume, It can handle only a few days. And when small areas all performed independently.
The choice of tiles
Before starting work, should pay special attention to the tile view. In total distinguish two main categories:
- vibrocasting tiles.
- stamped.
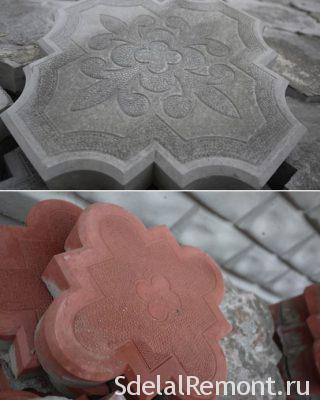
For the most part it is best to give preference to the first embodiment, because it is quite economical in the financial plan, and in addition, such a material possesses an attractive appearance.
Also, attention should be paid and on the thickness of the material. Depending on, which will be posted track, should be used and different material. In particular:
- When laying paths and garden paths suitable tile thickness 2 cm.
- When exposed to cover large loads, for example, machines, should provide a thicker tile. desirably 40-45 and to 60 millimeters. note, that for conventional cars, and enough 4 centimeters, but the possible impact of many-ton vehicle should protect themselves against damage to more expensive tiles.
Another factor for the choice becomes executable image. For the first time should use the standard tile with bundles. No need to take the diamond, brick or paving stones, since not beginner skill level enough for the job. So it's necessary to involve experts
And the latter becomes colors, which has hundreds of shades. You will be able to choose for himself something. The only difference between the cost of becoming.
Before how to make a cake for laying paving slabs, depending on the soil base and the use of the surface is important to define the technology works.
Substrate Preparation for laying
And we gradually move on to the preparation of the base for laying tiles on the solution. Now, first, what to do, is to explore the slope area, which will be held styling. Wherein, note, that mandatory coverage must be provided with a slope of at least a few degrees, in order to avoid stagnation of water in the yard.

Required tools and materials
We now proceed directly to the need for "arming", for work. so, we need:
- Quite a lot of sand, since from it you must base. Its amount will depend directly on the square tiling.
- Of course, the very tiles.
- Additionally, you will need to equip border.
- Kneading cement grout.
- For markup needed strong thread, as well as metal or wooden pegs.
- You will also need a regular and a rubber mallet.
- Wheelbarrow for debris removal and the transport of materials.
- Tamping device for a base.
- Building level and generally.
- buckets, shovel and trowel.
- Concrete cutting special needs electric Tile or Bulgarian.
- Also, two steel pipes.
- Broom.
- And the last ingredient will kneepads, because the work will have on his knees.
Application Penoplex the regeneration garden path base

Perhaps the best concrete replacement in the regeneration of paving track will penopleksovy list that make an additional bridge from the ground freezing and serve as the outflow of groundwater. Such a situation can be prevented with the help of the pie of gravel and thermal insulation extruded polystyrene foam before laying the paving slabs. Typically, many of the described arrangement of blind area around the house using foam and sheets poliisterolnyh, but this technology is suitable for paving paths and is considered the best option.
Temnologiya use of polystyrene in the regeneration of the tracks is to draw up the correct cake layers drinazha.
In the first stage, the ground leveling using sand cushion and rammed. Further installation of slabs on the sand, performed with sutures vrazbezhku. Thickness Penoplex under paving path generally 5-10 cm, depending on the load and composition of the soil. Then poured on a heater which serves as drainage gravel. The next layer is laid a layer of geotextile (possible replacement of geotextile grit fraction).
At arrangement of the track it is important to put the curb smoothly, respecting the proportional size.
For a better immobility of the tile with a dry mixture of sand and cement in a ratio 1*4 it will firmly secure the tiles. This composition begin to lay paving slabs, aligning the level of. Ideally, when the providence works used compactor.
After the gap in the surface to rub dry mixture of sand and cement, to increase the water resistance track and fixing tiles.
Marking a tile
To create a gradient, take as a basis the street level, This will be the starting point, namely the zero level, to which you want to navigate. Note the straight line, with respect to the slope which is formed. Along the edges of the line trying to drive pegs and stretch the yarn between them. Thread itself should be strictly horizontal, that level is checked (put it best bottom).
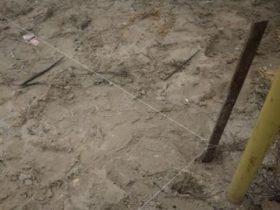
The next step, one of the pegs tie thread, and shrinking it perpendicular to the first mark. Wherein, the second end of the thread should also be mounted on the pegs, wherein the thus, that its level was somewhat higher than the first end. ie. thread will be at a slight slope of a few degrees.
Next, stretch the following, tension is parallel to the first strand. It should be perfectly horizontal. And the last step of connecting the first and last pegs, thus yielding a closed circuit in the form of a square or rectangle.
The technology of pouring concrete base
First, you need a little lift soil. The depth of the excavation of a small amount 20-25 centimeters. After it everything necessary to properly clean the surface from debris, then fall asleep to rubble 10-15 centimeters, and depending on the required slope tamp it.
Finally, you can proceed directly to the casting base, which will be used for gravel solution of, of cement and sand in the ratio 2:1:3.
First of all are building formwork, the height of which must exceed some concrete layer. Besides, boards thickness should be more than 4 centimeters, otherwise design does not keep the pressure of the concrete.
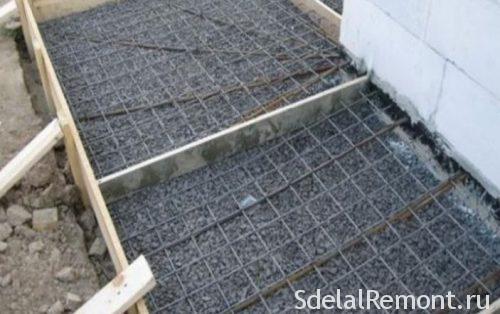
We put on the rubble and begin a mesh fill. Originally filled layer 5 centimeters, whereupon additional stacked mesh and poured the remaining 10 centimeters.
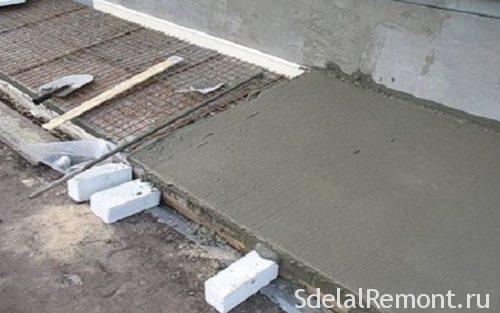
After three days, after drying of the solution, It begins to conduct laying tiles on a concrete base.
Laying tiles
ground ready, and it can now be carried out tiling on concrete. And then consider the incremental algorithm of work on this issue. In total, the process will be divided into several parts, among which:
- Construction of border.
- Backfilling area of cement-sand mixture.
- Directly tiling on a concrete base.
- Grouting.
- And the last stage of preparation for the operation becomes.
Proceed directly to the case, and look at each of the stages in more detail.
Construction of border
first, what must be done - to set borders for fixing paving and avoid its displacement.
To set the border need to perform layout, It is fine and that, which makes for pouring concrete. The filaments in this case are located at a height of future border. It is important to not forget about the slope.
Along executed markup dug trench, which in its depth is fully consistent part of the curb, which will be located under the ground, plus added by 3 to 5 centimeter cement for pillows. For example, if the execution of planned fence height 15 centimeters, and the underlying material used, having a height 25 centimeters, the approximate depth of the trench will be 13-15 cm.
The width of the same dimensions must correspond to the stone, taking into account the gap in 1 cm on each side. Respectively, when stone width 8 centimeters, trench must be sized 10 cm.
Now knead the cement slurry and spread layer 3-5 see the bottom of the trench, after which he laid the curb.
Importantly, necessary to drive the stones that a layer of cement mortar, which uses a rubber mallet.
After one day the distance between the boundary walls and the trench is filled with sand. It is necessary to moisten it and ram.
Filling the cement mixture
The next step is carried out filling mixture, which requires the separation of the marked portion on the individual lines (stripes). Their width should match the length of the selected rule (in particular 20-30 centimeters longer, What itself).
Further, from zero retreating a selected distance, scoring with a peg. also do, on the other hand. These pegs must be connected to each other. The height of the threads need to be aligned in accordance with the sides parallel to which it is stretched. Thus the separation is performed only portion.
Now you need to fill up the base. As known, generally laying paving tiles to concrete carried out using a dry sand-cement mixture. As a part of this is one part cement and sand six, without addition of water.
Backfill held across the site in a layer 6-7 centimeters. At the same time become an indispensable factor leveling and tamping.
And the final stage of preparation of the base held its alignment in accordance with the marking. In this way, in places, wherein from thread to gartsovki distance is too great need to pour the mixture. At the same sites, where the string is too low it should be a little bit away. note, that the gap should be approximately 1,5-2 selected tile thickness.

And particularly important factor is tamper gartsovki in places, where it pours. This is done using a special device - tamping. An example can be seen on the photo below.
In some cases, instead of such a mixture is used, clean sand, but it is less effective, as it is much worse fixes tiles. Unlike cement base, which, when absorbing moisture adheres sufficiently well with the concrete surface, and tiles. Accordingly, the use of clean sand makes it much easier to replace or repair the battered tile surface.
When, when it comes to laying in places where heavy machinery, even the decision to use gartsovki fails, but in this case comes to the rescue tsmentnaya screed or a special adhesive for paving slabs.
The use of such solutions to maximize the durability of the tiles, but the reef is, that this kind of coverage can not be repaired. In this way, even if several tiles will be broken, it will have to take them out punch, respectively refolding they are not subject to.
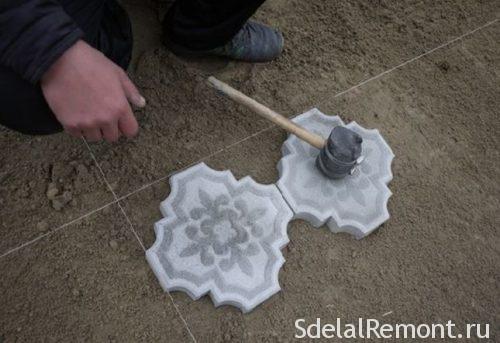
Laying tiles garden
The next step we will discuss how to put the tiles on the concrete base. And everything is done quite simply. Tile rests on the backsheet and vtrambovyvaetsya therein with a rubber mallet. Accordingly, it is necessary in this case to fully control its horizontal position and the correct position, which is done through the bypass, level and taut thread.
Technology laying concrete tiles implies a gradual progress and directly laying itself from itself. Thus you will be moved on the green roofs. When, When on the road across obstacles, which can not be eliminated, bypass them whole tiles.
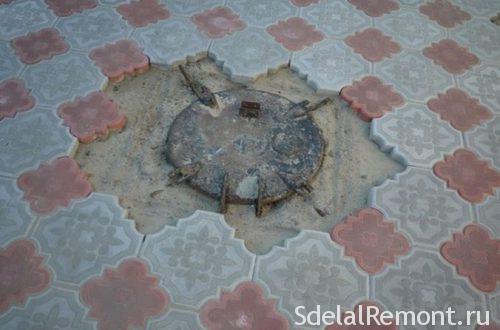
Directly updating and pruning will be carried out on completion of the work on the final phase. note, that it is always necessary. cases, when the track is so perfect, that it all will be enclosed single piece - a great rarity.
Immediately she pruning is done using a grinder or conveyers.
Important! Upon completion of works it is necessary to moisten the surface, as a dry mixture can not hold well enough tiles, because, We need to provide cement setting. Thus, to put the tiles on the cement is not so difficult.
Grouting
Upon completion of the works, It is also carried out and grouting cement-sand mixture. While it is performed in several stages, in particular:
- Backfilling and hydration, whereby mixture shrinkage occurs.
- Re-filling and hydration.
- And so until, while shrinkage no longer occur.
Surface preparation for operation
Needless coating dries in a few days, in particular, after 3-4 day paving is already completely dried. When this period is its cleaning and preparation for operation. In particular, eliminating all debris, and, it's desirable, prometaetsya clean squeak, to avoid the appearance of white marks cement. Then, if necessary, wash the surface at high pressure.

conclusion
And finally,, can say, that for maximum durability of the coating just enough time to carry out cleaning, Rushes eradicate weeds around the perimeter. Also becomes important and the, on a solution to put a tile, and here, following the recommendations of professionals, can be taken directly to a special mixture, instead of, to be laid on gartsovku. But is it worth it? Probably no, because, follow the instructions, Lay the tiles home and enjoy the beauty and comfort of his court.