- How to start installation of drywall on the ceiling
- What will it take for plasterboard ceiling devices
- Cunning: how to do without the laser level
- work schedule
- Driving and computing
- Dimensions plasterboard
- Important: guide profile installation rules
- marking
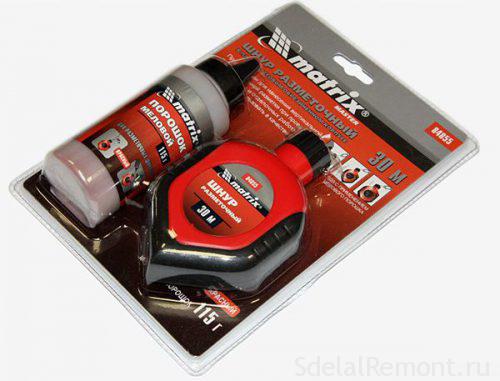
- Not to buy tools
- Mounting of the profiles and suspensions
- Cunning: it is easier to insert into the guide ceiling profile
- How to save on crabs
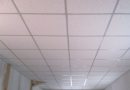
- Installation of gypsum plasterboard
- How to mount sheets
- Adaptations to not keep a sheet of drywall
- How to cut drywall sheets
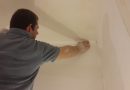
- finishing
- conclusion
Here is a guide, describes the installation of the ceiling plasterboard. It is quite detailed and understandable even to those, who are not experienced with the GCR. Consider all stages - from the design to the rough finish. In addition to standard techniques, you'll learn some tricks, to save time or money. At the beginning of this article are given lists of required tools and materials, and recommended for such work conditions. Then, a brief operating procedure. And with the next section, called "Plan and calculations", It begins directly detailed description of each step.
How to start installation of drywall on the ceiling
With the wall decoration. The fact, that the correct installation of drywall on a ceiling requires perfect smooth walls. So before the ceiling wall papers should be prepared for finishing (plastered and plastered). Or at least lined with plasterboard.
Future ceiling is also necessary to prepare. Remove the old finish, if it hurts. Fix on the ceiling all communications - wire, ducts, tubes.
Ceiling Mounting rules of plasterboard almost the same, that wall mounting. There are complexities. But on the whole idea is worth it, even if you are new to the GCR. Of course, Fitting for plasterboard ceilings desirable, so you know how little contact with the power, and possessed a physical strength.
What will it take for plasterboard ceiling devices
You have to work long and relatively heavy materials. You will definitely need an assistant.
Of the tools will be needed:
- water or laser level;
- pencil;
- marker;
- Metal shears (suitable Bulgarian);
- drill;
- hammer;
- knife;
- Phillips screwdriver bit and a few PH2.
Should be supplemented by a list of tools and fixtures, which greatly facilitate your work:
It would be superfluous and a normal level of construction. If you do not gidrourovnya or laser level and there is nowhere to get them, you can get by with the usual.
Cunning: how to do without the laser level
- Secure the normal level on a long tape, perfectly straight bar;
- put the bar a known horizontal surface;
- If the bubble is not exactly in the middle, prosunte thin wedge at a level corresponding end. Try to perfectly align the bubble;
- rotate the bar to 180 °. Make, and that in this position the bubble is exactly in the middle.
So instead of short and imprecise level, you got a long and accurate.
Also need tools for finishing. The list will depend on the variety of finishes, but in any case needed:
- spatulas - narrow and wide;
- bucket (or other convenient container).
It is desirable to have the nozzle on the drill (mixer) for mixing construction mixtures.
Very help elementary bench. Forget the ladder - to work on them uncomfortable. Put together of the boards of chipboard or twist simple bench. Calculate its height so, to over your head left 10-15 to see the future of the ceiling surface.
material list:
- guide profile;
- ceiling profile;
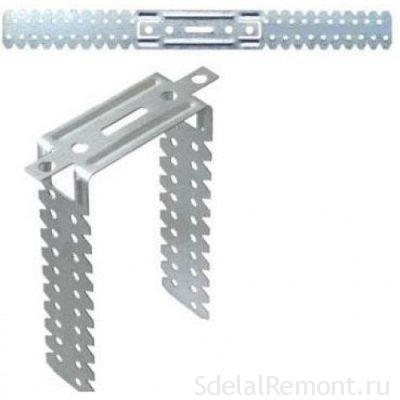
- siblings connectors ("Crabs");
- longitudinal connectors (if required longitudinal profiles longer than 3 meters);
- suspensions straight (to a height of 20 cm);
- suspensions anchor + thrust (to a height of more 20 cm);
- dowel-nails in diameter 6 mm
- or wood screws for wooden walls and floors (black, with a rare thread pitch);
- screws to press the puck 4,2 x 13 mm (silver, without drill-head);
- screws for plasterboard (black, with frequent thread pitch)
- himself drywall;
- and plaster;
- primer;
- and serpyanka.
How many materials needed? to have enough, but no more surplus, We need accurate calculation. How to do it, see "Driving and calculations".
work schedule
Conditionally divide the installation hectoliters at the ceiling into five major stages. In addition, each section of the article will describe the steps with all the details.
- Driving and computing;
- marking;
- mounting profiles and hangers;
- drywall installation;
- finish /
Measure the room and to chart, you will get a clear idea, qs materials.
Technology mounting drywall on a ceiling requires accuracy. To design is not skewed, you need to apply with great precision marking the perimeter of the room.
take over drill. No less accuracy is required when attaching the guide profile on the perimeter. Ceiling profiles are attached screwdriver.
Raise and anchoring plasterboard sheets. A lot of work screwdriver.
Left putty ceiling. That's it - perfectly smooth surface, which is convenient to put any finishing.
And now the whole course of the work with all the details.
Driving and computing
so, you are ready to wall. They are sewn with plasterboard, ideally - plastered and covered with a layer of putty. Measure each wall in the room. Very high accuracy is not required; the main thing - to understand, materials as you need and how to install drywall on the ceiling (longitudinally or transversely).
Draw a diagram of the room on paper. Draw in Scheme plasterboard sheets, to see, at which location there will be less waste.
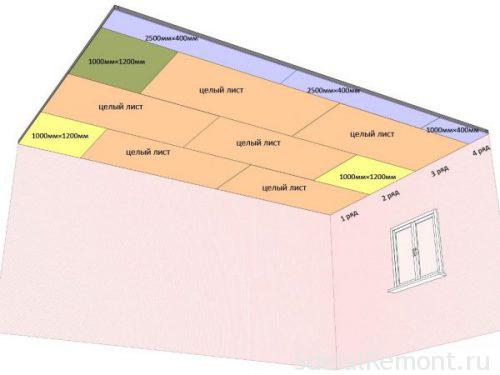
Sheets should be placed like a brick. I.e, each subsequent row is shifted with respect to the previous half the length of the sheet.
Dimensions plasterboard
The most common size - 2,5 on 1,2 m. Less common length sheets 2,7 or 3 m. Normal thickness - 12,5 mm, but for the ceiling may be lighter 9,5 mm. Although Knauf technology supposed to be laid in 2 layer sheets that allows to build a solid structure and get rid of the cracks in the ceiling.
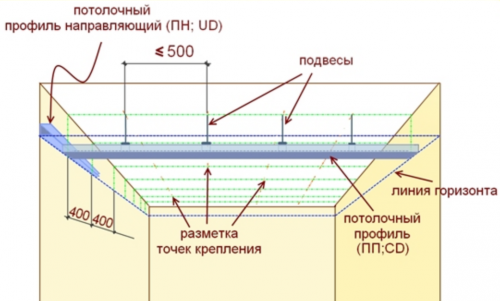
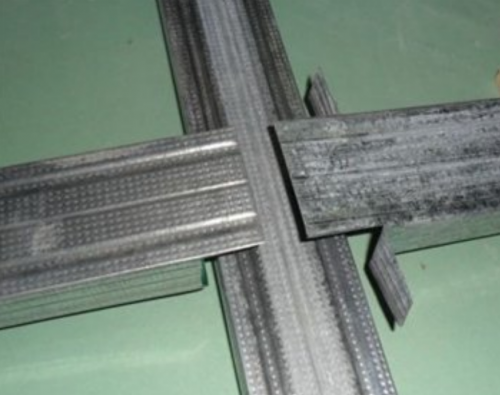
Now the count number of profiles. Technology gypsum ceiling next: first perimeter metal profile fixed guide. It inserted ceiling profiles and are attached to it as. Additional profiles are attached to the suspensions overlap.

Important: guide profile installation rules
Between the segments of the guide profile should not have gaps. In one corner of the profile is inserted into the other until it stops. On the same plane profile sections are joined in butt. If there is an outer angle, then one of the profile segments have to stick to 27mm. Thus obtained solid belt of the guide profile.
To count the number of dowel-fastening nails guided on approximately every 40-50 cm.
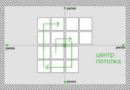
Long stretches of ceiling profile set exactly every 50 cm. Plasterboards arranged across them. In this way, the edge of each sheet will lie precisely in the middle of the profile. None of the edge should not hang in the air! end, adjacent to the walls, They will be attached directly to the guide profile.
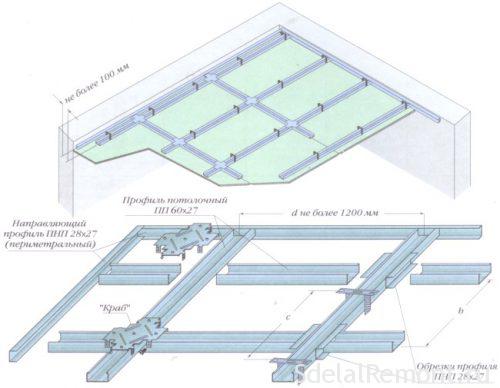
Across the longitudinal profiles inserted jumper. It segments the same ceiling profile, set increments 60 cm. The principle is the same: all edges of each sheet GKL should fall on the middle profile. The middle sheet must also be secured. jumper length = 50 cm width minus ceiling profile (60 mm), i.e 44 cm.
Suspensions are installed along the entire length of the longitudinal profiles with a step 60 cm.
For clarity, draw all the profiles on your circuit, not to be mistaken in counting. Each intersection of the ceiling profiles - this is one crab and three self-tapping screws for metal (with pressshayboy).
Screws for gypsum boards are screwed to the step 15 cm. Just take the total length of all profiles in centimeters and divide it into 15.
Putty buy calculation 1 ready mix in kg 1 m2 about 3 kg per letter. Kilogram is ready mix, not powder.
Materials not buy with a small margin - about 20%. Quickly calculate the required the amount of material on the ceiling online calculator.
marking
so, start directly installation of the ceiling plasterboard.
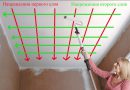
Typically drywall ceiling mounted horizontally. Equip your level and get ready to draw a horizontal line around the perimeter of the room. We can restrict short strokes every half meter. the main thing, to mark the ends came together exactly at the same level.
Not to buy tools
It makes no sense to buy a fairly expensive piece of equipment for a single work. such tools, the laser level, hammer and screwdriver can be rented.
You can draw a pencil line on a long straight strip. For this purpose, suitable piece of ceiling profile. You can stamp only in the corners, then drive them cloves and stretch lace. But even easier to stretch between the chalk marks cord and slam them on the wall - remains flawless, direct and clearly marked line.
For this markup will establish guiding profile. Remember, that finish ceiling surface will be about a centimeter below.
Next you need to mark the installation site ceiling profiles. Put a mark on the wall, just below the line of attachment of the guide profile. They should be visible even after the sheets GCR. Put the finishing touches with a pitch 50 see for installation of long ceiling profiles, steps 60 see - for bridges.
It remains to note the connection points of the longitudinal profile with jumpers. On metal paint marker. Put down the finishing touches every 60 centimeters of longitudinal profiles. You can do this even before, as you install them in the guide profiles. Mark those ends, from which you started: they should all be on one side of the room.
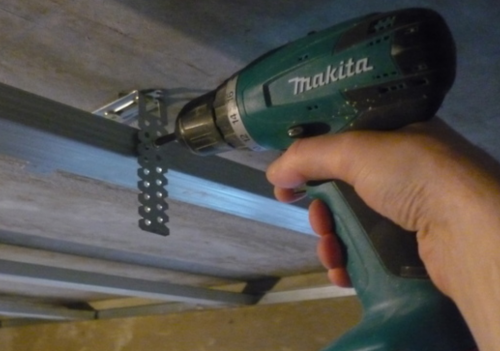
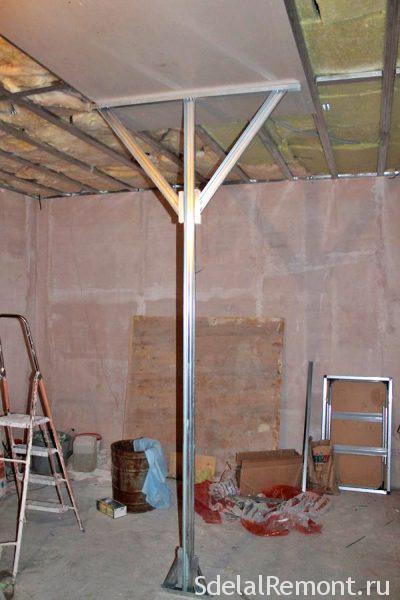
Mounting of the profiles and suspensions
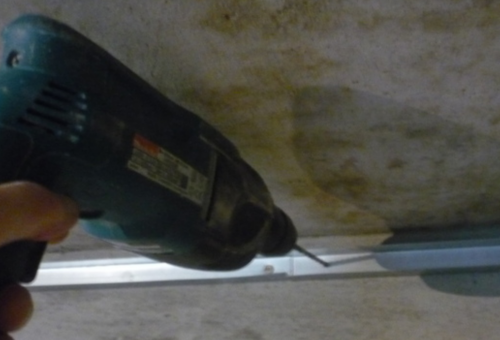
Drill drill drill guide profile 6 mm increments around 40 cm. In principle it is possible to punch punch directly to the installation site. When burite wall, hold the profile. Keep, that it did not move in relation to markup.
If you have a plasterboard wall, it is necessary to imagine, at some distance from the wall is drywall. Working part dowels (ribbed) should take fully into concrete.
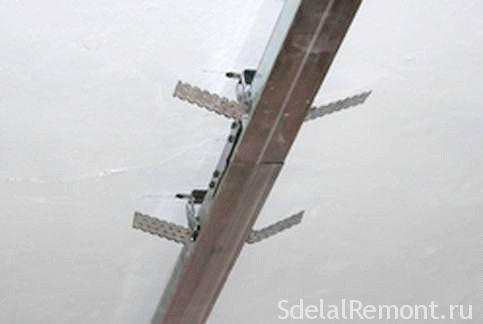
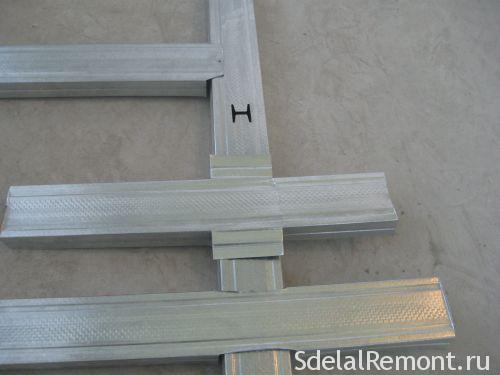
On the walls of a length 3 m sure "splice" guide profiles, inserting one into the other. Just need to be docked and in the corners. Then set the longitudinal ceiling profiles, inserting them into the ends of the guide profile.
Cunning: it is easier to insert into the guide ceiling profile
Cut with scissors the corners at the ends of the ceiling profile. So it will be much easier to insert it into the guide, especially if you are working alone.
Suspensions are best installed before, how do you fix the longitudinal profiles and set the jumpers. Only need to follow, to profiles were exactly in their places: on them you will be guided, where to put the suspensions.
For mounting in concrete typically used dowel-nail. You can also take plug-wedge - he holds a much stronger, but it is much more difficult to dismantle and.
Concrete floors in older homes insidious. often, that drill, passing a little less than a centimeter, It falls into the void. Deal with such surprises are different ways:
- take a very long dowel-nail;
- attach hanger elsewhere;
- instead of dowel-nail to hammer wooden plug and fix the suspension softwood.
Attach a straight suspension is better not to the extreme holes (that in the petals), and in the neighboring, are closer to the middle. Attach of the petals, of course, more convenient: it is easier to get, when the frame is already assembled. But this method will allow the ceiling to sag a bit.
You can use direct suspensions even if, when the ceiling height of the ceiling more than 20 cm. Just instead of one suspension is necessary to use two.
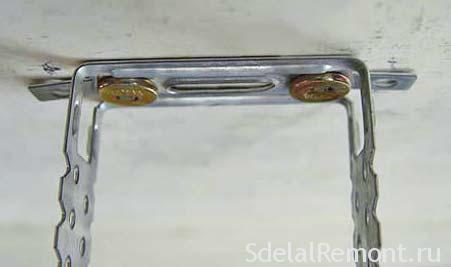
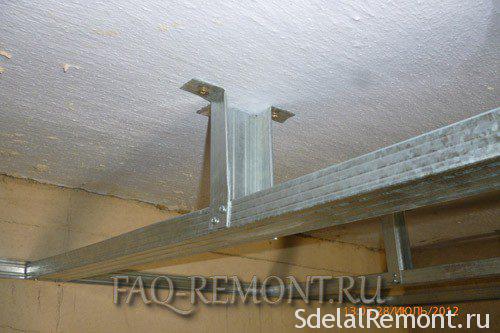
But it is much more convenient to use an anchor pendant. Link hanger anchor mounted to overlap the same methods, and that the direct suspension, through the eyelet, pre-folded at 90 ° pliers. note, that only need to bend the ear itself. The rest of the rod must remain perfectly straight.
Where to install the hangers? Above each of the long ceiling profiles, in increments of about 50-60 cm. They should not get to the point of connection of longitudinal and transverse profiles! Focus on previously suffered markup.
Came straight hangers, bend tabs 90 ° down. Do this carefully - after the folding legs must remain perfectly straight.
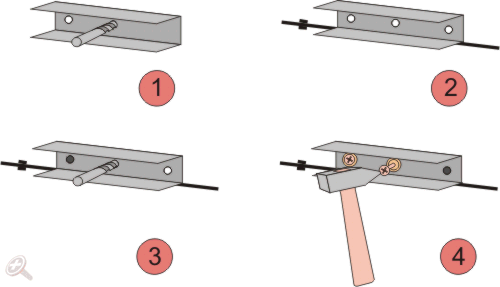
When all the hangers nailed, set the longitudinal profiles of the markup (every 50 cm). Secure them with screws through the guide profile, one at each end.
Tighten the screws without drill is not too difficult. The main thing - to use appropriate bat (labeled "PH2"). How to push the screw (but without fanaticism) and turn on medium speed. After a second or two sharp tip pierces the metal, and then screw screwed easily.
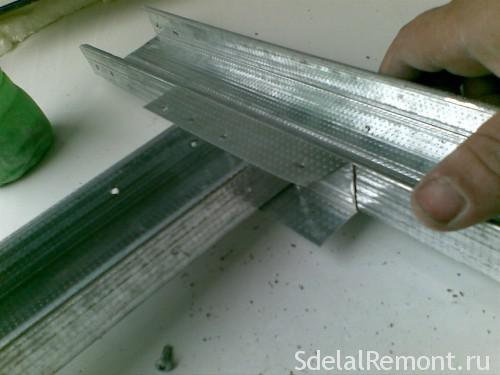
Cut jumper. note, that the length of the extreme jumpers will not 44, but 47 cm. Connect jumpers "crabs".
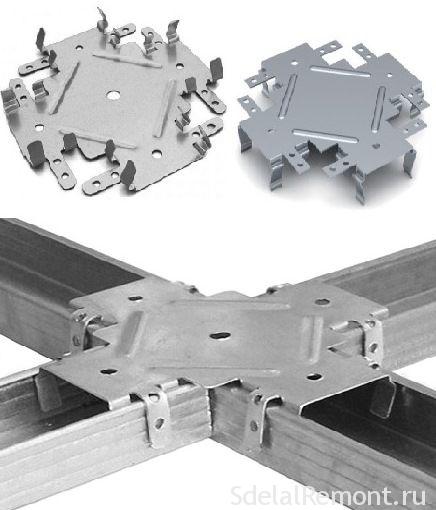
Crabs latched top. They have special petals with holes for mounting screws to profile. Bend the petals and stick a crab to a long self-tapping profile. Before that, make sure, that he did not move in relation to the mark. More on the two self-tapping screw through the same petals in each jumper.
How to save on crabs
Make a jumper on 6 centimeters longer. Cut off the shelves on the side 3 cm from each end. the rest, average, Screw the self-tapping part directly to the bottom of the long ceiling profile. Do not be fooled, that the screw head sticks out a little: it will not be a serious obstacle for a snug fit drywall.
Variants of connection profiles without the use of a crab on a photo:
When such savings suffer several carcass rigidity. Of course, ceiling does not fall; just be a little less smooth and durable.
Do not rush straight tie hangers to profile. The problem is, that the length of the profiles 2 m and more inevitable provisnut. Especially if you use an extension cord (a longitudinal connector).
Eliminate the slack with a cord, taut across all longitudinal profiles:
- tighten the screws on one guiding profile at each end of the room, middle of the wall;
- bind to them and how to lace his pull;
- you can see, that the long profiles of "lie" on a shoestring. Before fastening hangers, lift them so, so that they hung in 1-2 millimeters of cord.
When the longitudinal profiles are bolted all the suspensions and all jumpers, frame ready. Proceed to install drywall on the ceiling.
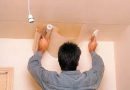
Installation of gypsum plasterboard
But first you need to make insulation (if in your case it is necessary to). There are different ways to insulate the ceiling. maybe, the most convenient - is insulated with mineral wool. Roll insulation simply placed on top of the frame. Work gloves, glasses and respirator - dust even irritate the skin of mineral wool, not to mention the mucous membranes.
And now it is possible to fasten the sheets GCR. Start from the edge, wherein whole leaf is placed. Place a sheet of crosswise long profiles, close to the walls. If you did everything correctly and accurately, the edge of the sheet along the entire length will be exactly at the middle ceiling profiles.
Screw the sheet to all profiles, and on the edges, and in the middle. At the edge of the screws should go about every 15 cm, in other places can be increased step-up 20-25 cm.
How to mount sheets
In GCR has front and seamy side. On the front side of the rounded chamfer on longitudinal edges of the sheet and have a small unevenness. Wrong side is always flat – for a snug fit to the surface.
Screw the screws to ten millimeters from the edge. The cutting edge needed to retreat at least 15 mm. Stick to no less than five centimeters from the angles!
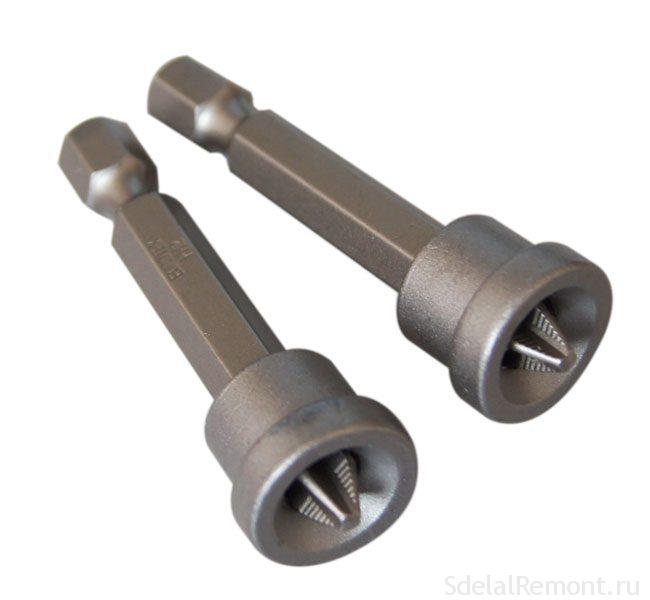
Hat of the screw must be lightly utaplivat in the surface of the plate. Do this carefully: screw fairly easy win, especially when lack of experience. In this kind of work is very helpful a special bit for plasterboard with a limiter.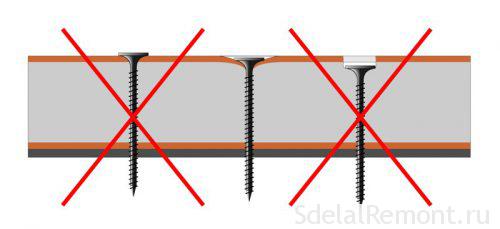
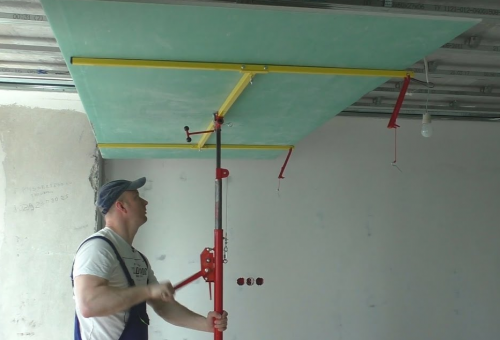
The mark on the wall, you will see, where are profiles. However, You can advance plasterboard sheet raschertit, even before, as you pick it up and begin to strengthen. Continue longitudinal row of sheets, end to end, without gaps. This work is difficult to do without an assistant.
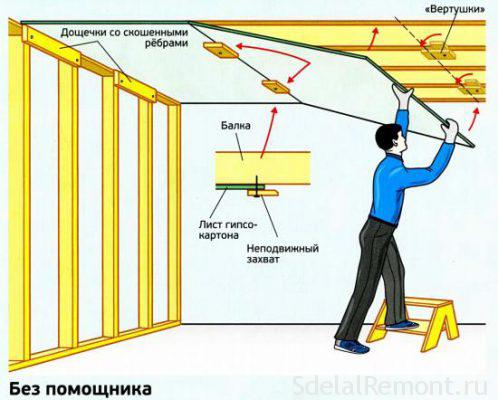
Adaptations to not keep a sheet of drywall
Make a backup. Take the plank slightly longer than the height of the ceiling, fasten it across the board cut of about one meter in length, To get the letter "T". Strengthen the two planks diagonally. In this device, like a mop, are masters of the world, when doing installation of drywall on the ceiling.
Methods for mounting a ceiling of GCR without an assistant:
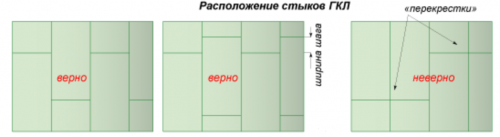
Next row starts with a half sheet. The technology requires, that the seams between the sheets do not intersect crosswise. Proper positioning of the plates resembles masonry.
How to cut drywall sheets
knife. You can stationery. Note exactly the middle and make an incision on the line. You certainly have a piece of ceiling profile - use it as a ruler. The incision can be shallow, enough to cut paper. Cut sheet under the same profile or sheet put on the table and break it. Will only cut paper from the back side.
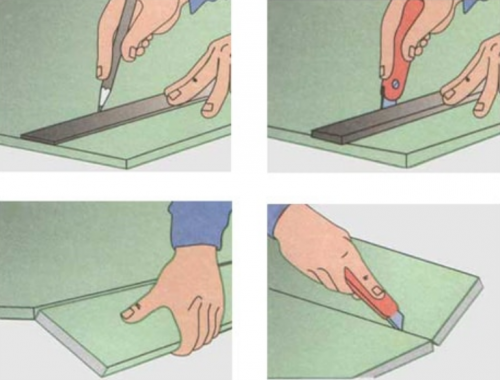
If you need to cut a very narrow strip, it is easier to use a hacksaw on wood.
We need to cut the edges of the additional chamfer. This is necessary for quality spackling. The same knife cut off from the front of a few millimeters at an angle of about 45 °. The accuracy at this stage is not required. Factory longitudinal edges do not touch - they have already rounded chamfer.
Detailed secrets work with plasterboard.
finishing
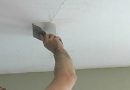
Prime the ceiling roller or large brush. Small brush carefully go over the seams.
After the primer has dried stick tape serpyanku. It is glued only at the turn of the factory seams, as well as the angles. Immediately after that, you can putty joints.
Knead a small amount of filler. At this stage only need to cover the seams and the deepening of the screws. Apply putty narrow spatula, then spread wide.
According to the technology putty joints need twice. So I have to wait for drying putty, then to cause the second, thin, layer. But before that, be sure to scrape off with a spatula all burrs (just do not apply excessive force).
And now in a good need to apply a third, solid, putty layer. The result is a smooth white surface for painting. Many ignore the correct way to paint without the glare and then spots visible. More about this https://sdelalremont.ru/prichin-poyavleniya-blikov-na-potolke-i-kak-ot-nix-izbavitsya.html
conclusion
properly, that's the whole article is about, how to mount plasterboard. Save this page or print it out - let it be your cheat sheet on how, how to install drywall on the ceiling.
Good luck to you repair! In addition, look at a selection of videos on installation of the GCR designs.
https://www.youtube.com/watch?time_continue=6&v = hAgij2orkO0