
Ceiling installation, referred chandelier, It is the main source of lighting in many residential areas. See article how to choose the right lamp wall. located chandelier, usually, in the middle of the ceiling, so far as possible evenly distributed flow of light. Fixed chandeliers or hanging of hook, or by means of special dowels by rigid attachment, where in this case there are two options, how to install a chandelier:
1. Secure special bar, which would be included in the design of the chandelier, to the place of supply of the power supply wires from the ceiling. Plank This must be done so, so that it can be removed with the help of unscrewing two screws with decorative heads. After attaching the strap to the ceiling attached lead wires, wear body chandeliers and tighten the screws.
On the ceilings in the old layout of the apartment there are often large holes, in which previously installed hooks for hanging chandeliers. In this case, just move a little place of special fastening strips so, the hole for housing the chandelier hook shut after installation.

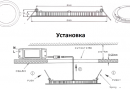
That's what made the installation of today's popular budget options. chandeliers installation desirable to not alone, and together, using a stable stepladder.
2. Somewhat differently mounted heavy chandeliers, in which it can often be inserted down transformer. How to install ceiling chandelier of this design is correct, we are now also will understand. The design of such chandelier consists of two parts - the outer panel with different numbers of cartridges designed electrical arts and massive base to control gear (what, however, It does not occur very often in recent years,) and a step-down transformer. First, using three or four anchoring dowels to the ceiling base.
Then, connect the two power supply wires. Connect the leads to the connected to the transformer (rather, to its primary winding) contact terminal. These contacts can be easily determined visually, as it is much thinner wires of the secondary winding. In the case of the third ground wire, you must connect it to the chandelier. Then don on the basis of the outer panel and fix it with the screws with decorative heads.

In this and in another case, before installing it is imperative to remove all legkobyuschiesya components - electric lamps, diffusers, crystal reflectors. After installing and connecting the chandelier can be safely Screw or insert lamps ,to test their performance in all existing operating conditions. At least it has to install all legkobyuschiesya and fragile parts.
Probably, the easiest to install and connect the chandelier, which is hung on a hook. After that, as chandeliers are installed on the hook, only need to connect with her supply lines, lift the cover cap, position that hides the electrical connection and the hook and firmly fix the cap in this position. Then you can freely twist electric lamps and produce verification of their performance. At least there are also installed and fragile part legkobyuschiesya.

How to connect the wires to the ceiling chandelier correctly
In rooms, designed in the good old Soviet times - whether it's "Leningradka", "Stalinka", "Khrushchev" or other types of apartments - chandeliers, usually, connects a lot easier, than in areas of modern buildings. Upon completion of the dismantling of the old chandelier in the middle of the ceiling is usually observed a hole for the hook, and from it or around it sticks out a few wires. If we remove the lid switch dvuhklavishnogo, usually located on the wall, also see, that it is connected to the same number of wires, which sticks out from the hole in the ceiling (most of all - the three wires). See our article how to install and connect the switch open and concealed wiring.
If the wall is one-button switch, third wire must still be somewhere near, I am just a laid aside and isolated. Most likely it means, that dismantled the chandelier was only one lighting mode and connected it was three wires, that protrude from the ceiling, only two. In older homes are often in the hallway, bedroom, the kitchen, bath and toilet from the ceiling can stick only two wires. It means only that, that there is no alternative and have to be connected single-mode type of chandelier.
However, most chandeliers, manufactured in the Soviet Union worked with three lighting modes:
- Mode is not bright lighting - when only a central lamp. In the case of, if the luminaire is no central lamp, lamp is lit lower portion of the side.
- moderate bright light mode - when not working central lamp, but lit side. In the absence of the central lamp in the luminaire, burning most of the light side.
- full brightness mode - when working at full power all the lights.
Chandelier, It operates in three modes consists essentially of two electrical inlets, each of which is a group of electric lamps, are connected in parallel with each other. by the way, one wire coming out of the three lamps is common to other. In the event of a voltage between any two of the other wires and the common wire begin to work both groups.

If the network is a single-phase, voltage occurs between the working and zero phase. In the case of permanent connection to the common wire chandeliers zero and supplying the working phase through a double switch to the other two wires can be considered similarly be exercised compound. If there is a permanent connection to common wire chandelier with the phase at that, that after the switch to the other two wires fed working zero - chandelier would also work with this compound, However, such a connection can not be called good, because it was possible electric shock to persons, when necessary is to replace blown bulbs, as well as the switch out of service.
Therefore, the principal is a need to find a common wire of the three wires, that protrude from the ceiling. How to do it? We can consider the most effective ways:
The easiest way to be gently spread apart wires, and then translate the two key switch in the "on" state. Picking up a screwdriver indicator, alternately touch the bare ends of each of the three wires. In the case of a spark ignition in the screwdriver on the two wires and the absence of the third can assume, that the wiring is correct, a third wire, by touch on the display to which the screwdriver does not turn on light, It is common.
For the ultimate confidence, administration site renovated apartment in a new building with their own hands recommends to turn off both the switch and the keys a second time to check the presence of voltage, touching the ends of the wires. If everything is in order, indicator is nowhere to shine, as the switch opens and swells phase electrical circuit.
The indicator may also light up when you touch the bare wire at the end of the off and on switch. It may mean they do not absolutely correct wiring and the, that the wire is common.
If you have any similar problems, it is best to use other ways to find common wire, which may seem a bit complicated, but it will be more reliable. for example, You can use a multimeter, special measuring device. It is necessary to put the device in the position in which the AC voltage is measured and converted into the operating position at least one of the switch button.
Then touch probes multimeter turn the bare ends of the wires. Turn down towards the two wires, not their peremykaya, translate the key switch into the "off", and the other - in the "on" state. The voltage between the two wires, which have been bent to disappear.

The third remaining one of the conductive touch probe device, and the other probe in turn touch the ends of the two bent wires. Where there voltage at a contact wire to be shared and. It is necessary to mark a special way.

It remains only to find a common conductor on the chandelier. To do this, screw the light bulb and turn the multimeter to measure the resistance between the ends of the three wires, that come out of the chandelier. Thus the need to find the two wires, among which will be the most resistance. None of them can not be a general, since just the third wire in this case is common wire.
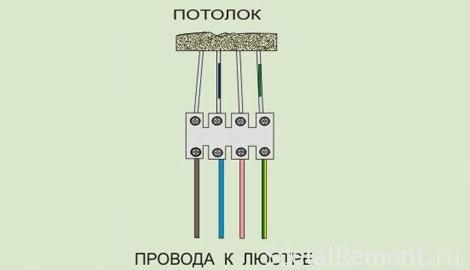
After identifying the common wire, You can connect the chandelier right. Pre fully in the apartment off the voltage and connect the terminal connector (see our article methods of connecting electric wires) wire chandeliers with the feeding end, that protrude from the ceiling.

If there are additional chandeliers fourth wire (it is usually a yellow-green insulation and is grounded), this wire will not be connected and simply isolated. Check lamp operation after the voltage. If everything was done correctly, chandelier should work normally.
The modern rooms of the ceiling does not often stick out three, and four wire and the fourth wire is the ground. This yellow-green wire is attached to the lamp housing via a wire of the same color, which comes out of it. Problems can arise if all four wire, sticking out of the ceiling the same color - then you need to look for more and the ground wire.
To do this, you must first turn off the panel at the induction machine. Then quite a long piece of wire, one end of which is cleaned and released from isolation attach to the probe of the multimeter, the other his stripped and released by the end of the isolation valve is wound on the unpainted part of the battery. Put the multimeter in the resistance measurement mode and check the probe alternately all four wires. Where the meter will show resistance (which will still be very small), It is ground wire.

How to connect the chandelier with remote control, on the remote control.
Perhaps, the most modern household lighting devices are chandeliers, which are equipped with a remote control. The design of this chandelier, usually, It consists of several lamps (often LED) and controller, which is the control device. such lamps, by the way, can perform not only the lighting function, but can serve as a timer device or tsvetomuzykalny multiprogram. These specially attached to control panel. However, for some people it is forgetful, seemingly indisputable, advantage can turn into a disadvantage, because they always forget and lose the remote controls, when moving from room to room.
Therefore, some chandeliers are provided with two remote controls - actually, remote and stationary base, which performs the search function. Installed and connected stationary basic console on the wall instead of the switch. You should use the search function and the "lost" panel will be found quickly thanks to the buzzer, inserted in its structure.
Now a closer look at how to connect the chandelier with a remote control to wires and switches correctly, and then look at how to install a ceiling chandelier. Quite easily to the network in the old homes are connected chandelier with only one remote control. Grounding is not necessary to connect, one has only to connect the ground and any two other wires. the wire, which is not connected, you must bend to the side and securely isolate.
New apartments with four wires, sticking out of the ceiling, require more and earthing the lamp housing. Wall switch can be left in its place if it is always on, or remove all. If clean, the two wires in place switch must be connected to each other.
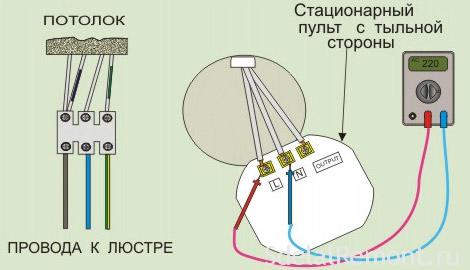
However, if there is also a stationary console all is also not so difficult. For normal operation of the stationary remote voltage requires two hundred and twenty volts, so you must ensure that it is such a power. First you need to turn off the power at the switchboard, dismantle the switch on the wall, gently spread on the sides of the wire ends, which was connected to the switch.
On the ceiling then connected in common with one of the two remaining wires (naturally ,not only with the ground) and the power is turned. Between the bare ends of the wires should be attached a small voltage appears, which can be measured with a multimeter.

wire, between which a voltage, attach to the terminals L and N at the stationary remote, the remaining wire and connect to the terminal "output" (however, it may be indicated in another way, for this it is necessary to read the instructions, which is attached to the chandelier). In the case of PE terminals do not need to connect it anywhere. For twin driving a ceiling wire connects one of the wires, to a single - the second, and to the ground - a third grounding, if a, of course, he has.
Controllers with Remote Control.
All chandelier with remote control contain the electronic controller unit. This device helps to perform brute force different lighting modes including cutting off a part of the group chandeliers. Sometimes, electronic controllers are sold with remote controls in retail and are relatively inexpensive, and they can be purchased separately from the chandelier.
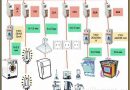
If you change the wiring so chandeliers, to connect them via the controller, Besides ,it is possible to achieve remote connection modes, You can improve the functionality of such a scheme due to the fact, that will increase the number of its modes. If we dvuhklavishny switch allows you to control two branches of the circuit, the controller can control up to six branches in the middle (when increasing numbers!). As an example below shows the circuitry connecting process chandeliers, which consists of five fixtures.

Since the body size of small chandeliers ,it's easy to hide mounting, at least in the same hole in the ceiling, which is intended for fastening the hook. Now you know how to install a ceiling chandelier correctly and how to connect the chandelier with remote control and without it, too, right. Remember:
All works, during which it is necessary to touch the bare wires, carried out in the absence of voltage!


all as much as I did in my 4 discharge but Western models of chandeliers connectors require
new tool and without it is really dreadful and the most simple materials and fasteners.
That's for sure)