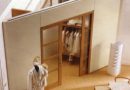
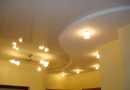
- Ideas create exciting aerial ceilings
- Design beautiful soaring ceiling
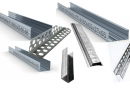
- materials
- Lighting to illuminate the soaring ceiling
- The project for the soaring ceiling
- Preliminary work before assembly of the frame profiles
- Marks on the rough ceiling for plasterboard ceilings
- Installation soaring ceiling of plasterboard with backlight
- Installation II the ceiling of GCR
- The second option mounting soaring ceiling plasterboard
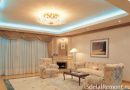
When the idea of repair in apartment, Each tenant is willing to do something beautiful, design, individual. Soaring ceiling plasterboard with lighting creates a simulation of the air of the ceiling. Highlighting visually expands the room and make it lighter, spacious. Drywall is used in many repair works. This material is leveled surface, are curved ceilings, very beautiful walls and arches.

Ideas create exciting aerial ceilings
plasterboard ceilings present in almost every room. The big advantage is the smooth surface. Soaring ceiling has its difficulties in mounting. But, with the necessary tools, and following a clear plan of work, the process will take place without difficulties and complications.

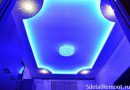
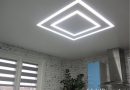
Soaring ceiling may consist of a single quadrangle, highlighted ice-tape, and of some geometric shapes, which by means of illumination "float" under the ceiling.

Advantages of the floating ceiling plasterboard:
- The appearance of the ceiling is transformed into an extraordinary, sharpens on attention, It is making the entire interior of the premises to modern, beautiful.
- With soaring ceilings aligned corners, hidden communication.
- With illumination floating ceiling visually increases or decreases premise.
- The effect of "floating" allows you to realize your fantasies, Create beautiful soaring ceiling plasterboard.
Creating a floating ceiling might indoor small square footage, as well as the small height of the walls.
Design beautiful soaring ceiling
To create a ceiling structure with the effect of "floating" there are different variants of the ceiling:
- Sibling soaring ceiling of plasterboard with backlight. It is the simplest design, which is going with his own hands, while the process itself is simple.

Sibling soaring ceiling in a small room - A two-level ceiling with the effect of "floating". Here, the first layer is the base for creating a second level. The second level are considered to be figures, started on the ceiling using metal profiles and are covered with plasterboard. Different illumination has the effect of increasing, bulkiness, Beauty.

Duplex soaring ceiling with backlight - Multilevel soaring ceiling. It has 3 and more levels, which have both geometric shapes, after various shaped items.

Three-tiered ceiling with lighting


Duplex and multi-level soaring ceiling has a more complex system to install framing basics. But, adhering to the drawing, work plan - it can be done with their own hands.
Important. Multi-level structure installed only in rooms with height 3 m and above, because it is bulky design. In a room with a low ceiling, this design will look like is stuck on and the ugly.
materials
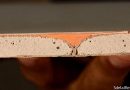
- Plasterboard ceiling 9.5 mm.
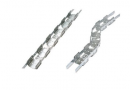
- profiles PNP (OUT), PP (CD).
- direct hangers.
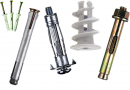
- Dowel-nails 6/40, 6/60.
- Anker-kliny6h40 or 6h60.
- Screws for fastening profiles 9-11 mm.v length.
- Self-tapping screws for fastening drywall to metal frame 3.5h25 mm.
- Electrical wires for lighting.
- Priming with antiseptic.
- Primer.
- Putty composition for reinforcing joints, tape.
- putties.

The amount of materials is calculated from the measured size. It is worth to purchase 10% More building materials, than the calculation.
Lighting to illuminate the soaring ceiling
One major factor is the choice of lighting elements for the ceiling with floating effect. used: LED-band, daylight lamp.

Lighting fixtures combined: on the edge of the integrated LED-strip, and in the center chandelier.
Please note, LED strip warm, it takes care of heat dissipation, to avoid overheating.
The project for the soaring ceiling
Before, begin to direct drywall construction, should draw on paper, how many tiers will be in the ceiling, what they will, and as indicated with backlight.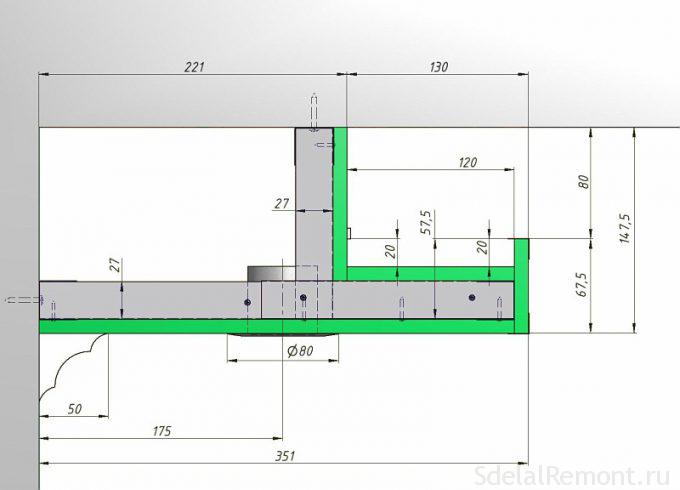
On a sheet of paper is a diagram hovering ceiling plasterboard. Applied all the recorded size. designated point, where there will be a transition from one level to another. Be sure the dimensions are specified in millimeters. Because it plays a big role in creating the wireframe bases.

On a separate sheet of paper lists all the places lighting installation, Electrical circuit is drawn wiring.
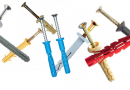
Preliminary work before assembly of the frame profiles
After the drafting of the room should be free from unnecessary, interfere with the process of things, furniture and other items.
- From the ceiling wallpaper removed or peeling paint.
- In places swollen plaster, should remove all, hole putty. In some cases (cracks) use reinforced tape.
The preparatory process is an important step in the creation of drywall constructions. Since the surface of the eye is closed, It knows how to behave in old plaster (She collapses on the soaring ceiling and heavy with design), crack - can go ahead and expand.
Marks on the rough ceiling for plasterboard ceilings
To carry out the markup required:
- laser level;
- building level;
- pencil or crayon. You can also use the cord otbivochnogo, that is most comfortable in a large room.
In the room, where soaring ceiling is assumed, should choose the lowest angle. In this corner of the ceiling should fall back down 8 cm. This point with a laser level is transferred to the opposite corners, forming a flat surface,. On the walls of this point is drawn one smooth single line - to guides.

Next, from this line should fall back down onto the 20 cm. This will be the second rail line, indicating the height of the "floating structure".
On a ceiling through each 60 cm. draw lines for the ceiling profile. On these lines, steps 40 cm. Dotting for suspensions. Since it is assumed the second level of the floating structure, skeleton of the first tier should be strengthened to do. Therefore, perpendicular to the main lines of the ceiling should draw increments 40 cm. cross.
And the ceiling it should be noted in terms of future fixtures, that they lie on a straight line and not fall to the place of suspensions.
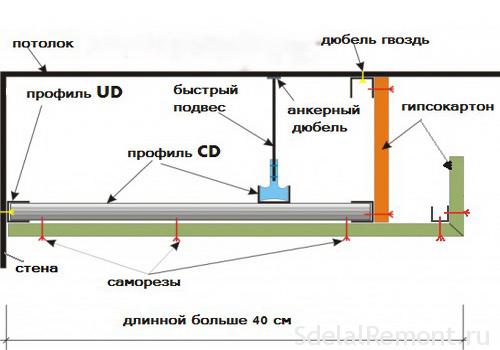
Installation soaring ceiling of plasterboard with backlight
Before you fix the guide profiles to the wall of the markup, should be on the back side of the profile damper sticking tape, which serves as a barrier between the base metal and.
- The guide profiles attached with dowel-nails along the lines of the walls. Step fixing this: fastens the beginning Profile, After a departure 30-40 cm. fix the second dowel-nail. And so on until the end of the profile. End also fixed dowel-nail. (Fig.1)
- On the ceiling, on the marked points are installed with the help of suspensions anchor-wedge. This fixture is fixed to the suspension lugs and is mounted by plugging a hole made.

important factor. If suspensions fix other fasteners, then the design will be flimsy and eventually sag.
- The next step is to fix the ceiling profile to guide and suspensions. It should follow the single plane. Each attached profile is required to check the level.
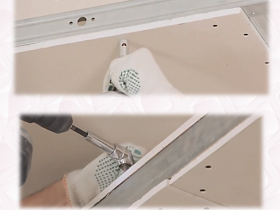
- Between the ceiling profiles are mounted transverse. Fixing takes place by means of screws and crabs "ê".
- Honeycomb frame soaring ceiling of gipsokartonaiz profiles carefully checked for strength (creaks, not falter) and evenness by the level and the rules.

Produced honeycomb frame for gypsum board - Frame base completely sewn up drywall. Reinforce the joints do not need.


wire should be put in place lamps on 20 cm. for further fastening.
Installation II the ceiling of GCR
Further, you should know the exact dimensions of "hovering" of drywall constructions. On the ceiling to draw the marks on the 10 cm. less than the figure itself. Key pointers for link guide. Should prepare in advance carved part of the CD Profile. The length of the element is equal to the height of "floating" figures. Along the edges are left "ears" of the side parts Profile.

On the ceiling are marked lines for ceiling profile. On these lines are set points for suspensions. These elements are attached with screws to the Plasterboard overlap. For the strength of the magnet are determined by passing the place of the first-level profiles.
- The guide profile fixed to the ceiling with screws Plasterboard.
- To guide profile mounted vertical cut-out portions of the CD using self-tapping screws "ê". step fixing 40 cm.

stepwise algorithm for creating 2 level on a floating ceiling - Ceiling profile fastened to the vertical beams and suspensions small screws. Ceiling profile should extend beyond the guide on 15-20 cm. On the protruding part of the beam is set CD profile.

On protruding ceiling profile "dresses" the profile of equal height of the structure. Forming a niche for the ice-belt - Once created frame is sheathed with plasterboard.
- Speakers ceiling profiles on the inside as well sheathed GCR.


The entire structure is coated with a primer. Gypsum seams reinforced, apply filler for joints. Masters recommend to choose the putty mixture KNAUF "Uniflot", «Fugen».
The entire surface of the ceiling I and II tiers puttied finishing solution, is overwritten with sandpaper.
Important. For durability gypsum putty mixtures structure selected one vendor.

The formed recess LED-mounted tape. It has on the rear side an adhesive layer of glue, which is closed on top protective strip. In the recess ceiling tape is removed and the protective material adheres to the substrate. Wiring the wire protruding from the first tier.
The final step is painting the ceiling plasterboard soaring. If the LED ribbon color, then painted on the ceiling 2 shades lighter, what color ribbon. This contrast is visually increase the size of the room, and will also make plasterboard structures floating in the air.
The second option mounting soaring ceiling plasterboard
Creating a framework basis for plasterboard ceiling, along the perimeter of the profiles is a niche, stepping back from the wall 15-20 cm. Niche height of no more 15 cm. On the ceiling are fixed guide profiles along the entire perimeter. Data recorded profiles cut vertical beam profiles of CD. Profile length equal to the height of drywall constructions (from 10 cm. to 15 cm.). Uprights are fixed via each 40 cm. small screws. Ceiling profiles are mounted on the markup to the suspensions and the uprights, speaking for them at the border 10 cm.

Frame base sheathed with plasterboard. Speakers profiles from the backside sheathed cut pieces of drywall. The whole construction is subject to the further reinforcement of joints, priming, coverage putties.

Soaring ceiling plasterboard is one of the options, suitable for a large room and a small kitchen. The design is created easily with your hands without attracting artists. If it assumed as a main light heavy chandelier - located on the metal frame reinforced extended profile.

Soaring ceiling can visually enlarge the room, make it a bright and well-kept. but, soaring ceilings in large rooms are in 2-3 level of plasterboard, having a dark color - blue for the sensation of coolness or brown for the shadows.