Situation, when you come home, turn on the lights, and in response to darkness, It is often. Press the Power button, it becomes clear, something broke inside of the lighting system. maybe, blown bulb, contacts open, failure in the chandelier. Determine at a glance actual, Only visible break the lamp bulb, viewing it on the light. We go by process of elimination, changing a light bulb, darkness.
Likely failure within. How to Repair a crystal chandelier is not yet clear, but sometimes it is simply necessary to know. After analyzing the situation, looking lantern, and in the daytime, tool. We begin the process of repair.
Exclusion method breakage
It is not excluded, that the failure occurred not in the chandelier, and to her, in the chain. May malfunction switch itself, burn electricity supply wire. Check need the whole chain - from the safety relay in the distribution board to the contacts in the cartridge.
- We must start with a visual inspection. Inspect the automatic switch at the bottom of the lever position (disabled), try to turn it on. It reacts to a short-circuit in the circuit. If you can not put it to on, it means, that the circuit is closed so far.
- Normal machine lock switch in the up position indicates that, that the circuit at the moment there is no. maybe, it appears during operation. Turn off the relay, change the lighting element in the chandelier and turn the whole circuit again - from the machine to switch. If electricity is not supplied, check on, do not forget to turn off the switch before working on devices.
- Check the unit for distribution board, turn the switch. Modern circuit breakers are usually provided with backlighting, look, Does it burn. If there is no indication or it flashes, will have to do an audit and there.
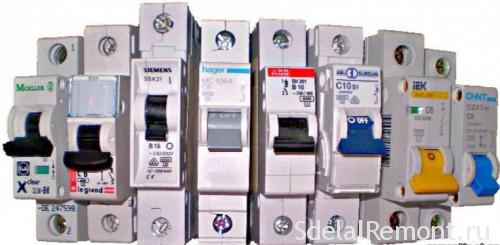
Types of electrical machines
Do not attempt to lock the safety switch in the up position (included), as this is dangerous. Ignition possible wiring fault point.
- Remove the keys using a screwdriver with insulated handle.
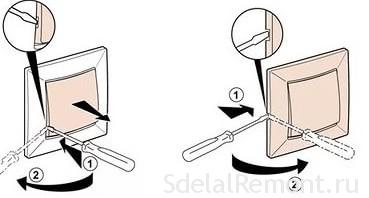
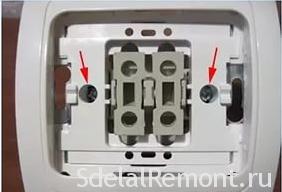
- Release fasteners screws, remove the switch and check the contacts for fractures, burnouts wire.
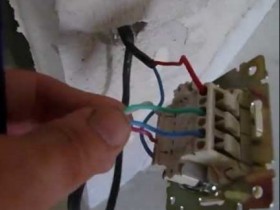
- Before, how to repair a crystal chandelier, check, it can be multiple lighting groups, then put a double switch in the two groups, eg, one lamp plus two. Check order. visually intact, mountable back, if not, We carry out repairs.
How to repair the fixture with his hands
After inspecting the circuit and spending some of audit work in the shield, switch, we try to understand, how to repair itself chandelier.
For example trohrozhkovy embodiment chandeliers with crystal elements. Before repaired chandelier, prepare:
- thin screwdriver Phillips tip;
- flathead screwdriver;
- tester;
- adhesive tape;
- soldering iron set, where rosin and tin is present
- a small piece of sandpaper;
- knife;
- trohrozhkovoy chandeliers scheme also does not hurt during repairs.
Repair chandeliers cartridge is better to start from a place, where screwed lamp lighting.
Cartridge consists of several parts:
- The tube is threaded in 40 mm, which is screwed into the lighting element.
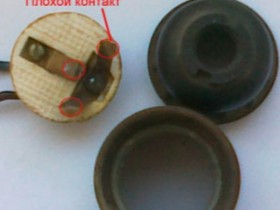
Loose socket - Porcelain insert with the contact group.
- Housing with a seat within the group and externally threaded to tube.
Repair chandeliers with their hands logical place to start is with them, where often the scorching contacts, a loose contact with the contact group plinths. Repair the cartridge chandeliers carried out in two stages, First remove all jewelry from crystal, twisting lamp, and then begin to repair the cartridge.
Let us examine everything to screw:
- Search cartridge failure to carry out simple. Unscrew the top of the cartridge with a thread for the lamps. Do this at once on all the horns chandeliers. Remove decorations from crystal.
- Review the integrity of all thread, there are no points on the short-circuit. If there are fixed in a shallow (grain 200) sandpaper.
- Inspect the cartridge contact group, consisting of antennae. The presence of soot delete knife, sandpaper, if he is.
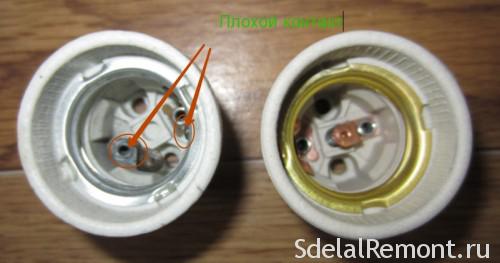
Check the quality of the contact group - Having hooked a screw-driver with a flat end of the ceramic sleeve, remove it from the cartridge housing. If it is collapsible. Check wires, they must be tightened screws, from the back of the ceramic. Dark color contacts or screws, says, that contact was weak, tighten the screws, holding the wire. Now you can collect.
- Turn on the relay machine, switch. take indicator, We put on the test voltage (220 AT), We check the electricity supply "phase" and "zero", touching the contacts within the cartridge, thread and mustache. indicator shows, whether there is electricity. With rounds completed, if electricity arrives react indicator. If not, go to the junction box chandeliers or her control.
Check the wiring diagram
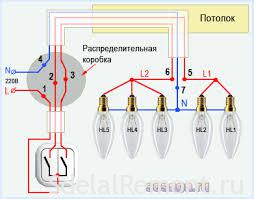
Simple lighting device does not require much knowledge, another matter Repair Manual chandeliers. In the usual way trohrozhkovoy chandeliers you will have three wires from the ceiling outlet. Two phase wires, One Blue zero.
To start, take out the wires. Is there not a line break. Make it easy. The scheme works as before:
- Check the contacts in a group, the plate, if it is, or twisting, exposing wires.
- Determine, which wires go to the specific lamps. Insulating tape must be removed at the same time.
- Present open contact, eliminate, Wire insulation.
Everything should work.
Do not forget to remove power when working with soldering.
Repairs to the control lamps require a little more time:
- Turning off the power.
- Check the integrity of the wire. Before repaired chandelier with remote control, check the two wires, remaining on the site of the old rocker switch, sometimes oxidized compound. Then take a soldering iron, tin and rosin and propaivaem contact.
- You can switch to leave the old place, if it will be ON. It depends on the type of remote unit. For repair chandelier with remote control requires one tester and screwdriver. Sometimes repair crystal chandelier, it is necessary to remove itself completely. We need access to the controller.
- Using the attached diagram indicates the location of the contacts, After a thorough inspection of the regulator. Often manufacturers specify scheme connect network cables and chandeliers directly to controllers.
- In case of breakage eliminate and try to connect the circuit.
Must all work, the possible failure of the chain from the shield, to block, we have eliminated.
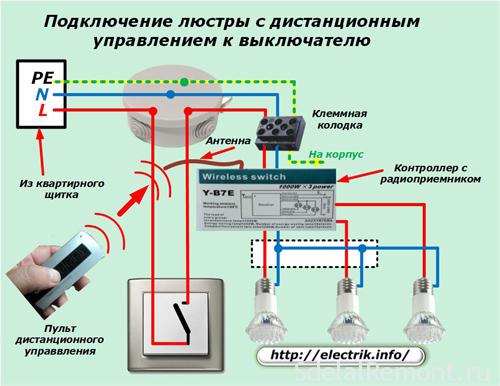
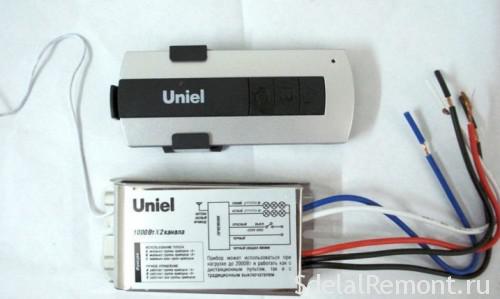
Failure detection regulating lighting unit, visually identify, We have to replace the controller of a new. All teams, received from the remote, He takes it.
Conclusion
How visible, nothing complicated chandeliers repair, his hands no, you can do it without problems. Almost all possible remedies considered failures, minor faults can deliver a lot of trouble. The most common of them - contact open, podgar in place of the device and the relay connection, chuck, switch. Trite can sit battery Remote Control Power.
All work carried out by specially insulated tools, Use rubber gloves.
After spending some simple work, thus saving the family budget, you will get invaluable experience. It is only sometimes necessary to call in a service, to invite the master, when you simply do not have the tool at the wrong time, holiday or anniversary.
Also see the video on how, how to repair your own chandelier:


