- Work on the screed on the floor
- materials, used to tie
- Waterproofing screed
- Definition and classification
- Tools and materials
- Substrate preparation
- Processing of sutures
- surface primer
- Preparing the solution
- The technology works with a coupler
- Applying fill layers
- floor heating device
- Possible mistakes
- professional advice
- Security
For a surface alignment for floor covering or as a topcoat in the moment there are numerous embodiments of ready mixes and methods of performing mounting. But people are trying to find something suitable and at the same quality, favorable across the board. For this reason, more and more began to resort to pouring self-leveling floor, which has an extensive classification and types, the choice of which depends on the circumstances of repairs.
Work on the screed on the floor
With the right approach to the repair of the sexes, you can easily achieve that, that the parquet begins to squeak through time, laminate will not sag, a tile can be laid on a thin layer of glue. Work on the screed is the crucial stage, which demands the undivided attention of builders. Here you need to know and understand, that small differences in the flatness may result in defects at the finish floor covering.
materials, used to tie
To fill the alignment layer is used cement-sand mixture. Pouring the mixture into a thick layer can be added: rubble or concrete block. If the layer is small, to 7-10 mm, then use ready-mix self-leveling. It is worth noting, that the premises, which will be carried out tiling work , screed must be as flat.
Waterproofing screed
It should be noted a caveat, when screed works are made in the kitchen or bathroom. Because in these areas by wiring plumbing and there is the possibility of accidental contact with moisture on the floors (gust water pipe, leaking sewage and so on.), in such areas should be made with pre-screed waterproofing. The process does not differ from the standard, Only before the stack metal mesh, old floor base surface and about 10-20 see the walls treated or waterproofing mastic asphalt mixes of "GLIMS-water stop" type. Then you can begin to fill the screed on the main tehprotsessu.Posle as thoroughly dry screed (from 7 day for tiles and about 30 parquet) you can start laying any floor covering materials.
Definition and classification
Self-leveling self-leveling floor - a variety of materials, used for loading subfloor. Moreover, the surface may be quite different. He has the main goal - to make the floor perfectly smooth and durable.
The composition of fruit liqueurs include cement, fillers modifiers. Each of them gives the finished solution of required quality. In spite of their name is self-leveling, still have to spread over the surface of the floor of the future with a spatula. Subsequently, they can serve as a basis for tile, linoleum or, such as laminate.
If it is necessary to align the layer of concrete or screed of cement and sand, the base mixture is selected. At the end you still have to use other mixtures, especially if done topcoat. The thickness of this layer may be up to 80 mm, but will not be less than 10 mm. after 12 hours after installation, you can walk on the surface, since screed receive strength.
When the surface roughness reach 30 mm, on the layer of concrete or cement-sand screed most middle layer mixture is poured. The minimum layer thickness is 7 mm. High surface hardness is already achieved after 4 o'clock. Perfect for almost any flooring flooring, which will be chosen for the room.
Topcoat after drying has no flaws, if complied fully fill technology. 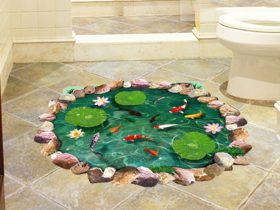 You can do without flooring, a painting implement or otherwise decorate the floor, who had not even caught the eye. This layer is not thick and is minimally 2-3 mm. The maximum allowable thickness shall not be more 1 cm. Durability is achieved after mounting later 4 o'clock.
It has been said about mineral leveling floors. We should not forget about the polymer, where isolated:
- epoxy. They have a lot of positive qualities. Most often used in rooms, where a standoff various chemicals, oil, solvents, dyes etc.
- polyurethane. Excellent durability properties, resistance to high and low temperatures, elasticity, resistance to aggressive chemical industry substances. The main floor features set indoor use and can be safely poured polyurethane self-leveling floor.
- methyl methacrylate. It is very demanding to the device, and for this reason they are less popular. But the drying time is only a couple of hours and they can fill, even at low temperatures not higher +8 degrees. It is very important ventilation of premises by pouring, since there is a great release of harmful substances. This immediately removes the issue of, possible to fill the floor at such temperatures, on the street and in adverse weather conditions. Methyl methacrylate flooring can easily cope with this task.
- epoxy urethane. This self-leveling floor unit is used on the parking platforms, where there is an intense and constant movement of people and transport. Strength is very high, and thus endowed with many qualities of polyurethane flooring options.
Tools and materials
Before, how to learn, how to fill in a self-leveling floor, should take care of the preparation of the necessary equipment. The most important thing - to have the required amount of mixture.
self-leveling floor It must be carried out on the job. I.e, no breaks and can not be, and all interested persons at one time. A problem may occur when a limited number of ready solution. So the best option - to buy just a little more, than required by technology.
Tara will play the role of Mixing. Of course, it is more than, the better. But it will require some equipment for the qualitative mixing of grout. If the volume of the bucket will be approximately 30 liters, the need to stock up 4-6 such options.
To avoid wasting time on blending the mixture of components, takes a drill with a mixer. Turnover drills thus should be at the level of 300 r / m. 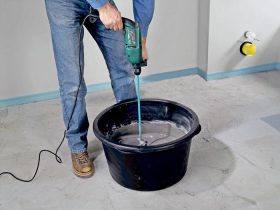 Fill the finished fluid itself and easily spread over the surface. But even in this case, is useful spatula, which achieved the best results.
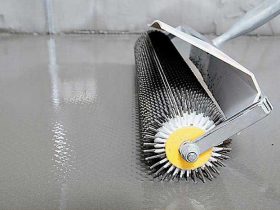
To be able to fill the room evenly, use a squeegee. He has the ability to expose the gap in millimeters above floor level. The material thus disperse in the required quantity per square meter. When mixing the mixture will form bubbles. In order to avoid them in the future, work is done with aeration roller with needles. It will be enough to put in your 40-50 m2.
If there is a need to move on a solution, who had just filled, acquired sole spiked. It can be placed on the surface and no fear of damage of the top layer.
Upon completion, the tool does not need to throw out. It should be qualitatively launder from the solution, that can be used in the future when performing any construction work. To facilitate the task of the solvent used.
Substrate preparation
A very important step - training activities base. It was from him will depend on the quality of all work. If the devices Technology Self-leveling floors not be respected, then later the base will start to crack and shrink. Neither of which durability and can be no question. Whatever it was under the surface of the self-leveling floor, it must be cleaned completely. This is done even when laying on the asphalt. Everything has to be removed, without exception,. Each material has its own properties. for example, cement perfectly absorbs moisture.
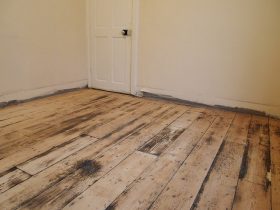
If you put self-leveling floor on a cement-sand screed, problems may occur in the subsequent operation life. Besides, the surfaces should be clean and remove even the dust. In this case, the vacuum cleaner will help building.
There may be situations, when the base is self-leveling floor will have a porosity. These pores are subsequently working solution easily gets. With this help cope special impregnation, available on the implementation in DIY stores.
The timber and can act as a base. It is very popular with private construction of houses. There will need to produce grinding it, to roughen grate sandpaper. Avoid fats Spent tree, varnish, oil or any kind of dirt.
When carrying out pouring of self-leveling floor tiles, it should carefully examine. When it is tight to the ground and never ridge, it can safely casting solution. Otherwise, the tile is removed and the surface is cleaned.
Processing of sutures
When the construction of any home, 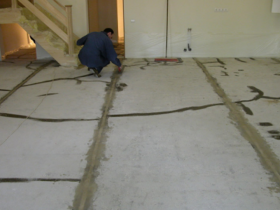 concrete base shrinks. It even provides the building rules and regulations. Each joint must be thoroughly cleaned of dirt. Only followed by a special cover soil for the surface of the concrete. In some situations, even had to use a sealed filler, to cope with the tasks. The junctions of the walls and the base sealant is entered, to prevent ingress slot and to the prepared solution for self-leveling floor.
surface primer
The final stage of preparation for pouring - applying soil mixture. The most optimal option for this - betonokontakt. It contains fine quartz sand. To fill the self-leveling floor with his hands clinging to the ground well, The surface should be slightly rough. But before the floor installation should wait at least a day before the primer has dried.
Preparing the solution
To begin with the amount of solution needed is calculated. All will depend on the size and thickness of the layer. If the layer will be 3 mm, then for each m2 will be needed 3 liter fill. But certainly nobody will give you the answer, so you should prepare some more required. In addition, consistency will depend on the manufacturer. Screed should solidify at a temperature from +5 to +25. That these temperatures are optimal. The very foundation should not cool down to less than +4 degrees. Heating the mixture and will not bring positive result. Its maximum temperature should not rise above 20 degrees.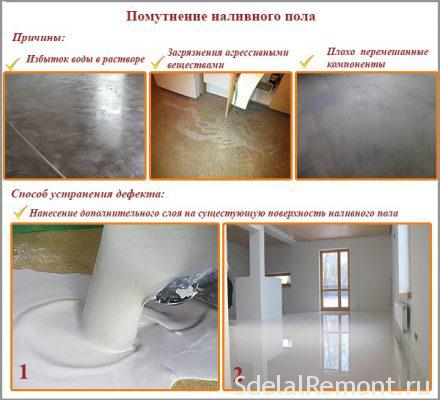
All components of the future pouring mix, using a drill with a paddle. After a few minutes of rest, stirring is repeated. Additional excipients are added in the second stirring solution of.
The amount of solution must be such, to be enough time to 1 hour. Otherwise, it will start to dry out and lose its properties.
To get a variety of patterns and colors, in a mixture of various pigments may be added, as well as decorative blotches.
The technology works with a coupler
The main rule is correctly filled in layers - perfect horizontal level and the plane without differences. important point, if work on the screed conducted with additional armouring.
As reinforcing elements, screed used metal mesh. Depending on the layer, selected grid cell, a thin layer of small cells, for larger, greater. Next, set the beacons. In order to find the ideal level for the floor, pre kicking mark on the walls. This is done using a laser or water level. Marks are connected in a continuous line, and from it is already possible to take the basic amount, in this way, Determine the height and the horizon for the lighthouse. If work on the screed are conducted in large rooms, after issuing beacons, checked their plane, achieving a perfect horizon without drops and vypuklostey.Posle as beacons on display, old foundation soil can be poured and the mixture was uniformly distributing it over the entire surface from a distant corner and ending at the entrance of the room.
Applying fill layers
It should at least understand, how to fill in self-leveling floor leveling. To begin forming the backsheet, which usually consists of quartz sand. Consumption is thus reduced about twice. Leveling occurs by means of a needle roller. Further there is a fill face layer.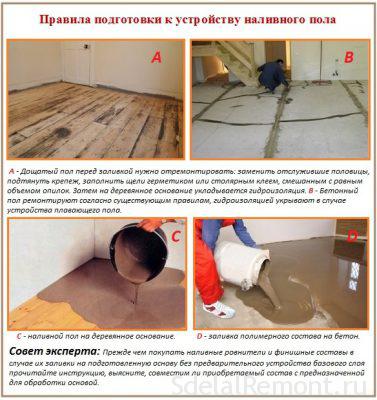
Should not appear questions about, whether it is possible to fill in the self-leveling floor unprepared base. There can be only one answer - no. Otherwise it is necessary to carry out the dismantling. But this one does not wish to face, even specialists of the construction industry. The fact, that self-leveling floor eats into the ground and it is practically impossible to disconnect improvised means there.
Perform the fill solution must start from a high point, and then move on to all the other gradually. To move you can use kraskostupy.
floor heating device
Warm floor a self-leveling floor should be done after a detailed consultation with a specialist. Not every embodiment polymeric floor will remain harmless during heating. some deem, that at the temperature within the base 30-36 will evolve toxic substances. Fear is not worth it, but should adhere to certain rules, when the question arises, can be heated floor pour self-leveling floor.
After preparing the base, which is standard for all variants, it should be degreased. Next, you laying underfloor heating, the version, which was pre-selected under the premise. The first layer is poured on the finished surface. This layer must stand for an hour, sag. During this time, the cement starts to set. After a set time assembling topcoat produced from a selected mixture to self-leveling floor. Slipperiness after drying, the surface is not no, it will be perfectly smooth.
Questions may arise about, possible to the inlet floor for floor heating of the water tube. Here in the first place is filled with concrete screed, which is controlled by the level in the evenness. Next stacked foil polypropylene, and carried out the installation of pipes for floor heating. Atop the used "Skorlayn" and made of polyurethane primer coating. Only in the completion of all these works, you can arrange self-leveling floor. Time for drying of the "pie" is two days.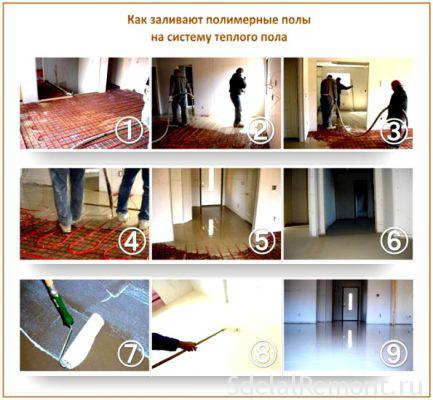
After reviewing all these subtleties in detail, There should be no questions about, whether it is possible to fill in warm floor self-leveling floor. At first they seem petty these nuances, but then really help you get the desired result, without any defects. The inlet floor heating will enjoy for a long time.
Possible mistakes
Most of the errors, arising at the time of pouring warm floor self-leveling floor, It appears due to ignorance of the differences from the usual ties of this technology. Filling coverage gives us a "horizon", a screed - base strength. The thickness while also different: in the first case - to an average of 3-4 mm, and tie more. The entire load must go to the floor and flooded with self-leveling floor, and not suffer the flooring due to the constant deflection.
professional advice
The list of minor tips can help avoid difficulties when priming Self-leveling liquid floors:
- Unprepared grounds give self-leveling floors cracks, crunch.
- If you leave before the grout cracks, air enters the latter, bubbles appear.
- Hardening is uneven, unless grouted time does not ride a roller.
- It will be impossible to dig from the resulting flies floor, hair, any debris. This suggests the need for special costumes during operation, as is done respecting construction firms.
- Mixture and all the ingredients are thoroughly mixed. If you do not, certain areas become dark and ever will be wet and stick to the legs.
- Any solution to dry allocates various harmful substances. So you should use special protective masks, to avoid poisoning.
- Large drill speed when mixing the solution will lead to the emergence of bubbles, from which the problem will be to get rid.
- Pour half the best zigzags. Subsequently, there will be only over the entire area razravnyat.
Security
During kneading the mixture is extremely difficult to avoid getting the solution on your hands. Thus damaged human skin, and it turns into a burn. This is obtained by kneading cement and sand, resulting in an alkaline reaction. gloves, as well as special glasses for protection to avoid it and continue to carry out work on the device of bulk floors without consequences.
If the ready solution randomly gets in your eyes, should immediately rinse them with water. In more severe consequences should immediately seek medical advice.
It is very important and ventilation indoors, where there is a need to fill in a warm floor self-leveling floor. All safety instructions must be followed at each stage.


