To produce high quality surface leveling in any room satisfied self-leveling self-leveling floor. Such an embodiment can be performed independently, even without specific knowledge in the construction field. installation process compared with conventional cement screed is reduced at times on the time frame. Suffice it to day, to get a perfectly smooth surface, suitable for floor covering planks.
advantages of the floor
Positive qualities perform a self-leveling screed has a huge amount. It should focus on the most common ones:
- The liquid form of the solution allows to obtain a flat surface. All variations and irregularities are filled with a mixture of. It will only be finished later, as needed. It carried out without problems laying linoleum or parquet, tile or laminate.
- Ready solution after drying has such qualities, as fire and water resistance. If you take a mixture based on cement, the floors can even be installed in the bathroom or in the kitchen. Their moisture not terrible.
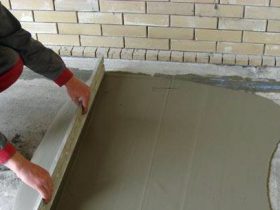
- Almost always, no need to install beacons, and perform reinforcement. Still, experts recommend the use of the beacon-frame, allowing the surface to give an ideal surface level of.
- Using the self-leveling composition for planarizing, we get a low weight of the whole structure, that does not exert pressure on the basis of. Bearing structures do not suffer.
- To perform the work can no skills. The main thing to adhere to self-leveling floor device technology, to get a great result.
- After pouring on the surface can be walked on after 4-5 hours. At least a day begins laying certain types of flooring. This significantly reduces the time for repairs.
This is only the minimum points, because of which the self-leveling screed flooring has a huge popularity in the market.
types mixture
In carrying surface alignment for the subsequent laying of flooring, be the best option for the preparation of a solution mixture of. They all have a large classification, but worth a stop on the layer thickness and trim levels:
- finishing mixture. It turns perfectly flat surface with a layer thickness of 4-8 mm. Further finishing is not necessary to produce, and in itself various components are added to a solution of, allowing you to change the color, the texture of the resulting floor. Very nice look 3d floors, suitable for any interior room.
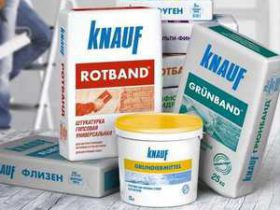
- Rough mixtures are used to seal small drops and have a thickness of about 10-20 mm. With their help, you can hide all the bumps and hollows, defects of old ties, or any other surface. They make the base layer self-leveling floor, which is called "blister".
- Having high strength. By acquiring such a mixture for kneading solution, Self-leveling device carried by the floor thickness to 60-70 mm. All the significant defects at the base of the fill removed and hidden. It is worth noting, in that case very strongly influences the ceiling height, since the distance from the floor is significantly reduced. Not fit this option, eg for the bathroom.
In any case, the main thing correctly and accurately prepare the base, smooth all the disadvantages, make the surface as flat, that it was used in the following solution for less.
Substrate preparation
That preparatory activities have a tremendous impact on the final quality of the self-leveling floor. This stage should be given as much time and attention. In addition to height difference, Closely examine the surface on the moisture level, and the presence of oil or paint stains. If this does not resolve, the rest of the work will come to nothing. Technology of preparation is somewhat different to the concrete base and wooden, what should talk separately.
If we have a concrete floor, all floor covering must be removed by a maximum of. This applies to the door sill, doors, baseboards and other elements in the room. Available crack originally disclosed, then sealed with self-leveling solution mixture. Must-see destination is the surface of the primer for better adhesion. All kinds Self-leveling floors shall be filled on high-quality base.
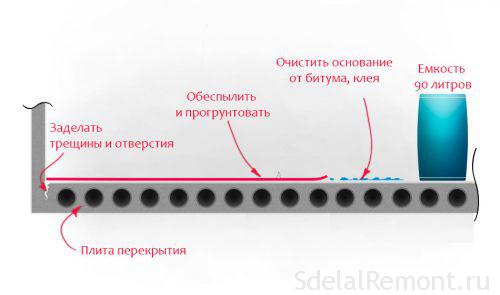
Dust, mud, debris going building cleaner. Do not be amiss to walk cloth, moistened with water. Using a level, and generally exhibited a horizontal level. We can not allow, that the room had significant undiscovered projections. They come out after pouring, but will do something no longer possible. Will have to carry out the dismantling of self-leveling floor.
Drying of the concrete surface is carried out at a moisture level 4%. If it is still above the norm, It is qualitatively perform waterproofing layer.
If the sub-floor screed made of cement or concrete carried out recently, you'll have to wait about a month to complete drying of the surface. Use mixture and arrange self-leveling screed in such case be.
To eliminate the thermal expansion and the subsequent damage to the floor surface, follows the perimeter of the room damping glue tape. subsequently,, after pouring, it simply cut to the required level.
You need to know about, how to fill self-leveling floors on wooden base. There is a danger in a possible contact with the prepared solution in the gap timber. The problems will be more, if you carry out installation self leveling screed on the creaky floors. All this suggests that, that in order to start preparing the surface, carried out a thorough renovation, and only then executed grouting.
With the timber must be removed old coatings, which can be paint, caresses, glue, wax and other. 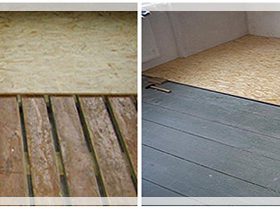 For this purpose sander. Visible splits reveal more and are stripped sandpaper. wooden floor moisture content should not be more 10%.
Plastered on the basis of glue allows to close up all the flaws base. Thereafter, each of the elements must be completely dry before the start of the self-leveling grout mixtures.
When working on a first coat of wooden flooring is best to use high-viscosity primer, allowing to obtain the desired result after the first layer.
When a surface preparation for pouring, We should think about, how much is self-leveling floor per square meter. The smoother will be the base, the less the solution will have to spend at installation.
Lighthouses
Many people think that, that pouring self-leveling floor can be done without beacons. After all, the solution itself must be distributed uniformly over the area. But experts still recommend using special beacons, were called benchmarks. Outside help in any way needed, to obtain perfect flatness.
Using the rule of length 2 m, the distance between the exposed beacons should not be more 1.8 m. This will allow smoothly and evenly distribute the mixture over the floor space. 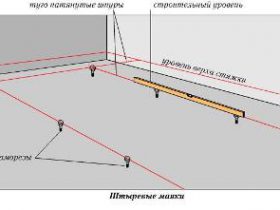 Usually put on beacons and stretches. The first lighthouse on the wall is located at a minimum distance 40-50 see from her. There is an alternative beacons, to quality was implemented pouring self-leveling screed:
- Screws.
- Profiles with square section.
- Metal pipes.
- guides, used for plastering.
- A solution of the cement for repairing surface.
From these methods only the latter remains in place after casting. All the rest - are removed immediately, and the existing holes are sealed.
stirring the mixture
The maximum period of time from the mixing of the solution until its solidification is 1 time. It was during this time frame should meet, to produce a fill. 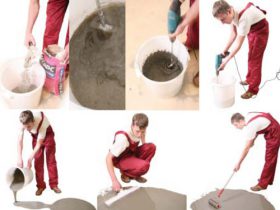 This indicates, that the kneading process is performed just before actually applying the solution on the substrate. We'll have to find an assistant in the performance of the installation in a room with a large area, to do everything in one bay.
On each bag mixtures, has different rates for self-leveling floors, there is a clear instruction, how to produce a kneading it with water, as well as the period of solidification. This should be followed, since the manufacturer himself knows, as drawn with the material for.
Feature self-leveling mix is, that the first container into a prepared quantity of water is poured, and only then is poured the required amount of the mixture. If you do the opposite, then stir qualitatively solution will not work: A large number of lumps.
Mixing takes place in two stages. After the first use drill adapter, the mixture should stand for several minutes. It then re-kneading. Pay attention, that the drill should run at low speed, to reduce the number of bubbles in the solution. If you want to add any additives and components, then they fall asleep on the second stage.
When a water solution is much, it will spread more quickly. But in a subsequent impact on the quality of surface: there will be cracks, drying will take a little longer. It is not uncommon bundle self-leveling floor, that require a high-quality and expensive repairs.
Mounting ties
In the implementation of the fill must be maintained at the temperature indoors 15-25 degrees. This is not to allow its descent below 5 degrees. Pay attention to the humidity, not exceeding 80 percent. If the indicator is more - there is condensate, having a negative effect on the drying process of self-leveling floor screed.
Casting process has to be started from the corner, opposite the entrance. And so it goes to the door. Leveling of the solution occurs at established beacons. It is for them and comes pouring ready-mix. The most popular option - stripes, parallel to each other. You can certainly fills certain places, but that requires a certain amount of knowledge and experience. So it is better to choose the traditional method.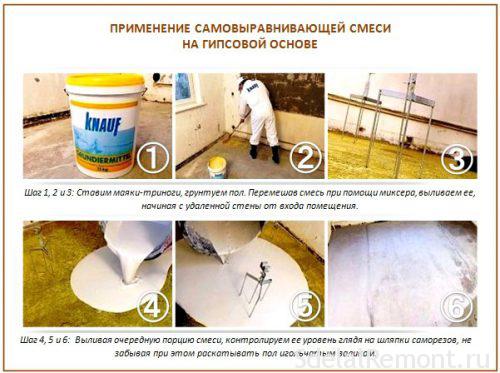
After that, Fill like self leveling mixture, should go aeration roller, to remove all the bubbles. This can not do, if you want to get a rough surface. Burst bubbles form crater, and who fulfill this function. If you examine each of the nuances of the work, it is not a question, how to fill in the self-leveling floor Self-leveling screed.
When pouring the screed on the system underfloor heating, his work until the week may begin. Otherwise uneven drying of the surface will take place, and strength to get will not work.
Subsequently, the entire finish will depend on the purpose of self-leveling screeds. If just for leveling the surface - to prepare for flooring flooring. When a finishing layer - treated with lacquer or use other possible decorative elements.
rates
A lot of interesting, how much is the work of pouring self-leveling floor. It will depend on several factors:
- binder.
- Thickness.
- Filling (highly filled, or thin-film).
- dedusting.
- antistatic effect.
- The conduction.
- decorative elements.
The cheapest option - polyurethane self-leveling floor. It is for this reason it is often used in the regeneration of warehouses and industrial buildings. If you want to spend on the maximum parameters, then the choice should fall on the transparent option. Rates on the fill inlet floor will decrease depending on the amount of the mixture in the floor area and. The greater the amount of the order, and the cost will become lower.
Pouring self-leveling flooring screed is required to impart the base flat surface. But this is not the only version of its application. Screed can act as a finishing layer, different elements that decorate. Perform installation can be in-house or to spend a certain amount on specialists. The main thing to note, is it possible to carry out the work of their own hands, to subsequently do not spend money is not the dismantling of self-leveling floor.


