- preliminary steps
- Methods of fixing plasterboard to the wall
- Fixing plasterboard to profile
- Fixing plasterboard to the wall without a profile
- Installation of drywall to profile
- Fixing metal profile
- Mount Technology drywall to profile
- Methods of drywall installation to the wall without a profile
- Cutting plasterboard with their hands, a photo
- Chamfering on drywall
- Make a cut in the drywall
- Processing gypsum board joints, internal and external corners
- Treatment of joints on the wall of plasterboard
- Wall mount interior elements
Plasterboard is an excellent modern finishing material, with which you can not only get a perfectly smooth surface, but also given the opportunity to make beautiful arches, transitions and niches.
Plasterboard, as construction material, It has a number of positive properties and qualities, who own words, and make it widely used.
preliminary steps
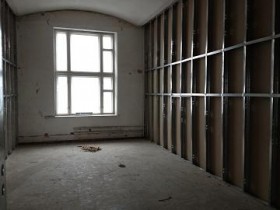
Before you decide, like fasten drywall to the wall, necessary to determine its structure and geometric parameters:
- If the wall has projections and niches, which will not be used, then it is better to lay the bricks.
- Cracks in walls should embroider and paint over with a mixture of reinforcement. Generally, necessary to prepare the surface.
- Further, before drywall fastened to the wall without a profile or a profile, necessary to antiseptic preparations base. This is to prevent or terminate the existence of mold and mildew.
Methods of fixing plasterboard to the wall
Having dealt with the base, The existing methods of attaching drywall to the wall.
Fixing plasterboard to profile
This method is used there, where there are a large number of irregularities and deviations on the wall. They are compensated by guides, which can be:
- wood;
- metal.
But mounting profile to the wall may be required not only to compensate for irregularities. Under it will be:
- Free to conduct all sorts of communication.
- Make vents.
- Get extra insulation.
Fixing plasterboard to the wall without a profile
This method is used there, where you want to save room space, And of course,, walls should be as smooth.
Installation of drywall to profile
To start to fix the profile for gypsum board, you must choose a profile. It is selected on the basis of the future load on the wall and the strength expected of it. If in the future it will hang kitchen or other furniture, it is necessary to apply a thicker profile, and its attachment to produce increasingly.
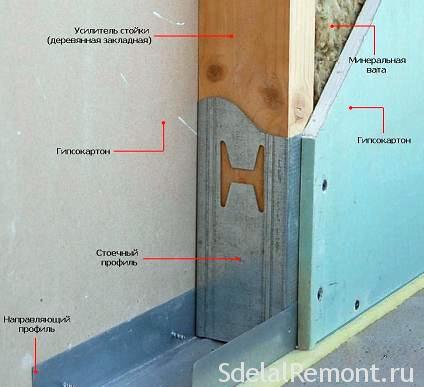
At all, profile is a rigid galvanized rail, which is obtained by bending in a press of galvanized metal sheet. Due to which it acquired the necessary rigidity and strength. As used in the construction of a batten GCR profile can be of two types:
- CD - the basic element, which imparts rigidity thereto and carried hinged fastening of furniture. It is mounted in the form of crates, fastened at the intersections. To this fastening is performed and plasterboard.
- UD-profile is more narrow width U-shaped bar without additional stiffeners. It is used to secure the battens for attaching drywall to the wall around the perimeter, the ceiling and the floor. It is necessary to invest with CD. Therefore, its size should be selected according to the height CD.
To fix the drywall to the wall you should have an appropriate set of tools:
- drill;
- Cordless;
- if the wooden wall, the structure may be fastened by means of ties or anchor, and for that still need to drill.
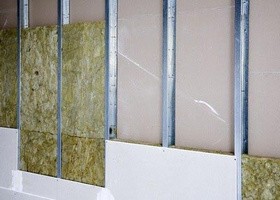
Fastening profiles for drywall to the wall by wall plugs. They are also selected based on the load on the wall and its structure.
If the wall is made from CGM blocks, the:
- Their length should be large enough, to penetrate deep into the structure of.
- Sometimes even the best option would be the use of anchors. This will allow the wall of plasterboard is not only to become rigid, but do not deform over time under the influence of external forces.
- In order to properly mount the profile for gypsum board shall be kept mounting interval of not more than 50 cm vertically.
Fixing plasterboard to the wall using the profile requires the observance of certain technologies:
- Should be as vertical, and horizontal structural members.
- In this case they are bonded together by means of additional components or methodologies.
There are two types of compound CD-profiles:
- T-. It is used in the field of cross joints sheets of drywall.
- Compound with cruciform crabs aid. These mounts profile is a metal element with four sides and a plurality of further taps - diffraction lobes for CD-profile. Is connected between a profile with screws or metal rivets, but to give greater rigidity is better to use self-tapping screws.
Fixing metal profile
The first thing to strike marks on the wall for the next frame. This can be done by means of two instruments:
- cord;
- level.
To attach drywall to the wall correctly, necessary to maintain the vertical position of these areas, and the horizontal should be strictly perpendicular to them. To do this,:
- With the help of level outline the site of attachment of end-UD elements, retreat a short distance from its middle and pull cord.
- Further, Label and lace mounted uprights. This profile for attaching drywall should be placed in a design with a pitch of not more than 60 cm. UD-profile is fixed to the walls, the ceiling and the floor with screws or brackets in increments of no more 40 cm.
Important to remember, at this stage, if you plan to mount on a plaster wall heavy furniture or appliances, in the CD-profile is necessary to put a piece of wood. And it already safe to tighten the large screws and brackets.
Mount Technology drywall to profile
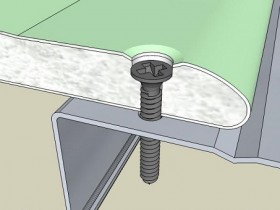
Having dealt with the construction, you must start the installation themselves sheets.
At this stage, it is necessary:
- To partition, and all communication wiring
- The sheets of drywall cut vent holes inputs, sockets and switches.
- Next, you must decide, than to fix drywall to profile.
But the task is not so complicated, because the hardware is carried out by means of screws with conical hats and fine thread. This allows them to safely immersed 2-3 mm in a sheet structure, without creating irregularities on the plane. Their size is selected based on the thickness of the sheet, usually enough 4-3 cm.
To properly fasten drywall to the wall, necessary to maintain the distance between the screws no more 30 cm.
Also, as the fixing plasterboard can be self-tapping screws or screws. But first need:
- Drill holes in the drill bit of smaller diameter for the screws the profile.
- Fixing plasterboard to choose based on the material of the support structure and the sheet thickness.
To facilitate the process much further, need to:
- All joints sheets of drywall should be implemented on a wide CD-profile.
- If the sheets are selected from the factory chamfered, the seams will be more qualitatively repaired by means of reinforcing mesh and putty.
- It is also necessary to remember that, to mount sheets was strictly in the vertical and horizontal position.
Methods of drywall installation to the wall without a profile
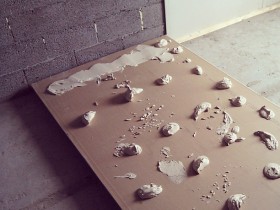
If you want to preserve space, is applied without fixing sheet Profile. For this special glue and dowels can be used.
Before the deal, how to fasten drywall to the wall without a profile, must:
- measured the wall.
- To find out, where the greatest deviation is present.
- On the spot it will be necessary to enclose the same drywall and more adhesive.
- Before applying the adhesive surfaces with a pre-primed.
Important to remember, that for gluing the bottom sheets must retreat distance of at least 5 mm. It is necessary for the possibility of its thermal expansion due to humidity changes. Also, to attach drywall to the wall without the profile of the maximum quality, it must be supported any stand on the drying time.
Cutting plasterboard with their hands, a photo
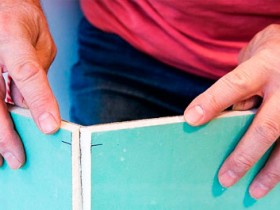
dismantled, as the drywall is attached to the wall, we can proceed to its installation. But in the course of work and then have to cut away pieces of a variety of lengths and shapes. You can use the following tools:
- jigsaws. It is used for curved cuts, if necessary,.
- mounting the knife. The main tool for cutting.
- saw Nozhovochnaya. It is used for cutting large rectilinear elements.
For good measure, you need to cut a piece:
- Use a metal ruler.
- Tightly pressing it to the surface and is strongly pushing the knife assembly, incision upper layer paperboard with a plaster composition.
- Further, Cut a piece of neatly folded in the opposite direction and the incision knife paper with the second side.
- After the cut the required pieces, drywall is attached to the wall without a profile or with him, as planned earlier.
Chamfering on drywall
Many elements require a perfectly flat wall corners and surfaces. often required, corner elements to each other perfectly converged. To do this chamfer with the sheet. This can be done with the help of mounting knife:
- It should be noted a distance from the sheet edge in 10 mm.
- Under a metal ruler or level accurately cut corner at an angle of 45 °.
Make a cut in the drywall
Plasterboard is a three-layer sheet material, which is easily processed by any instrument for various purposes:
- In order to cut a circular hole in it under the outlets and switches are used for milling and drilling nozzles.
- To cut large holes using curved jigsaw, straight square holes - hacksaw on wood with a fine tooth. For this pre-made longitudinal using hacksaws, then the remaining side of the incision knife assembly and the sheet is breaking. On the other hand incision second layer of paper.
Processing gypsum board joints, internal and external corners
Often, to fasten drywall to the profile of quality in tight spaces, necessary to make adjustment of corners and joints.
For these purposes, you can use special a plane Drywall or a file on a tree.
Treatment of joints on the wall of plasterboard
Processing joints plasterboard sheets is carried out in the following sequence:
- Ceiling sheets that have a special refinement of the edge.
- It is embedded reinforcing mesh, but first you need to cover the deep seams and holes from screws with putty or plaster composition. He freezes the fastest, that allows you to perform all the work at once.
- The mesh is attached with the same composition, and then covered by a finishing layer fillings. Grid sold standard width of 80-100 mm or you can cut it from the roll.
- The final stage is smearing putty. For glossing over joints and grooves better to use a spatula 60-80 mm.
Wall mount interior elements
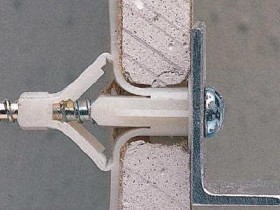
How to mount plasterboard interior items? You must use a so-called butterfly fasteners, If it is necessary to mount plasterboard elements of lightweight Interior, eg:
- lamp;
- shelf;
- hanger.
They represent a dowel with plastic collars, which when tightening screws are disclosed, like the wings of a butterfly, securely seating in the sheet. It can also be used in other fastening drywall, acting on the same principle.
See also illustrative videos on the topic:


