All the rules for applying the bark beetle
To begin, let's define, that we are not talking about the bark beetle, which is an insect and eats your floors, and a special textured plaster. Basically, this plaster is applied to the facades, and less often indoors. But before you start using this formulation in his direct appointment, should familiarize themselves with the application of the rules of composition. In principle, nothing complicated technology and plastering pitted easy, but still know some nuances worth, and even better to see the video tutorial, you'll find just below this article online apartment repair by own strength. The work itself consists of several stages:
1. Primer.
2. Applying to the surface of the bark beetle.
3. Zatirka koroeda.
For, that would be to learn how to apply this textured plaster, you can workout at the back wall of your house facade, using a few bags of bark beetles.
To work with this mixture, it is best to choose the autumn or spring. You can do this summer, but still worth knowing, what plaster will quickly dry up, so you will need to work quickly. So in order, to learn how to best, of course, choose a neutral season, ie the spring or autumn.
But before you get to work, you must prepare the necessary tools for the correct application of plaster woodworm:
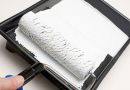
1. Tray and roller, which will be necessary for the primer.
2. Drill with whisk.
3. Bucket.
4. The blade and applicator for applying plaster.
5. bryzgalku.
6. Terk. It is desirable plastic.
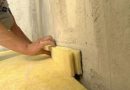
Now proceed, directly to the. first, you need to do - it primed your wall. See our article how to choose the primer, types of primers. To do this, you must use a special dye-primer. Choose white primer. All this is necessary in order, that the black color of the walls in the grooves do not show through. If you have chosen an expensive dye-primer, then they can go through the wall, only once, since it has a very thick consistency and quality. If your soil from the cheaper, then put it on the wall in several layers. This is because, that cheap soil more fluid, and in order, to achieve the desired result, must be applied on the wall about two or three layers, that is, until it is time, unless your wall does not acquire a uniform white color. After that, you struck the primer, should wait, until it dries, otherwise you run the risk of rub it to black while the bark beetle.
The technology of plastering woodworm
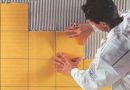
The next stage - the application of bark beetles. To do this, knead in a bag plaster, so as indicated on the bag you choose bark. But it is worth remembering, there is no need to mix too much, since you can not have time to work out all the stuff, and he simply wither. Apply bark beetle should be made of stainless steel spatula. Do everything carefully, evenly. Remember, that the layer thickness should be in your bags size fraction plaster. A very important advice may be something for you, that should be applied plaster rows horizontally or vertically. During the application of one row should capture the entire height or thickness of the wall, then the result will be even and neat.
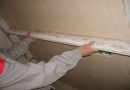
If your wall is too high or wide, then it is necessary to limit the advance level, to which you will be able to get, and as accurately plastering, but on the target area. It means, it should be divided in half wall using masking tape and the first to reach him, and the next day, tearing it up and, gluing the treated part, Apply just pitted for the second half of the wall.
After that, how you dealt woodworm, to wait for ten or twenty minutes,, for, that plaster clutched. It all depends on the weather, the warmer, the sooner it will begin to grasp. In principle, you can check it out, Using pre-prepared plastic float. If the plaster it will not stick, so, you can safely move on to the next stage of work, ie the grout bark.
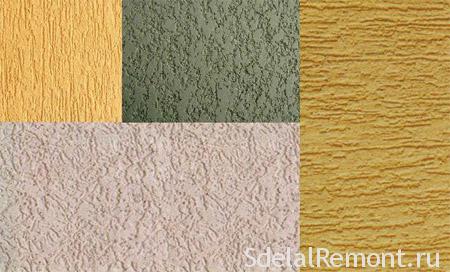
Grouting technology bark It is simple and is done using the same plastic float. To do this, you must determine the pattern, if you want to see the "rain", it should overwrite vertical - top-down. If you like drawing "lamb", while doing a circular motion. After that, you will overwrite the first row, should immediately proceed to the application of the second series, wherein the joints between the rows is necessary to spray water, so as not to be visible transitions. The video below is clearly demonstrated.
If this happened, that you do not have time to wipe the plaster has dried and pitted, then use bryzgalku, and the missing figure can to finish with nails.
As for painting, the paint pitted the best roller or brush in the furrows, and at least two sloev.Uznat much plaster will need, will help online calculator amount of plaster.