walls of premises, whether they are brick, gypsum or concrete, often get diverse nature of the damage. Because of this, they often are formed holes. Deal with the, how to patch up a hole in the wall, even to, that has no experience in construction work. Easy to cover the hole, but in order, to make it qualitatively, We need to understand, that the nature of the work depends on the material, from which built the wall.
puttying holes in the wall
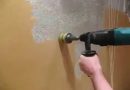
Patching holes in brick or concrete walls, like any other business, It begins with the preparation. first, what is being done - estimated size of the hole.
For sealing small holes need:
- a vacuum cleaner;
- small spatula;
- passatiži;
- dowel nail.

The hole is cleaned from the inside by means of a nail dowel-, clamped in pliers. Further, all the fine construction debris removed with a vacuum cleaner. Purified hole putty smeared. Movement spatula must be simultaneously pressed and leveled.
Remember, that matter, as the hole will be cleaned well, will depend on the aesthetic qualities of the wall.
If the hole is large, you must first decide what, than patch up the wall. Well suited alabaster, plaster or cement mortar.
Need such tools:
- spatulas, big and small.
- alabaster, plaster or cement mortar - a choice.
- Sandpaper.
- Sponge.

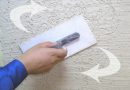
As with the sealing of small holes, first you need to clean the surface of the plaster crumbled. Then be wetted with purified portion and wait until it is dry. After the putty can be a hole and a portion around it. When the material zakameneet it should be sanded with sandpaper.
Plugging the hole in the plasterboard wall
Questions about, how to patch up a hole in the drywall, It occurs more frequently, since this material is less durable, than brick or concrete. In this case it is necessary not easy to cover up the wall, and restore the damaged section of the wall. They will need:
- pencil and ruler;
- putty knife;
- screwdriver;
- hacksaw;
- screws;
- sandpaper;
- plaster;
- plasterboard and wooden board.
Using a hacksaw the hole is attached to a rectangular shape. To do this, first applied Liner. Now you will need a wooden board or profile.
So you need to pick up a plate, to its width slightly less than the diagonal holes, and a length greater than the hole width of 6-12 cm.
A plaque is placed on the back side of the wall. In order to fix it, you must first screw the screw in the center of the board, he will "handle" for fixture. After fixing the "handle" of the board can be removed.
After tightening the screws, which hold the tablet, they must be "vtopleny" in drywall. Otherwise would interfere and look ugly.
Further cut plate of plasterboard corresponding size and shape of the holes, She fastened with screws to the plank, and on top is glued fiberglass tapes. Thereafter, the main and applied topcoat putties. When the glue is dry, surface overwritten sandpaper.
those, who previously worked with plasterboard, difficulties arise during its cutting. How do you get a flat piece:
- First you need to apply contour, on which will produce cutting, on both sides of the sheet.
- What follows is to make deep cuts in the planned lines.
- Then the hand holding base portion, to break the sheet, it does not require much effort.

Before how to seal the hole in the drywall, should assess the dimensions of the hole. If it is too large, then do not bother to manufacture and installation of patches. In such case it is better to resort to full substitution of the sheet.
Embedding other types of holes
A few practical tips for plugging holes in the ceiling and walls, depending on their type.
Cracks in the junction of the floor to the wall
Are sealed in the same, as well as holes in the walls, one feature - to sweep the gap needs to be expanded to 5-10 mm over the entire length. This will give a more reliable adhesion of new plaster.
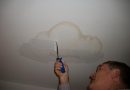
Holes in the ceiling after falling plaster
The easiest way to cover a new layer of plaster, but this decision is not correct, as the hole again appear shortly, because the need is not easy to remove the "symptom", and completely cure "sick body". The procedure works as follows:
- Before you seal the hole in the ceiling, you need to carefully clean up the damaged surface. It is important to make it qualitatively.
- Process surface antifungal agent, because it is the fungus most often is the cause of shedding plaster.
- Bypass hole and the area around it Priming agent.
- Putty surface 2-3 layer, depending on the desired thickness, and do not forget, that each layer should be given time to dry.
- Wipe the ceiling and re-primed.
Cracks in the panel joint
Problem, which is often found in prefabricated buildings. Are sealed in the same, and how cracks between the ceiling wall, but to be sure you need to paste the entire length of fiberglass mesh.
Holes around the risers
Often the plumbing work on the riser replacement performed in good faith and after their implementation there are cracks and holes. Small hole to 5 mm can be filled with silicone sealant.

With large holes harder, you need to make a simple reinforcement, then zapenit hole. When the foam hardens necessary to cut it to 5-10 mm above the ceiling, gypsum putty and putty. If the hole is large, the perfect Rotband which is used for plaster.