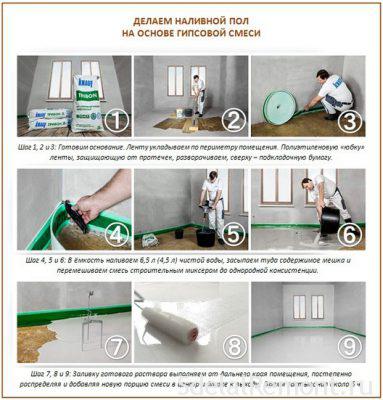
Poured floors are designed, to reduce the time frame of the work, as well as to reduce labor costs. For this purpose there is a wide range of ready mixes, to which is enough to add the necessary quantity of water and fill to implement. Thus it is necessary to examine only the basic requirements for self-leveling floors, due to which the entire installation process can be done on their own and get an answer to the question of, possible to fill the second layer of self-leveling floor.
Specificity of self-leveling floor
To align the floor for later use two kinds of mixtures - and finishing compositions rovniteli. Between them they interact intimately, since the former are used to smooth all the bumps and can be arranged on different surfaces, while the latter are designed to ensure, that give the base perfectly flat surface. It is this surface and will serve as the final version of the floor, which can be painted, and decorate their own devise various combinations.
Rovnitel It creates a surface from a height 10 mm 30 cm. Finish is arranged up to a maximum 25 mm. In the latter case, the thickness is not as large due to the high cost of pre-mixes.
This all suggests that, that if there is such a need, the blister layer initially filled self-leveling floor from cheaper mixtures for, and only after this is done the final coat has a huge number of positive qualities. The second layer can be made self-leveling floor, but it needs to complete drying of the first. In some cases, it takes about a day. But in the end it turns out a good result.
It should also be noted that variant, that the finishing layer is best to fill almost flat surface without significant defects. Otherwise, the drying will occur unevenly, Quality will not always be maintained at the initial level, and the cost of the finished floor will be huge. With this purpose, and creates a first layer self-leveling floor of special pre-mixes, which serves as a sub-floor. true, it can not guarantee a perfectly flat surface.
we learn composition
Any mixture, even if it filled with a finishing self-leveling floor, It includes the following main components:
- binders. It can be cement, gypsum, their combination, which are complemented by a polymeric component.
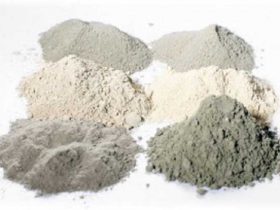
- supplements. They impart such qualities solution, as an excellent spreadability, better ductility, improved adhesion to the previous layer or overlapping.
- fillers. These include lime chips, sand fraction with a corresponding.
Already from the content of the mixture will depend upon its application - for topcoat or as a surface alignment on existing unevennesses. If desired, mixtures with dyes selected, that is especially true for finished floor options.
Each will have a mixture of purpose and: for kitchen, bathroom, garage and other facilities.
Gypsum products are suitable for dry areas, and to take better wet compositions based on cement. Their quality will be noticeably different, as well as the drying time varies.
Warm floor It requires flexible solution for. The mixture should be under constant temperature change (shrink and expand). When the time is running out and I want to do everything as quickly as possible, it is best to make a high-early-purpose self-leveling floor.
Universal self-leveling floor can be used for mounting not only the second layer - the finishing, but basic - rough sex. Everything will depend on the preferences of the customer or an independent artist.
Options for self-leveling floor
Before starting work,, even in the case of, if the filling is performed flooring second layer, It is defined with its total thickness. On this will depend on the choice of options. Considerable importance will play here and the material for the work.
- When coupling is made in compliance with technology and maximally adapted to the level exhibited, it is possible to immediately proceed to the fill topcoat. Him thickness It will be possible 5 mm. To the solution thus prepared can easily be connected to the base, the latter should be treated with primer.
- self-leveling floor with a device separating layer. Its thickness is usually up to 20 mm. It can be performed even on a wooden base. Particular attention is paid to the separation layer, which runs between the ceiling and the solution. For his performance used oiled paper. The waterproofing and impregnation is used as a separating layer (for cement screed). This is done with a view, to self-leveling floor does not suffer from the constant progress of wood, I will not crack or lose their quality. Even cement can take a moisture from the topcoat, which avoids the waterproofing layer.
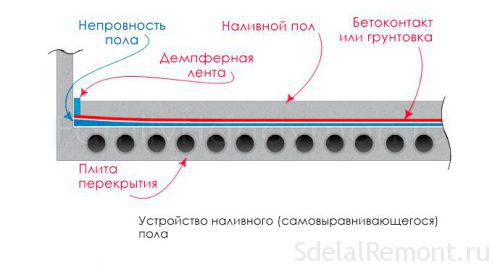
- Floating type floors. This embodiment is mounted for subsequent flooring planks (linoleum, laminate, parquet). The minimum height of the floor may be 25 mm. Here also a kind of layer, not allowing the solution to cling to walls and ceilings. On each side of the damper fits tape, and on the basis of - a film made of polyethylene.
fill rules
Not everyone knows about, that when the self-leveling floor is arranged on a self-leveling floor can be used in various mixtures. You could even say, it is not possible, and the need to, since the very thick layer will require substantial financial expenditures.
It is very important, They have been arranged to the windows and doors in the room, in order to exclude changes in temperature and appear drafts, promote uneven drying of the solution, and the occurrence of negative phenomena.
Maintain the proper level after casting should be the level of humidity and temperature readings. Each package mortar for self-leveling floor there is an indication of the rules for the preparation of the solution from the manufacturer. These recommendations should adhere, to prepare a really high-quality solution for.
Cooking surface
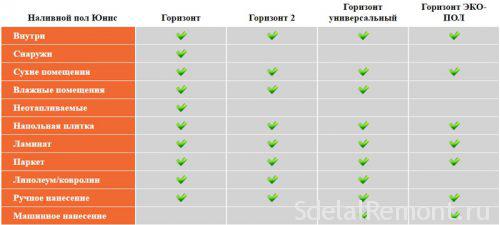
The surface under the self-leveling floor should be prepared perfectly every. It can be wood, Concrete, cement strainer. Wood moisture content should not exceed 10%, and the plinth is removed without fail. It can be set, but after the casting. no paint, varnish or adhesive should not be. If the surface has a significant height differences, vyscherbliny, no elements, for the beginning is executed first layer of self-leveling floor of the less costly mixtures. To do this, there are a number of ready-made options, including the popular self-leveling floor horizon universal fast setting. It can hold up to a height 10 cm, if there are substantial grounds defects. Also can be chosen already topcoat, nestling up 2 mm. This solution is perfect if there is "underfloor heating», as well as a floating floor apparatus. The strength of self-leveling floor in this case meets all the requirements of building regulations.
When talking about the concrete base, its moisture content must not exceed 4%. It compressive strength test surface using Schmidt hammer. Alternatively, you can type device Dean. Cement or concrete foundation to stand after laying be approximately 4 of the week, Only after that you can start pouring self-leveling floor.
None of the surface should be free of debris, dust, dirt and foreign elements. Especially when it comes to the old tiles, which as far as possible should be removed. This will contribute to a poor-quality drying and obtaining a poor surface. 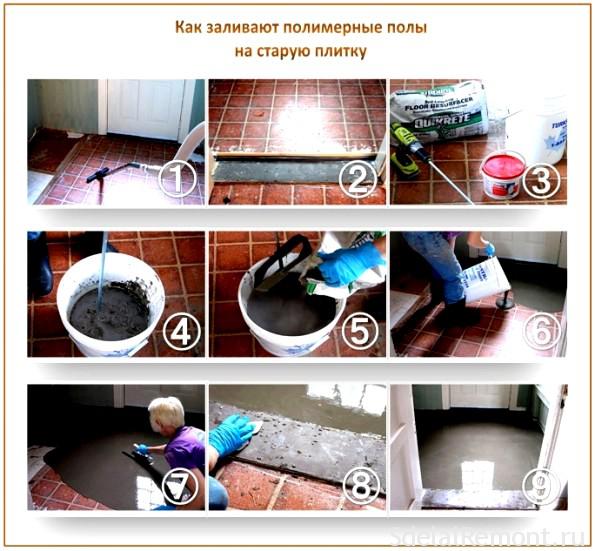 Probably, everyone knows that, it is better to spend money on professionals, able to perform self-leveling floor quality and fast, produce than its dismantling. The costs are enormous, and obtained not only in financial terms. In some cases it is possible to fill the filling layer second floor, but this process is best left to professionals.
Particular attention is paid to priming. This helps to improve adhesion to the substrate. In addition, self-leveling floor spread will be much better. In operation, the room temperature must be equal. Otherwise, bubbles may appear, from which it is necessary to get rid.
Step-by-step instruction
Manufacturers make a mark on the packaging with a mixture of, how to properly cook all, to fill the second layer of self-leveling floor. If you move away from mixing technology, operational characteristics will be lost immediately.
Mixture, prepared by hand, The polymerization time is about 40 minutes. During this time, the surface must be filled by a solution of, that he did not lose their quality.
Installation is performed with an assistant, especially if the room is large enough. Between each of the performers shared responsibilities, which should be followed: preparation of the solution, fill, distribution of ready mix over the surface with a spatula.
If you pour the floors in two layers, the first alignment must dry for a certain time. This will help to avoid possible negative developments in the future. For finishing layer, even if it is used for flooring, should adhere to the same technology and requirements, both first layer.
Work is carried out in a single step. Only one exception - a device combined the sexes. Pouring carried stripes, which does not exceed the width 50 cm. no harm will adhere to and staggered.
After that, how to pour the entire solution for floor space, it is necessary to remove formed in the process of mixing bubbles, Why use an aeration roller. When moving along the surface of the cast filler floor shoes kraskostupy, which can be done by yourself.
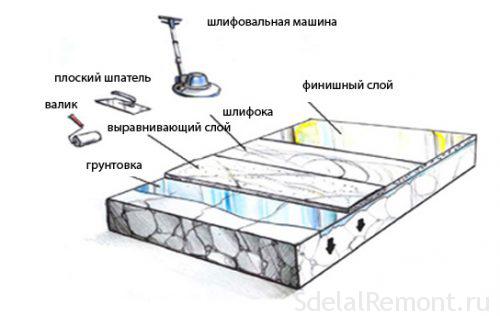
On the second floor filler layer may. It should only follow the recommendations and to select a suitable mixture of, not to spend a lot of money.
recommendations
difficulties may arise with the implementation of the process in self-leveling floor, that will fill only half of the floor space. This is especially true for beginners in the construction industry. All immediately begin to search for answers to the question of, whether it is possible to fill in self-leveling floor layers. It is very important to adhere to the minimum rates mixture thickness. When in one place on a zero level derived, and somewhere around 20 mm, the experiment nobody recommends. Because nobody knows, can behave like a ready solution after drying in a thin layer. He can crack or even peeled. Then we'll do all the work again. Of course, experts recommend one proven way: in the place of zero use tile adhesive, that greased the entire surface. It also saves money.
When the first layer of self-leveling floor made half, that is, instead of the required 20 mm, flooded 10 mm, it is possible to arrange the second layer of self-leveling floor. But we must not forget about priming the surface.
Thereafter, probably, will not have anybody questions about, whether it is possible to pour the floor in two layers. To do it, no one forbids even technology. The truth should wait until, while the previous layer is completely dry and get rid of some moisture.

