 If the bath enamel is damaged, Floor mixers damaged lime bloom, rust stains from the sink has not washed, and tarnished tiles fell off places. Well, Time for you to repair the bathroom. This service is very expensive. The costs for building materials and sanitary ware can be reduced only at the expense of their quality, but his own repairs himself quite feasible. The cost of such repairs is approximately equal to the cost of materials. Make it yourself, can halve costs. Prepare to, that the repair will take a long time and bring some inconvenience. Be careful and do not rush - and the result will exceed all your expectations! And now examine in detail the technology of laying ceramic tile on the floor and walls of the bathroom. After a look to secure the video lesson and be able to put the tiles with their hands in any room. See also related article, how to perform enamelling baths with their own hands.
Plumbing in bathroom
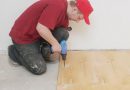
First of all, remove the plumbing in the bathroom, before the installation of ceramic tiles on floors and walls. If your drainage made of iron be careful - iron relatively brittle metal. Do not apply strong impacts on it with a hammer. Usually, of cast iron sewerage leave only vertical riser general (if it can not be replaced for subjective reasons). sewer connection, made of pig iron, usually, Retake sealed with cement. Remove the seal can be drilled his two-millimeter drill. This will facilitate the dismantling unnecessary part of the sewers.
Installation of sewerage and water supply is beyond the scope of this article. Therefore we confine ourselves to a single rule. We need to know exactly, where the plumbing will be located. If you choose to swap the toilet and sink, then you have to redo and running water to the drainage system. More specifically on the installation of water supply can be read here.
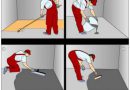
How to bring down the old tile with their hands
 To begin, remove the old tiles. This requires a hammer and chisel. Chisel have a maximum under a small angle to the surface being cleaned. You need to protect yourself, Wear protective goggles and gloves. If you have a punch - excellent! It significantly speed up. Tapping determine how well kept plaster. In older homes are often monolithic layer of plaster is really no longer adheres to the wall. In this case, it must be removed. Old coating is removed completely, and in the case, if it is made of mortar. The most complicated case - old concrete wall in the bathroom, painted enamel. Tile adhesive manufacturers ensure the quality of the masonry when the clutch is not less 80% the surface of the tiles to the wall, why not get scored on paint. It is necessary to bring down. Usually, the best result gives an ordinary hammer. But you can try and punch or a special attachment on angle grinders machine. The video examples of ceramic tiles have knocked.
After that, how you came to knock down the old tiles with their hands, go to the following important actions. Purified surface to enhance adhesion (clutch) treated soil. If the surface absorbs it (typical of the old brickwork), the primer is made several times or use a special primer "betonkontakt" (only one layer). When the primer surface is possible to use the principle of "porridge butter will not spoil".
Plastering of surface - preparation for laying tile
 Surface, which will be laid tiles should be as smooth and vertical (horizontal). This will reduce the consumption of expensive tile adhesive and improve the quality of the masonry. See how an article plaster walls with their hands Video, installation technology beacons and other nuances. The fact, that any, even expensive, Imported ceramic tile has a deviation from the nominal parameters. In the domestic tile first grade these deviations about a millimeter. it seems, it's a little, but a dozen tiles can provide centimeter accuracy! so here, one of these parameters - deviation from the ideal plane. Therefore, the flat surface will further control the quality of the masonry, follow, applied to the adhesive layer had the same thickness. Besides, when excessively thick adhesive layer, it is when you install the next tile can not be squeezed into the gap, and come under the previous, pressing it. Vertical walls can be checked repeatedly sounding them with a suspension. But you can use another method. Bathroom wall is marked with vertical stripes. Recent strips are approximately 10 cm from the edge. The distance between adjacent stripes is chosen depending on the tool, which will be applied to the plaster with your hands (rule, large spatula or poluter). It is better to use the rule of a length not less than a meter, and mark the wall so, the distance between adjacent three stripes were on 10 – 15 cm less length rules. In each lane through a distance of 0,5 diameter holes drilled m 6-8 mm. They are inserted into the plastic dowels, and dowels twist screws. Consistently screwing and unscrewing screws, via rack level we arrange them in a single "virtual" vertical plane. Endpoint "virtual plane" is a surface plaster. It is necessary that the plaster layer is not smaller 0,5 cm.
 On the basis of the exposed screws made guides. By screws pressed flat rail (eg, start metal ceiling profile for plasterboard «Knauf»). Under rail tightly clogged mortar. If the walls of the big drop and the mixture is kept, the thin strips may be used as reinforcement drywall, cementing them together with the same mixture. In a few hours, after the primary curing mixture, river cleaned, get stripe trimmed - guide ready. (The second option is shown from the side in the photo, is screwed to the wall required length profile, putting on a level and start to put it on a ceramic tile). The video below shows an example of, how else to put exactly. In commercially available ready-guides - special T-shaped perforated beacons. To their mounting strip is applied on the wall plaster mix, and then pressed into the lighthouse as it, the mixture was extruded through the holes. A vertical guide controlled by a level. Care should be taken, that between the level and the lighthouse along the entire length there are no gaps. More details about working with plaster and beacons.
When their hands made laying tile in bathroom, the technology necessary to use plaster mixture based on cement, they are more durable. Plaster hygroscopic and can not guarantee long-lasting and require placement waterproofing.
The mixture attacks the wall with a spatula or trowel sharp brushstroke. When using a home-made solution or inexpensive ready-mix, it is best to wet the surface, solution to be coated, water. Damage solution aligned rule, which slowly rises up the guide and at the same time a reciprocating motion perpendicular to them. If the finished surface has holes, they are filled with a solution and alignment repeats. For large uneven wall plaster applied in two - three layers. Each layer must be completely dry and primed. The finished surface can be sanded, if there is such a need, and primed.
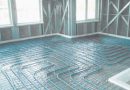
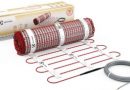
It should be remembered, that at least, one angle must be straight. In him established tub. By the same procedure leveled floor. The only difference - it must be pre-waterproofed. Waterproofing must protect the entire floor and the bottom wall. Waterproofing is easiest to use a special ready-mixed. Its application is simple and detailed in the instructions on the package.
The technology of ceramic tiles
 You first need to partition the surface with your hands. The video below is an example of, how to do it. it's desirable, to sink it was located symmetrically with respect to tile, bath It did not cover most of the number of tiles, and border did not go there, where there will be a mixer (it will not allow tightly and evenly pressed against the wall reflectors mixer). Ceramic tiles worth buying with a margin of about 10% on the area of the walls and the floor. Part of the tiles will go to waste after cutting and the fight. You can also put a stack of tiles in reserve, Suddenly she injured during the operation - will than immediately replace.
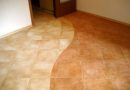
If the bottom row will consist of sliced tiles, it should start laying from the second row (bottom row is placed after the floor laying). To this end, the perimeter of the room with the level exhibited smooth rake. It will be a support for the tiles. Begin laying each row of tile is better with a central. This will help reduce uncertainty, accumulating due to the difference in the sizes of ceramic tiles. Notched trowel to apply adhesive tiled. according to the technology, spatula being at an angle of approximately 45 degrees. By density solution should resemble cream. Prykladыvaetsya tiles and light topytsya postukyvanyem rezynovoy kievlyanki. Excess glue is removed, ends of the tiles are cleaned and the operation is repeated with the next tile.
 The gap between the tiles aligned plastic cross. Tiles and have a cross sectional shape of trapezoid, so, The deeper recessed cross, the wider the seam, so you need to put it so, the tile is not mown. After all, the difference in the size of the tiles should be level, changing the width of the tile seam. This can be done by means of special plastic wedges. The easiest way to achieve a good quality - watch, the top edge of a number lying on the same straight line. To start the next row should be only after, as it will be completed prior. This will make sure, that the seams between the rows coincide (the upper edge a number of tiles lying in the horizontal plane). Besides, you can visually check the verticality of the corners of the walls of masonry.
If you want to, the ceramic tile cut their own hands with the help of Tile cutters or small "grinders" with pobeditovym disc. See article how to cut tile right. When working with grinder, be sure to wear gloves, glasses and respirator. Grinder can also erode and tiles to the desired size, make it a notch plumbing manholes. If you need to make a hole, here are ways to how to make a hole in ceramic tile. In order to hide chipped glaze in the place of the cut, you can use a plastic tile corners. Size parts and their colors are selected depending on the tiles.
Laying tiles on the floor to do better and be positioned so, incised to tile the bathroom was under. It is not necessary to use a notched trowel, better to apply an even layer of the conventional adhesive. When using a trowel likely formation of voids in the layer of glue. This may lead to, that the floor tiles to crack during operation.
 About a day joints between the tiles are filled with grout. It is applied with a rubber trowel. Through 15-20 min after application, seam smoothed with a damp sponge. The day after the remains of grout from the tile removed with a damp, and then with a dry cloth. Find out how much you need to grout, help calculator. Now watch the video lessons - examples, how to perform the same actions on tiling specialists. The technology is the same. Now you are ready to repair the bathroom with their hands.
How quickly put the tiles in the bathroom video
Two more video clips for example,, How to style tiles in the bathroom. The principle remains the same, but the approach is slightly different.


Thank you for your advice! but! In DIY stores sell a variety of corners,which are installed in the corners,where are joined facing tiles,the bottom wall,where the docking with the floor or the top of the, where the wall ends, etc.. d. In your recommendations about them does not say anything. It's not fashionable,den.A yesterday I would like to hear the opinion of experts as the designers should choose them by color,that they are well in harmony with plitkoy.Polozhim: Light and dark tile corners or one pitch, etc.. d. Thank you in advance! Happy 2013godom! Success and good health in the new year!
Anatoly.
good day! help to solve our problem- we have a concrete floor in a room painted with paint ,Now we have decided to align the first floor and then close the concrete or laminate or quartz-vinyl-coated . Tell me please ,what to do with dyed concrete ?
Welcome painted on the floor do not see problely paint will gidroizolyatsiey.Glavnoe pravelno choose mixture for concreting in view of the bed height,following the manufacturer's recommendations.
Really liked the article, so full, written by professional, moderately diluted relevant topics pictures, Apparently the author of the text, wrote an article exclusively for people, what can we say but praise for the article, Well done.
Very detailed manual helpful, of the tiles already laid, It goes great, It is now a matter of technology, as they say, thank!