Not everyone knows about, how to self-leveling floor to be arranged, that he possessed all the qualities and positive traits. New building technologies evolve and become known to anyone interested. As for the self-leveling floor, much will depend on, how well respected technology of work. Having carefully considered it can be concluded that, that is nothing special, enough to carry out all types of work at a high level at every stage.
notion
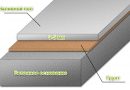
Self-leveling floors believe topcoat. No seams after pouring is not formed. It can be installed on any brand coverage, eg, tiles, Concrete, tie from cement and sand. They may even act as a base and wooden boards. There are several types of self-leveling floor, which differ in composition and components:
- epoxy.
- polyurethane.
- Cement and acrylic.
- methyl methacrylate.
- Epoxy-urethane.

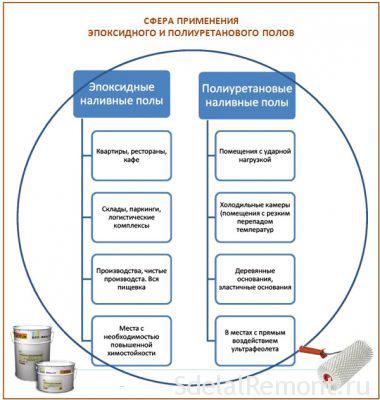
Among all types of floor unit is the most optimal polyurethane. This comes from the characteristics of, which include a high level of thermal conductivity, final surface has a low weight, that has no pressure on the basis of. Besides the appearance catches the eye every, entered on such a coating. any one of the colors can be chosen if desired, to pick up a whole room interior.
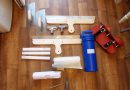
Set of tools
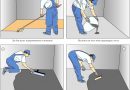
To begin to worry about yourself. During kneading the mixture until its complete drying, filled self-leveling floor allocates an enormous quantity of harmful substances. This suggests the need for the purchase of protective clothing. In addition, not be amiss to wear a dust mask and work gloves for work.
Among instruments for pouring can be identified:
- Containers suitable size.
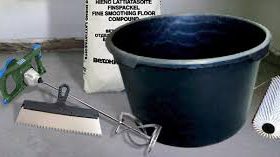
- Drill with mixer.
- needle roller.
- pallet.
- Building cleaner at the initial stage.
- Mokrostupy spiked appropriate length.
A specific list of instruments, needed to carry out work on the device of floors, will be chosen depending on the situation and of the installation.
Selecting the mix
To qualitatively was made self-leveling floor guide should be followed from the beginning to the completion of the work. No small importance is selected mixture, the quality of which will depend on the quality of the finished surface of the embodiment. Thus it is necessary to pay attention, that all work should be carried out as quickly as possible, that the final solution is not dried up and lost fluidity property.
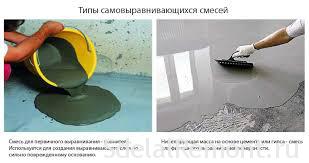
There are four main types of mixtures:
- epoxy. Have hardness after curing, They are very strong. Such liquid floors can be washed with various chemicals, impact alkalis. In spite of the great opposition to external loads, such surfaces are not sufficiently elastic, that can be attributed to the negative qualities.
- polyurethane. They hardly anyone finds significant flaws, because such floors can withstand not only the load, but different depleting chemicals are present. For this reason, most often they are used in medical institutions or similar shops. The polyurethane mixtures are suitable for warehouses with high vibration level.
- methyl methacrylate. Of course, such mixtures for floors in the end will not be able to demonstrate excellent strength quality, but they are completely environmentally friendly. Besides, they can be used indoors, wherein the temperature ranges from -70 to +150 degrees. In the process of installation will require certain skills and experience, to perform such a floor at a decent level.
- Cement and acrylic. The composition of these mixtures is not only cement, but polyacrylic copolymer. May be arranged in a high humidity level smokers. The resulting base has also anti-slip effect, having a matte surface.

Each specific embodiment and its application will depend on the premises, wherein the base is arranged. To get the perfect Self-leveling floors pouring technique must start with selecting the mixture was, preferring proven companies.
Getting Started
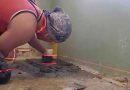
The basic rule when the preparation for pouring the floor - clean and tidy. The substrate must be cleaned as much as possible from foreign debris and even dust. It is not superfluous to use the building cleaner, able to collect a whole little thing, which may affect the final quality of the self-leveling floor.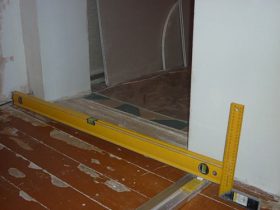
What follows is assess the height difference in the room, where the works. To this end, the floor is determined by the highest point and the lowest. Of greater importance takes less, and obtain the desired result. That is what will influence the establishment of the inlet floor thickness.
Very important, that the base had sufficient moisture level. For this is a good way: meter placed on the surface of the film per meter, its central part is raised slightly, and the edges are pressed against the load. Then you should pay attention to some nuances:
- Fogging occurred bubbles already a day later - should postpone the implementation of the floor fill.
- Drops began to appear only after 3-4 day - should perform quality priming.
- after 5-7 days was not formed any moisture on film - you can safely start all over with a stirred solution of.
Perfect will of course remove all the old floor, to avoid possible difficulties. After that is removed construction debris. Available slots, dimples, it is best to seal the solution, to the floor of the inlet flow was minimal.
To determine the curvature of the base is used a water level. It is increasingly being used laser level, true, its cost is very high. It is worth noting, that can get self-leveling floor to fill voids in the screed.
To the solution had good adhesion to the floor surface, last stands primed. Sometimes it is even in several layers. This method avoids the formation of mold and various fungi during operation. should wait, while the primer is completely dry. Then it is possible to arrange a damper tape around the perimeter of the room, as well as around the existing geometrical protrusions.
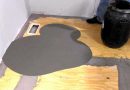
When the filling on a wooden base, then it must be repellent-treated. This will keep water in solution, rather than absorb it base. Not rare, when performed under the screed self-leveling floor. Most often this occurs when large differences in elevation. Each of the highlights include the necessary items in the preparation of the device under the counter.
exhibiting lighthouses
If someone does not know, how to make a screed floor with their hands, it is best to seek professional help. They will help to fulfill all quickly and at lower cost. When the device subfloor exhibiting very important step beacons. It is worth noting, they are markedly different from the usual classical Beacon profiles. There used beacons-frames, resembling a tripod, which are level with the mark. That's according to the marks and performed sex casting.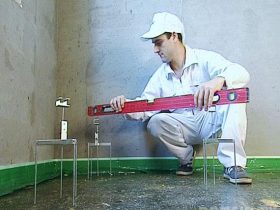
You can of course refuse their use. In this case, just on the perimeter of the walls held the line, which serves as a reference point during casting. true, do it under force only to professionals, which has more than once carried out such work. So what should buy beacons, rappers and carry out installation using them.
After finishing work beacons are removed. Thus any surface damage does not occur due to the qualities and characteristics of the products. The solution itself is zatechet without problems in those places, where beacons were located previously.
stirring of the solution
The composition of any composition for a self-leveling floor includes various components and additives, allowing to obtain a particular result in the end. The properties of the finished solution will have different quality, improvers base to the required limit. In certain situations, a composition may include a mixture of dyes and. This is done with the adjustment to the floor under the interior space, in which the filling.
In addition there are volatile substances after contact with water in mixture. For this reason, after mixing the performer of the solution has no more than 40 minutes, to use all the mounting. Otherwise, the solution starts to turn to stone, and nothing will not work quality. When there is no self-confidence, it is better to use this service, how to fill a floor under the key.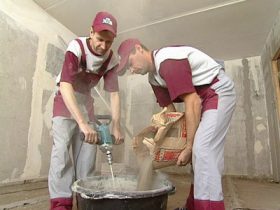
Qualitatively chosen solution will provide the answer to, how to make a screed floor. The final composition of the fill should resemble the consistency of sour cream. There are some exceptions to this, but they are not who speaks and uses the.
special containers of this size are used for kneading the mixture, which is enough for all the rooms at once. After all, no breaks in the fill should not be, to the surface to get a quality and durable. This does not apply to the implementation of self-leveling floor in the filler, when it is required to make the necessary alignment of the base to the limit.
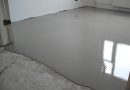
Installation of self-leveling floor
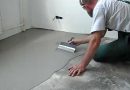
No difficulties should not arise with a ready solution. It will only be poured onto the surface and razravnyat. The surface becomes smooth self. But not all experts trust that, and are accustomed to using the rule or spatula, to give a solution of the ability to be distributed evenly on the floor.
Pouring the mixture is performed stripes, parallel to each other. In the process of distribution over the surface of the solution, are formed in the air bubbles. They also arise when mixing. If you leave it as it is, after drying bubbles appear on the surface, that just does not give appeal. We'll have to repair the floor in the room. To avoid this, use a spiked roller. needle length must not be less than the thickness of the entire layer filling. They are passed in area.
There are several options performance filling gender. In addition to the bands, apply islands and some parts, which are interconnected in the following. But it is more expensive version of forces. If there is no knowledge in the, how to pour self-leveling floor, then use the proven method. Compliance with self-leveling floor device technology allows to obtain a good result under all conditions. It also helps to get an answer to that, how to line the floor of the House panel. Only in appearance it resembles a flat surface. But if you get to work, the differences will be huge.
If you follow all these instructions, you can learn, how to make a self-leveling floor with their hands in stages. Each item requires attention. Any little thing at first sight in the future may have an impact on the quality of surface.
Possible mistakes
To know, how to fill in the self-leveling floor apartment, it is necessary to pay attention to some tips from the experts: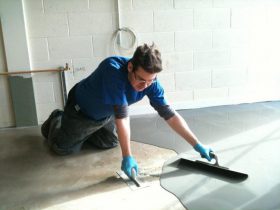
- It is necessary to assist in spreading the mixture. She can not get yourself to the corner, since poured more far away. In this case, a spatula is a recurring problem. Only then leveling floor screed with his hands fulfilled qualitatively.
- The correct choice of needle roller. Needles should be at least 1-2 mm longer, than the fill layer. Otherwise, they will be a mixture of surface movement.
- Installation of self-leveling floors only be carried out after, all compete testing their skills as the height of the room. You can encounter a problem, when there is a hill in the central part of the room, that go unnoticed. After mounting the tie he would stick out and create a whole bunch of problems.
All this suggests that, that when the floor filling instructions must be followed scrupulously. Before installation, especially a novice builder must study it. It will remove a lot of disadvantages as a result of.