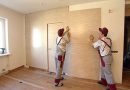
Wallpapers are the most popular type of decorative materials. A huge variety of colors and patterns, a large range of prices makes the material described by the most in demand in the construction market.
But you need to know, how to properly prepare the wall for wallpapering, to the most expensive wallpaper on the walls looked nicely, if it is properly executed by pasting.
Let's say right away, Surface preparation for wallpapering is not difficult, but it requires a certain knowledge, skills and special tools. With this task easily cope newcomer, if you carefully read the proposed article.
Where to start repair
Any work begins with the preparation process. You need to purchase the material itself and related products, tools and accessories.
ABOUT rules of choice of wallpaper we have told in the pages of our website.
Of the tools you need:
- mandrel for fixing the abrasive or sanding block;
- abrasive;
- polishing sponge for treatment of hard to reach places.

The grid can be used as an abrasive grinding material, but cheaper to use sandpaper. Quality of work will not suffer.
Application Sanding grid makes work more comfortable, because the grid is not clogged with dust and debris during operation. But also the right kind of paper gives very good results. Moreover, it is much cheaper than the grid.

The abrasive material marked on the back side. Rooms ... 80 200 describe a coarse structure of the abrasive, and the number 250 ... 2500 point to the fine grain structure of the material emery.
Sanding sponges are manufactured with cut corners for ease of processing hard to reach areas.
Of the appliances you need:
- ladder or sturdy table;
- spotlight or lighting fixture;
- spatulas;
- rule or level.
Always remember safety
Any work should bring joy and not cause adverse effects on human health. Preparing walls for wallpaper gluing is dirty, dusty process.
You can not do without protective eyewear, respirator or gauze bandage, headdress.
Removal of the old coating
If you are going to hang wallpaper in the new premises, the brick surface will have to be plasterer, putty, grind, prime.
The surface of plasterboard requires putties and priming.
More time-consuming process awaits, if you are going to glue the wallpaper or stick them on a colored or wooden surface.
You will need to prepare the surface, purging it of old wallpaper, paint and nails. Wooden walls have to be plastered, or sheathe plasterboard.
First things first
Any free surface of the old coating, dried and primed. If the surface is very uneven, plastered it.
After drying for a day once primed surface. The primer is applied after each layer of plaster or filler.
rule 1
For high quality surface, useful life can be measured in decades, Be sure to use all the supplies one manufacturer.
If you bought a plaster specific manufacturer, the filler and primer is desirable to be from this manufacturer.
Once again, the removal of old wallpaper
To remove old wallpaper, you can use a variety of ways.
The easiest and most reliable way of moistening the surface is considered a warm detergent solution. The solution was applied to the paper wallpaper with sponge, bead, sprayers. After a pause in 15 minutes can be removed carefully with a spatula lagging and swollen wallpaper.
This method is good in removing the thin paper wallpaper.
Do not forget, that the multi-layer wallpapers can not be deleted in such a way. they are removed, applying steam or proglazhivaya hot iron through a damp cloth.
For multi-layer non-woven wallpaper are, vinyl, washable wallpaper, because they have an upper protective layer, preventing ingress of water to the surface.
On the most important
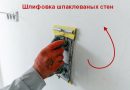
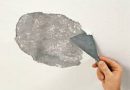
For high-quality surface for wallpapering need to perform finish polishing.
To prepare the walls for wallpapering perform basic operations:
- Install the right side lighting. The light source should be throughout the work stay in one place.
- walls grinding produce downward circular movement of the tool.
- Treat no wider band 1 m. After passing the strip to the bottom, grind the next strip of the same width.
- Control surface to the light with the help of the level or the rules, applied to the surface.
Never attempt doshlifovyvat holes or indentations. You just spoil the surface. Better shpaklyuyte defect found. Followed by stripping surface
In the preparation of the walls under the wallpaper, allowed on the ground surface fine scratches.

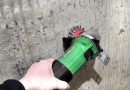
A few words about the process of mechanization
The use of mechanical devices useful when removing old paint, plaster, rough grinding.
At the final stage the newcomer is best to use hand tools. This is safer and cheaper, although a longer time of time. For more advanced builders recommend using eccentric or orbital sander.
Prepare wall surface for wallpapering
You have completed the preliminary steps - Remove old paint. where you have, left a layer of plaster.
Outset. The plaster should be used only for very rough wall or a brick or wooden base.
by the way, on wooden base plaster applied on pre-nailed shingles.
Before applying putty to carefully dried layer of plaster is applied to the primer layer.
rule 2
The primer is applied on a fully dried layer of plaster or filler.
On the rules applying plaster or putty in the alignment of the walls, we have repeatedly written in detail on our website.
Useful Tips for beginners in preparation of the walls under the wallpapering
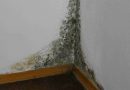
- When wallpapering in a humid environment, treat the surface with antiseptic.
- When large curvature walls apply a layer of plaster.
- Putty applied to the surface of the drywall or plaster surface of the pre.
- Grinding must be on the surface of a thin layer of paint or wallpaper.
- Grinding produce circular motion shkuroterki, not pressing hard on the tool.
- Begin to grind coarse grit. If the scratches are deep, select a fine grained grinding material.
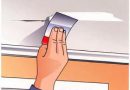
- In confined spaces, use the special sanding sponge. But you can use the old-fashioned method, folded in several layers of sandpaper, putting into a cloth or soft loofah.
- Control of surface quality produced by applying a layer plane or the ground surface to the rule.
- After grinding required to thoroughly clean the surface from dust formed.
- On the dried surface, apply a layer of soil. For porous surfaces will need several layers of primer.
As a primer the walls with wallpaper pasting is perfect to use wallpaper paste. dilution ratio is written on the packaging glue.

rule 3
About how to properly prepare the walls for pasting wallpaper. For coarse sanding using sandpaper №100 ... 220, and fine grinding produces abrasive №250-280.
Markings on the grid and the milling sandpaper is applied to the reverse side of the fabric.
Conclusion:
- to prepare the surface for wallpapering is available to any person, refer to the proposed instruction;
- you can get high-quality surface, using related materials of one manufacturer;
- strictly observe the sequence of works on preparing the walls for pasting wallpaper;
- do not rush and do not stop halfway.
Our article and videos will help you understand as a wallpapered wall qualitatively.
I wish you success!

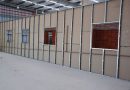


Preparing the drywall under the wallpaper pasting is, it is necessary to produce a primer-coating polymer in a single layer, then carefully proshpaklevat seams in the joints between the sheets and primed surface again. Continuous Shpatlevanie in this case can not be used, but, if the surface is not very smooth, it is necessary to put the second layer of putty on the whole area of drywall.
For leveling large uneven walls need to use plaster, depending on the degree of curvature required and special grid layer solution can be used for better adhesion with the wall plastering. Primer – it is a prerequisite for plastering and Shpatlevanie. Filler usually corrected minor irregularities.